
The moment I opened my kitchen door to the scent of toasted coconut, I felt transported to a sun-soaked beach, and I knew I had to share my Coconut Cream Pie recipe with you. This classic dessert is not only a breeze to whip up but also brings a taste of tropical delight to your table, making it perfect for everything from casual family dinners to festive celebrations. With options for gluten-free and dairy-free variations, this pie is designed to delight everyone’s taste buds while keeping the prep time easy and manageable. Ready to learn how to create a slice of paradise in your own kitchen?
Why is Coconut Cream Pie a must-try?
Simplicity: This recipe features quick and easy steps that even novice bakers can master, making it perfect for any home cook.
Tropical Delight: Bursting with rich coconut flavor, each bite transports you to a sun-drenched paradise, perfect for summer gatherings or cozy nights in.
Versatile Options: Want a twist? Try Banana Cream or Chocolate Coconut Cream Pie variations to satisfy different cravings and impress your guests.
Healthy Swaps: With possible gluten-free and dairy-free substitutions, everyone can enjoy this treat without compromising on taste.
Crowd Pleaser: Ideal for gatherings, this dish is bound to become a favorite among friends and family, especially when paired with fresh berries or a scoop of vanilla ice cream!
Don’t forget to check out our delicious Pumpkin Cream Cheese for a complementary flavor experience!
Coconut Cream Pie Ingredients
For the Crust
• Refrigerated Pie Crust – Provides a pre-made and convenient base. Note: Homemade options enhance freshness.
For the Filling
• Sugar – Adds sweetness. Substitution: Can use Splenda for a lower-calorie option.
• All-Purpose Flour – Thickens the filling. Substitution: For gluten-free, use a gluten-free flour blend or reduce to 2 tablespoons of cornstarch.
• Salt – Enhances sweet flavors.
• Whole Milk – Creates a creamy texture. Substitution: Coconut milk intensifies the coconut flavor.
• Eggs – Offer richness and stability. Note: Using only egg yolks produces a richer custard.
• Sweetened Shredded Coconut – Delivers the signature coconut flavor. Note: Toasting enhances taste; unsweetened can be used for a less sweet pie.
• Butter – Adds richness. Substitution: Plant-based butter for a dairy-free version.
• Vanilla Extract – Elevates flavor; Mexican vanilla adds unique depth.
For the Topping
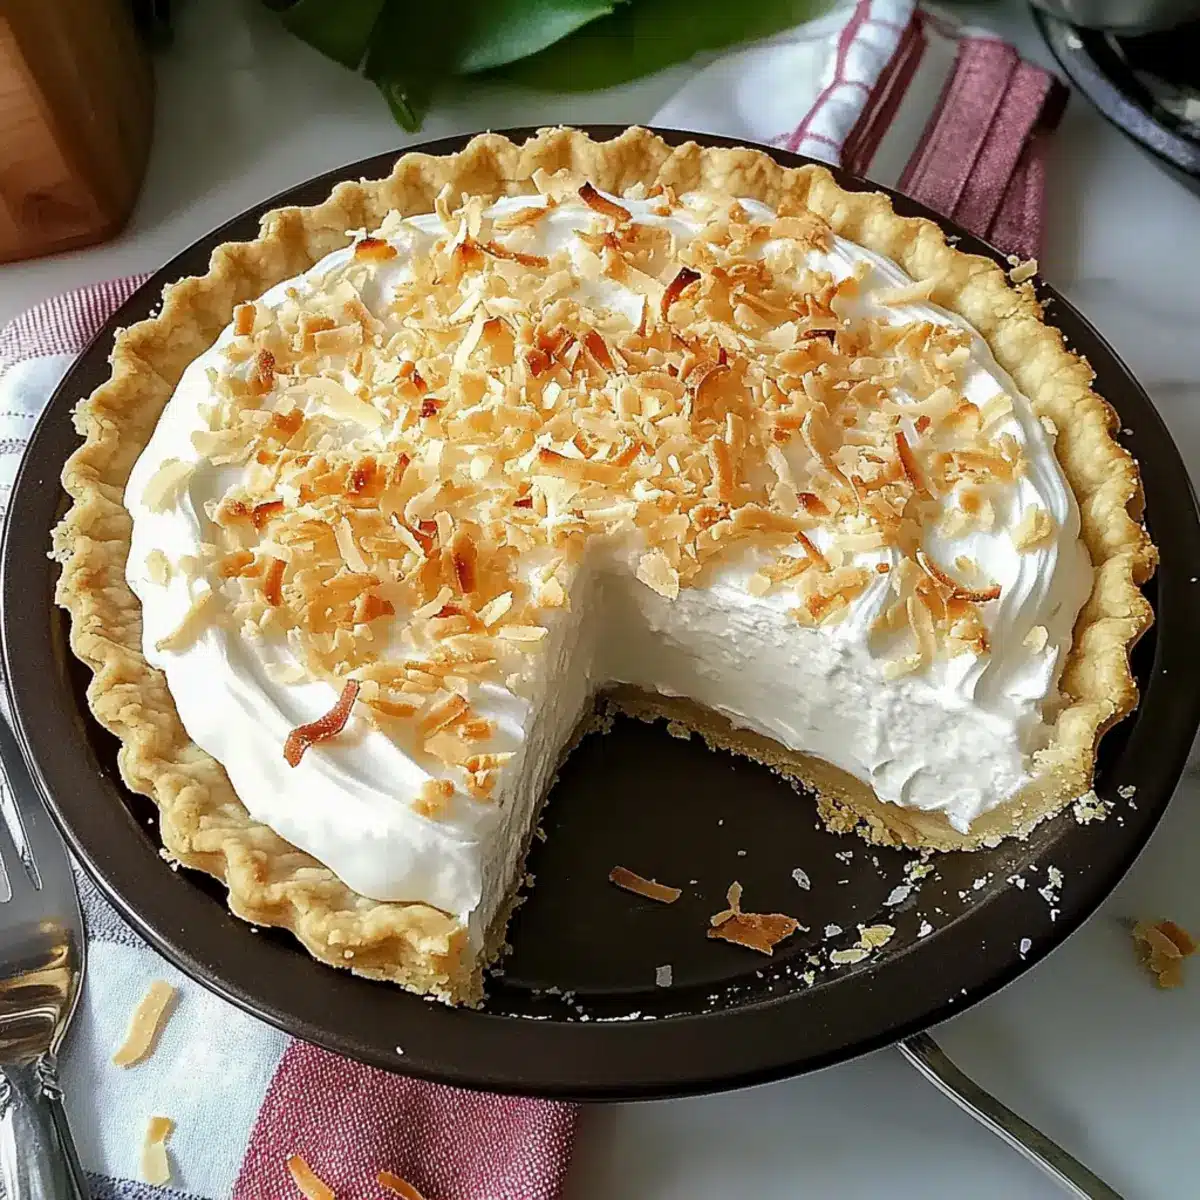
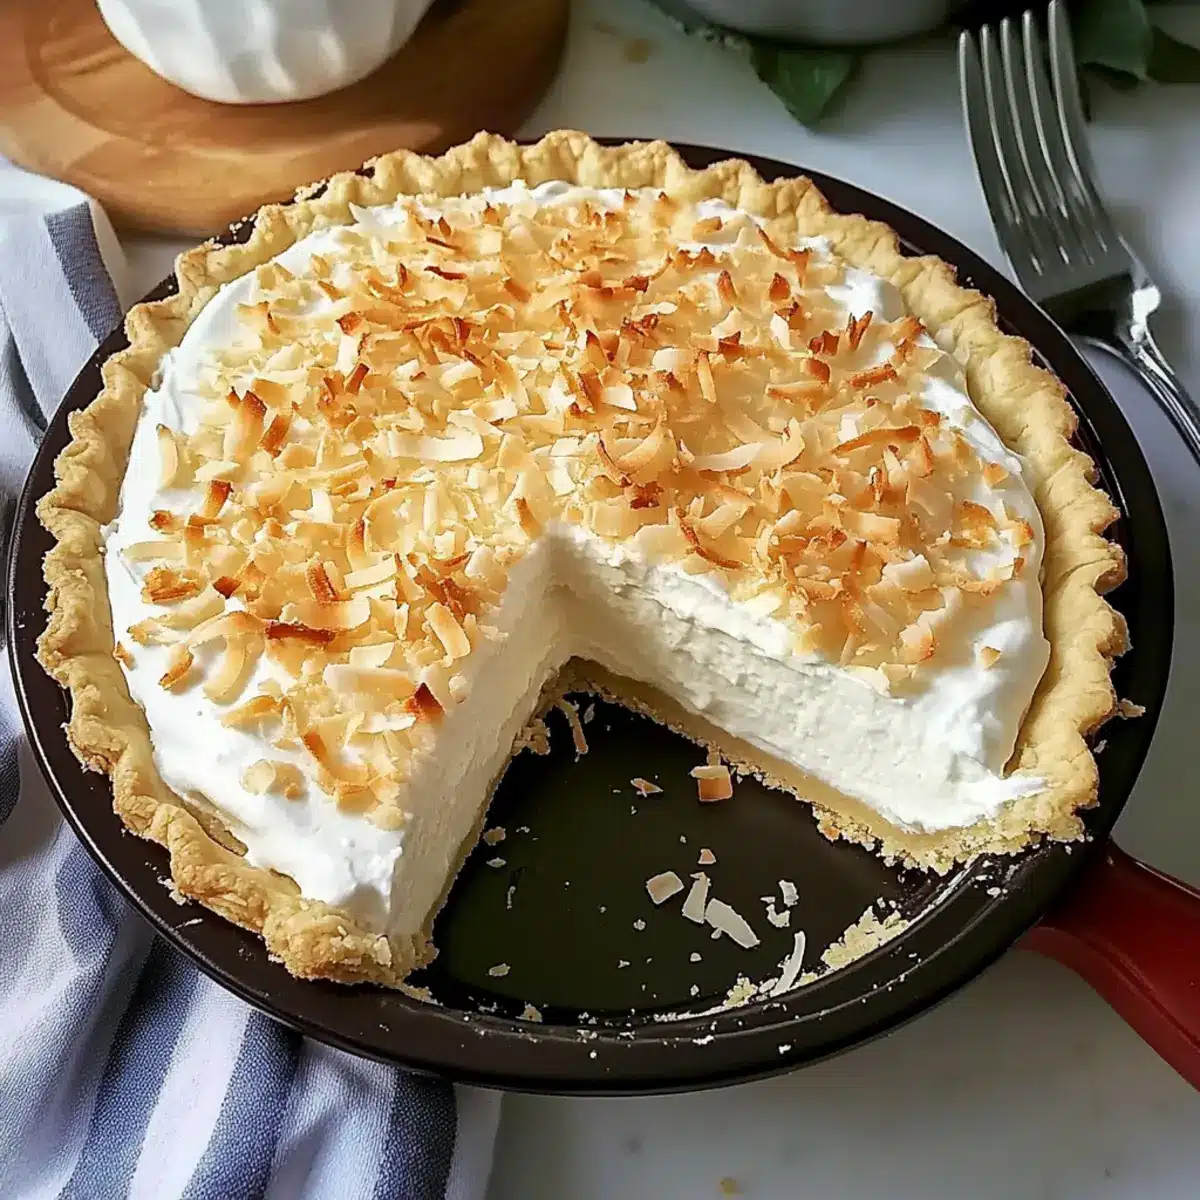
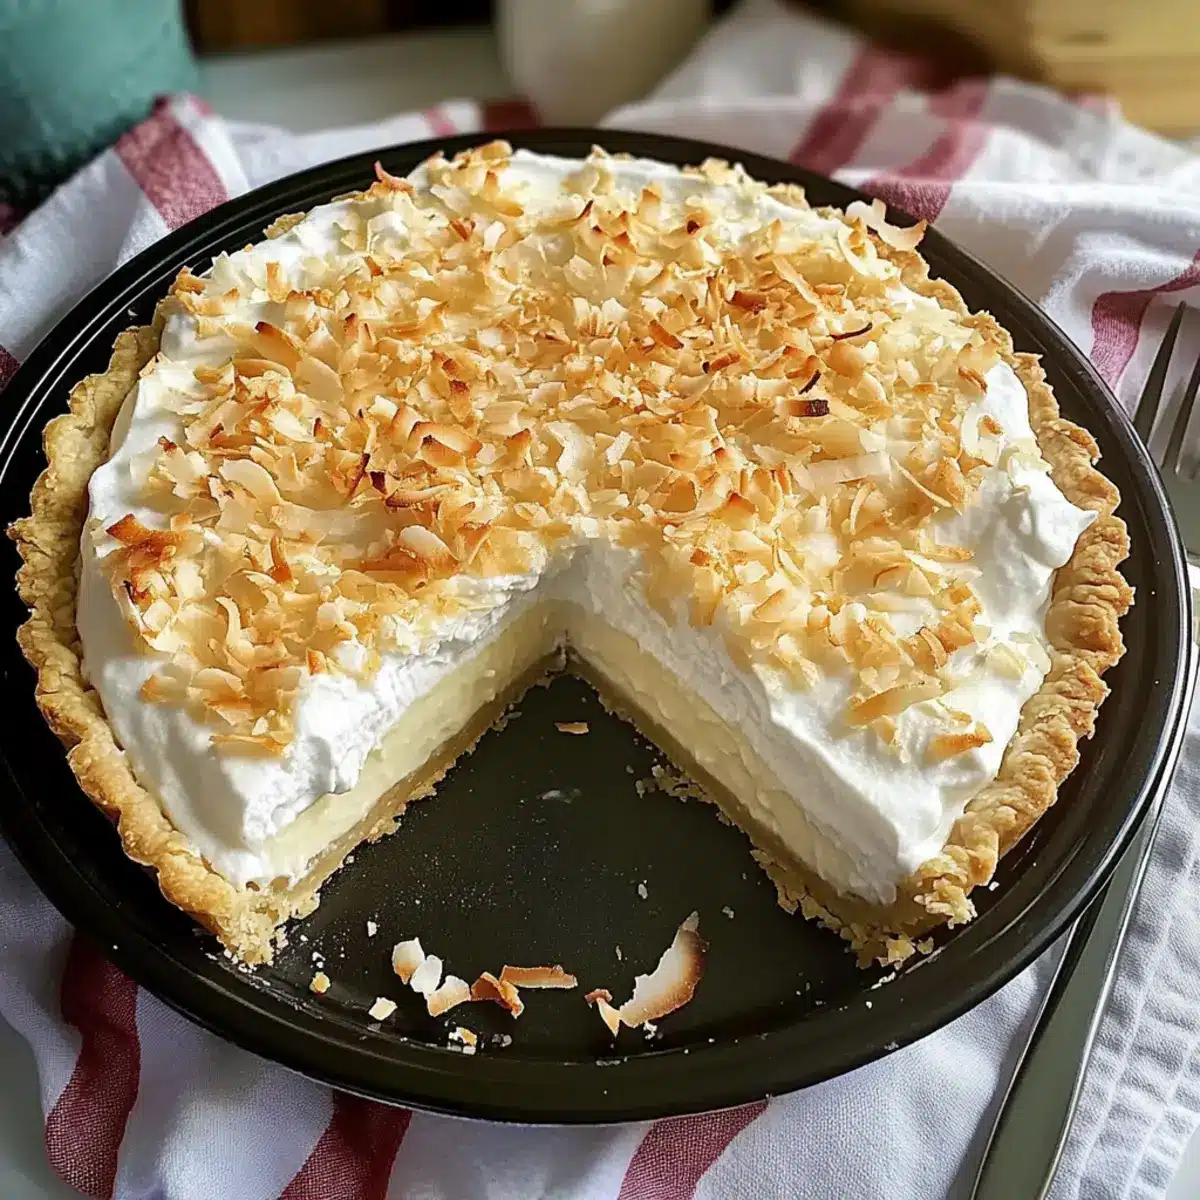
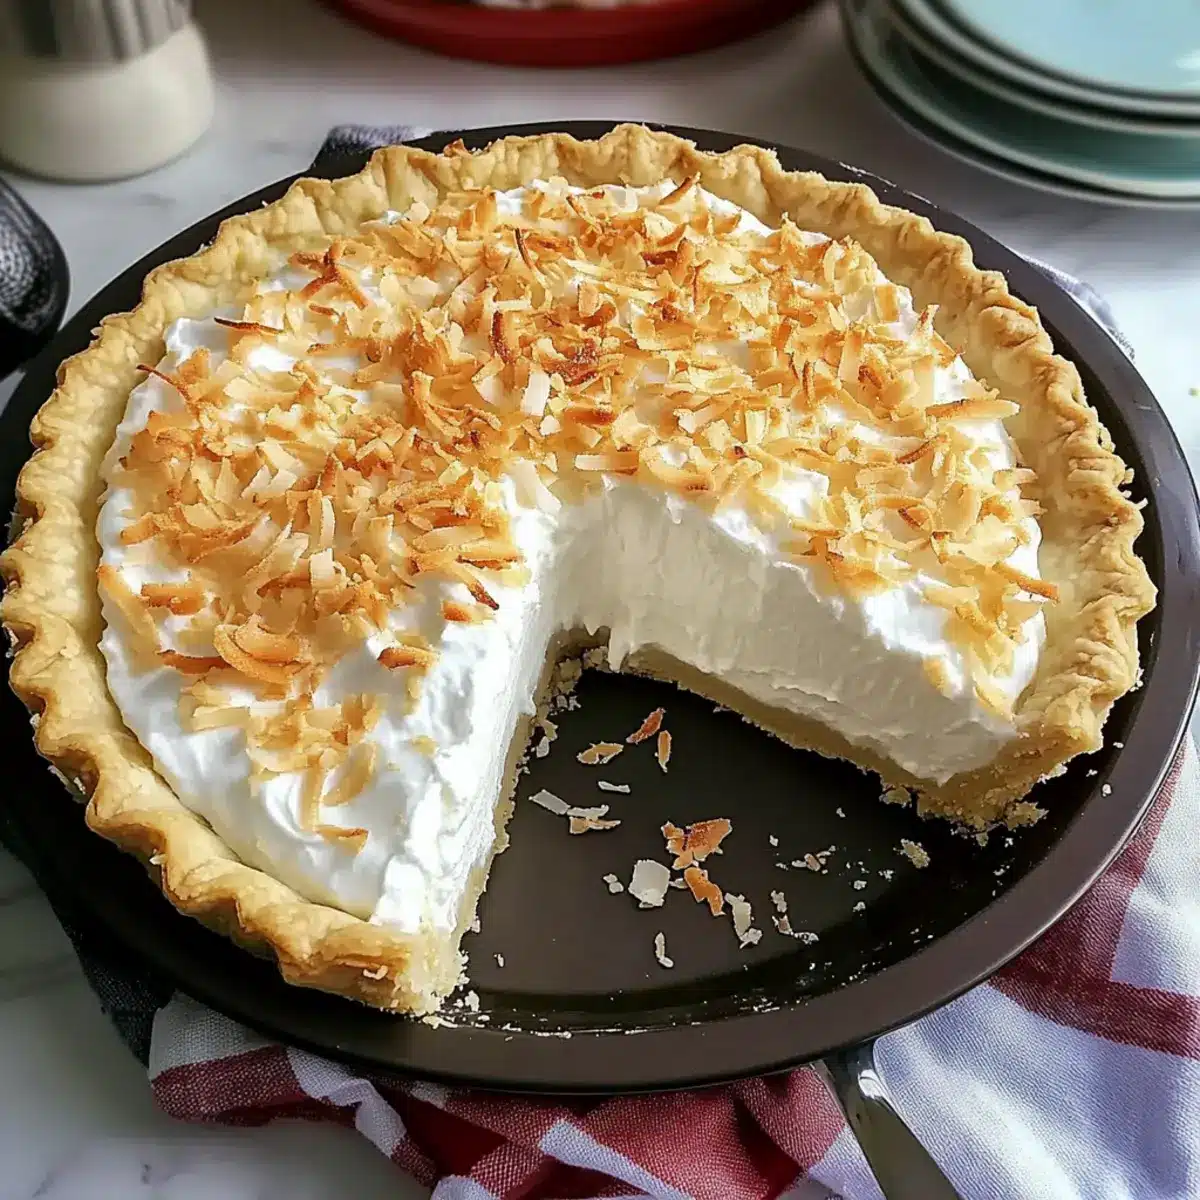
• Whipped Cream – Provides a light topping that contrasts with the filling. Can use store-bought or homemade.
• Toasted Coconut – Enhances texture and flavor; necessary for achieving the dish’s signature taste.
Step‑by‑Step Instructions for Coconut Cream Pie
Step 1: Prepare the Crust
Unroll the refrigerated pie crust into a 9-inch pie pan, carefully fluting the edges for a decorative touch. To ensure a flaky base, refrigerate the crust for 30 minutes, which helps it hold its shape while baking.
Step 2: Blind Bake
Preheat your oven to 400°F (200°C). Line the crust with aluminum foil, filling it with pie weights or dried beans to weigh it down. Bake for 15-20 minutes until the edges are golden, then carefully remove the weights and foil. Return to the oven for an additional 3-6 minutes, allowing the crust to become fully golden and crispy.
Step 3: Make the Filling
In a medium saucepan over medium heat, whisk together sugar, flour, and salt until well blended. Gradually incorporate whole milk, stirring constantly until the mixture thickens and bubbles gently, which should take about 5-7 minutes. The mixture should resemble a pudding consistency, providing the creamy filling for your Coconut Cream Pie.
Step 4: Temper the Eggs
In a bowl, beat your egg yolks until smooth. Gradually add a few spoonfuls of the hot filling to the yolks, whisking constantly to temper them. This step prevents the eggs from scrambling when you combine them back into the saucepan. Once blended, return the yolk mixture to the saucepan and cook for another 2 minutes, stirring continuously.
Step 5: Finish the Filling
Remove the saucepan from heat and stir in sweetened shredded coconut, butter, and vanilla extract. Keep mixing until the butter melts and everything is well combined. At this stage, the filling will exude a delightful aroma of coconut and vanilla, perfect for your Coconut Cream Pie. Allow the mixture to cool slightly before pouring it into the baked crust.
Step 6: Assemble
Once your filling has cooled slightly, pour it into the prepared crust, using a spatula to smooth the top evenly. For the best flavor and texture, refrigerate the pie for at least 4 hours, giving it time to set properly. The chilling process enhances the layers of taste and creates a refreshing dessert experience.
Step 7: Serve
Before serving your Coconut Cream Pie, whip some cream to soft peaks and spread it generously over the top. Sprinkle toasted coconut flakes on top for that signature crunch. Slice up your pie, and get ready to share a slice of tropical bliss that everyone will adore!
Coconut Cream Pie Variations & Substitutions
Feel free to let your creativity shine by customizing this Coconut Cream Pie to suit your taste and dietary needs!
-
Banana Cream: Replace shredded coconut with fresh banana slices for a sweet and fruity surprise.
-
Chocolate Delight: Add 1/4 cup of cocoa powder to the custard mix for a rich chocolatey twist that harmonizes beautifully with the coconut.
-
Fruity Layer: Layer fresh strawberries or raspberries beneath the filling for a delightful burst of flavor that elevates each slice.
-
Nutty Crunch: Fold in finely chopped pecans or walnuts into the crust or sprinkle them on top to introduce a deliciously crunchy texture.
-
Coconut Milk Boost: For an even more intense coconut flavor, replace whole milk with coconut milk in the filling.
-
Spicy Kick: Introducing a pinch of cayenne pepper or cinnamon can add an unexpected warmth; this will elevate the overall flavor profile.
-
Caramel Drizzle: Drizzling caramel sauce over each slice before serving brings a decadent sweetness that pairs impeccably with the creamy filling.
-
Dairy-Free Option: Use plant-based butter and coconut milk to make this pie fully dairy-free yet equally delicious. Each variation adds up to a delightful experience that enhances the pie!
If you’re looking to elevate dessert time with other flavors, check out our rich Pineapple Carrot Cream for something scrumptious!
Expert Tips for Coconut Cream Pie
-
Crucial Blind Baking: Always blind bake the crust. This prevents sogginess and ensures your Coconut Cream Pie has a crisp base that stands up to the creamy filling.
-
Thickening Troubles: If your filling isn’t thickening, don’t fret! Mix in an extra tablespoon of cornstarch while it’s still on the heat for that perfect custard texture.
-
Toast the Coconut: Toasting sweetened shredded coconut is key for enhancing flavor. Skip this step at your peril—your pie will miss that rich nutty note!
-
Chill for Success: Allow the pie to chill for at least 4 hours. This not only helps it set properly but also deepens the flavor, giving you that delicious tropical experience.
-
Egg Tempering Tip: When tempering the eggs, be sure to slowly introduce the hot filling to avoid scrambling. This technique is essential for achieving a perfectly smooth and creamy filling in your Coconut Cream Pie.
How to Store and Freeze Coconut Cream Pie
Fridge: Keep your Coconut Cream Pie in an airtight container in the refrigerator for up to 3 days. Cover the top with plastic wrap to maintain freshness and prevent the filling from absorbing other odors.
Freezer: If you want to enjoy it later, freeze the pie for up to 1 month. Wrap it tightly in plastic wrap, followed by aluminum foil for added protection against freezer burn.
Defrosting: To defrost, place the frozen pie in the refrigerator overnight. Allow it to cool completely before serving for the best texture and flavor.
Reheating: While it’s best enjoyed chilled, if you prefer a warm slice, gently heat individual pieces in the microwave for about 15-20 seconds.
Make Ahead Options
Preparing this Coconut Cream Pie ahead of time is a true lifesaver for busy home cooks! You can make the pie crust and filling up to 24 hours in advance. Simply blind bake the crust and chill it, then store it covered in the fridge. The filling can also be prepared a day ahead; let it cool before pouring it into the crust, ensuring that you cover it with plastic wrap to prevent drying. This way, when it’s time to serve, just whip some cream for the topping and sprinkle with toasted coconut. By prepping these components ahead, you’ll make serving a tropical delight a breeze, allowing you to enjoy more time with your guests!
What to Serve with Coconut Cream Pie?
Create a complete tropical feast that dazzles the senses with delightful pairings for your homemade Coconut Cream Pie.
- Fresh Berries: Bright strawberries or blueberries add a tart contrast that balances the pie’s rich creaminess.
- Vanilla Ice Cream: A scoop of creamy vanilla ice cream melts beautifully alongside the pie, enhancing the coconut flavor.
- Chocolate Drizzle: Drizzling warm chocolate sauce over each slice introduces a decadent touch, making it an indulgent treat.
- Citrus Salad: A refreshing citrus salad of oranges and grapefruit brings a burst of zesty brightness that complements the sweet coconut.
- Toasted Coconut Cookies: Keep the coconut theme going with crispy cookies for a delightful crunch alongside the creamy texture of the pie.
- Mango Smoothie: A tropical mango smoothie adds a refreshing drink option that ties in perfectly with the pie’s flavors.
- Sweet Tea or Lemonade: Cool sweet tea or homemade lemonade offers a refreshing sip that harmonizes with the pie’s tropical vibe.
- Coconut Macaroons: For coconut lovers, pairing with chewy macaroons intensifies the coconut experience, making for a rich dessert duo.
- Pineapple Sorbet: A scoop of pineapple sorbet adds a fruity and icy twist that cleanses the palate between bites of creamy pie.
Coconut Cream Pie Recipe FAQs
How do I know if my coconut is ripe enough?
Absolutely! When selecting shredded coconut, look for bags labeled “sweetened” for that classic coconut flavor. If you choose to use fresh coconut, aim for a coconut that’s heavy and sounds sloshy when shaken. The more mature, the sweeter!
How should I store leftover Coconut Cream Pie?
Very simply! Store your Coconut Cream Pie in an airtight container in the refrigerator for up to 3 days. Make sure to cover the top with plastic wrap to keep it fresh and prevent it from absorbing any other flavors in the fridge.
Can I freeze my Coconut Cream Pie?
Yes! To enjoy your Coconut Cream Pie later, wrap it tightly in plastic wrap, then in aluminum foil, and freeze it for up to 1 month. When you’re ready to eat it, transfer it to the refrigerator overnight to defrost gradually for the best texture.
What should I do if my filling isn’t thickening?
No worries at all! If your filling doesn’t thicken as expected, you can whisk in 1 tablespoon of cornstarch while it’s still on the heat, stirring continuously. This will help achieve the creamy custard texture you’re aiming for. Just cook it for an extra minute or two until it thickens up nicely.
Are there any dietary considerations I need to keep in mind?
I often suggest checking for allergies, especially to eggs or dairy, as traditional recipes use both. For a dairy-free option, substitute the butter with plant-based butter, and replace whole milk with coconut milk for an even richer coconut flavor. Remember to verify all ingredients based on individual needs, especially for small children or pets!
How long should I chill the Coconut Cream Pie before serving?
Allow your Coconut Cream Pie to chill for at least 4 hours in the fridge after assembling. This not only helps it set perfectly but also lets those delectable flavors mingle and deepen, giving you that refreshing tropical experience in each slice.
Heavenly Coconut Cream Pie: Your Quick Tropical Escape
Ingredients
Equipment
Method
- Unroll the refrigerated pie crust into a 9-inch pie pan, carefully fluting the edges for a decorative touch. Refrigerate the crust for 30 minutes.
- Preheat your oven to 400°F (200°C) and line the crust with aluminum foil filled with pie weights. Bake for 15-20 minutes until golden, then remove weights and foil. Bake for an additional 3-6 minutes until fully golden.
- In a medium saucepan over medium heat, whisk together sugar, flour, and salt. Gradually add whole milk, stirring constantly until thickened, about 5-7 minutes.
- In a bowl, beat your egg yolks. Gradually add hot filling to yolks, whisking constantly to temper them. Return yolk mixture to saucepan and cook for another 2 minutes, stirring continuously.
- Remove from heat and stir in shredded coconut, butter, and vanilla until well combined. Let the mixture cool slightly, then pour it into the baked crust.
- Refrigerate the pie for at least 4 hours to set.
- Before serving, whip cream to soft peaks, spread over the top, and sprinkle with toasted coconut flakes.
Leave a Reply