
Indulging in a sweet slice of Americana, these 4th of July cupcakes are a colorful celebration in every bite! As I mix up this festive recipe, the excitement in the kitchen builds—who knew a mere batter could transform into such vibrant, marbled swirls of red, white, and blue? These delightful cupcakes not only bring a stunning visual impact to your holiday table, but they’re also remarkably easy to whip up, making them a perfect choice for any home chef looking to impress. Better yet, they feature a moist texture with a touch of chocolate that will have your guests clamoring for seconds. Ready to infuse some holiday spirit into your baking? Let’s dive into these patriotic treats!

Why Are These Cupcakes So Special?
Festive Appeal: These 4th of July cupcakes are not just treats; they’re the centerpiece of your celebration! Their vibrant colors and marbled design make them perfect for BBQs and picnics.
Easy to Make: You’ll love how simple they are to prepare; ideal for both novice bakers and experienced chefs alike.
Flavorful Delight: The chocolatey depth combined with the rich vanilla frosting offers a delectable balance that’s hard to resist.
Versatile Options: Want to switch it up? Try a cream cheese frosting instead of traditional buttercream for a tangy twist!
Crowd-Pleaser: These cupcakes are sure to impress your guests and become the highlight of any festive gathering, leaving everyone asking for the recipe.
4th of July Cupcake Ingredients
For the Cupcake Batter
• All-Purpose Flour – Provides the structure for these festive 4th of July cupcakes; cake flour can be used for a lighter texture.
• Granulated Sugar – Sweetens the batter, keeping your cupcakes moist, without any direct substitutions.
• Baking Powder – A crucial leavening agent; ensure it’s fresh for that perfect rise.
• Baking Soda – Works harmoniously with buttermilk for even more lift.
• Salt – Enhances flavor and balances the sweetness wonderfully.
• Unsalted Butter – Adds rich flavor and a fluffy texture; margarine is a possible substitute but will alter the taste.
• Sour Cream – Contributes moisture and richness; full-fat Greek yogurt makes a fine substitute if needed.
• Buttermilk – Activates baking soda and keeps the crumb tender; regular milk with a splash of vinegar works in a pinch.
• Cocoa Powder – Introduces delightful chocolate flavor and deepens color for those beautiful swirls; use Dutch-processed for a richer taste.
• Red and Blue Food Coloring – Essential for those vibrant colors; gel coloring is recommended for intensity without altering consistency.
For the Frosting
• Vanilla Buttercream – Classic choice for topping; provides a sweet, creamy finish to your cupcakes.
• Cream Cheese – For a tangy alternative, whip this up instead of buttercream for a delicious twist!
Step‑by‑Step Instructions for 4th of July Cupcakes
Step 1: Prepare the Batter
Begin by preheating your oven to 350°F (175°C) and lining a muffin tin with cupcake liners. In a large mixing bowl, cream together 1 cup of softened unsalted butter and 2 cups of granulated sugar until the mixture is light and fluffy, about 3 to 5 minutes. Gradually add in 4 large eggs, one at a time, ensuring each is fully incorporated before adding the next. In a separate bowl, whisk together the dry ingredients and set aside.
Step 2: Combine Wet and Dry Ingredients
Slowly add the dry mixture to the creamed butter and sugar, alternating with 1 cup of sour cream and 1 cup of buttermilk. Start and end with the dry ingredients, mixing until just combined. This will create a rich batter for your 4th of July cupcakes. Avoid overmixing, as this can lead to dense cupcakes. Your batter should be smooth and slightly thick, ready for the next colorful step.
Step 3: Create the Colorful Swirls
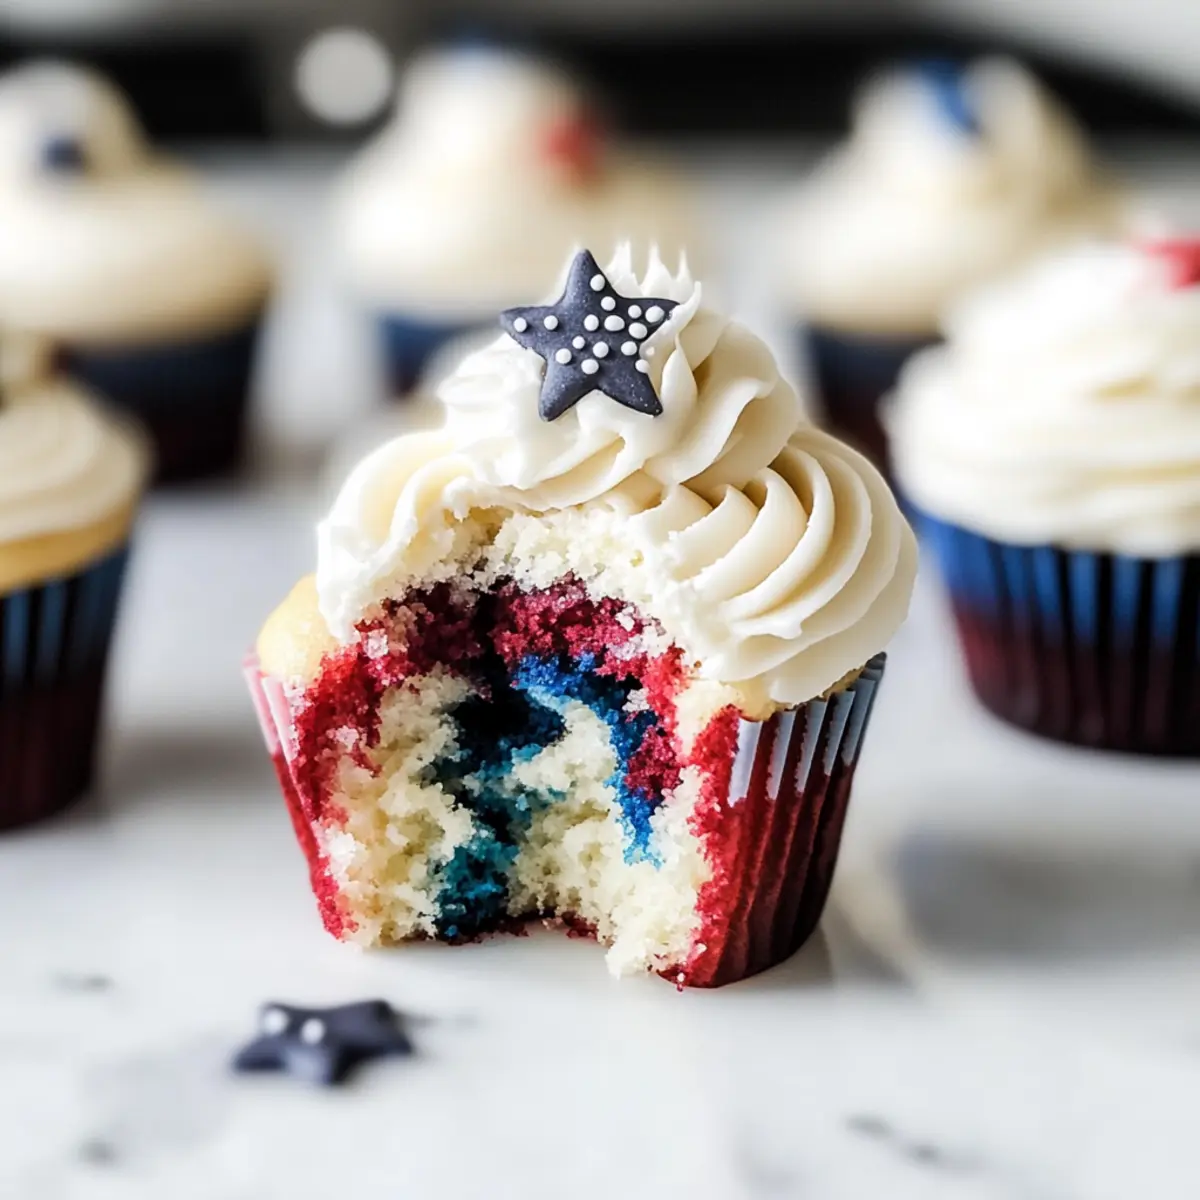
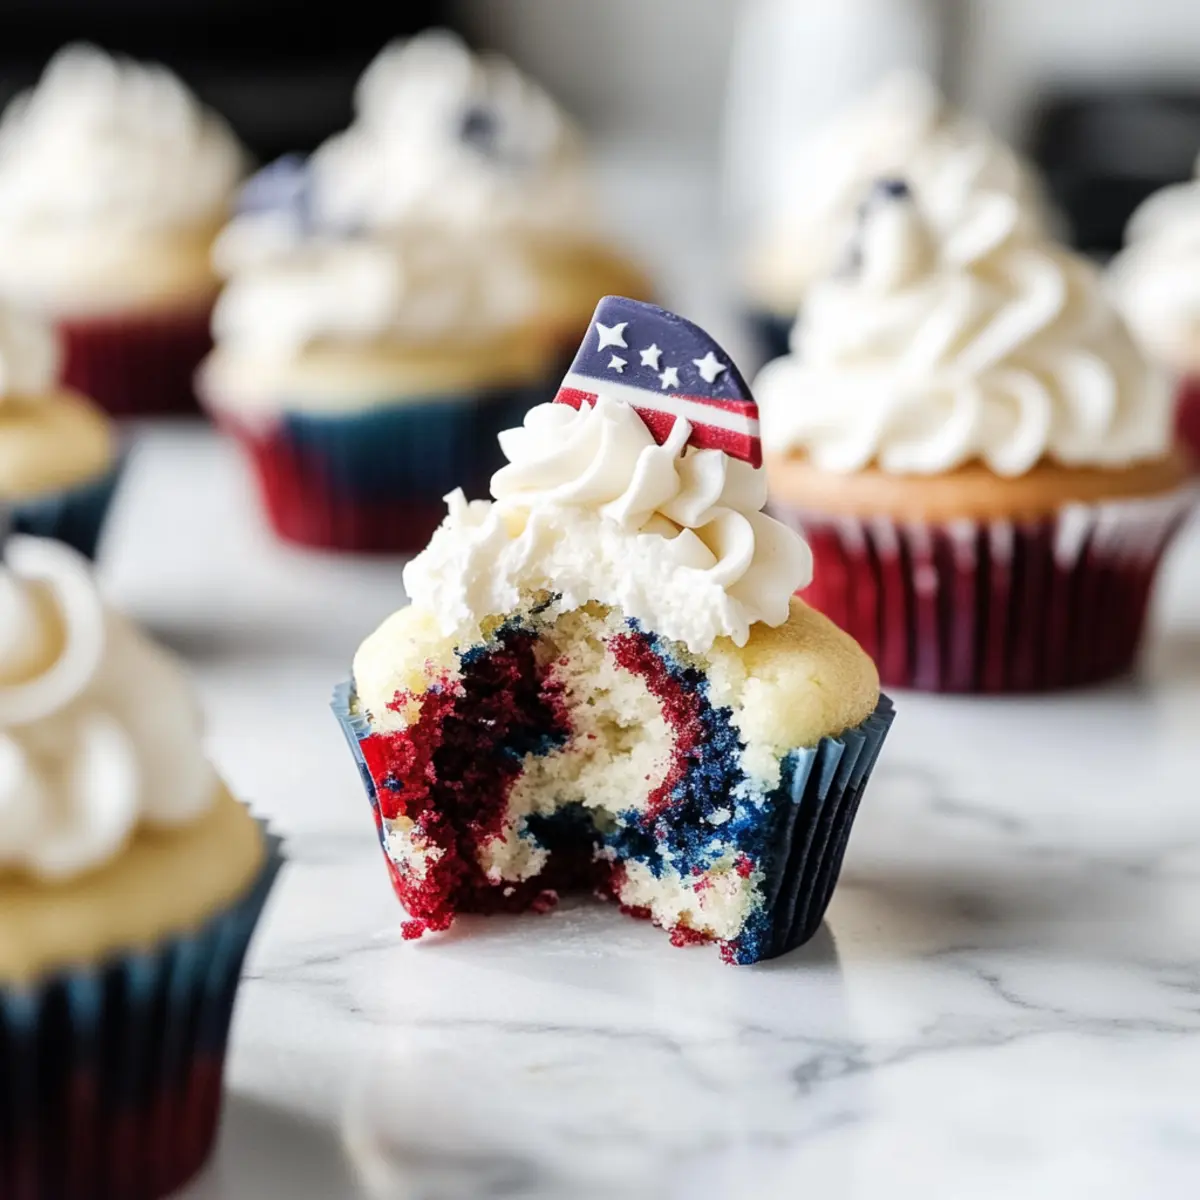
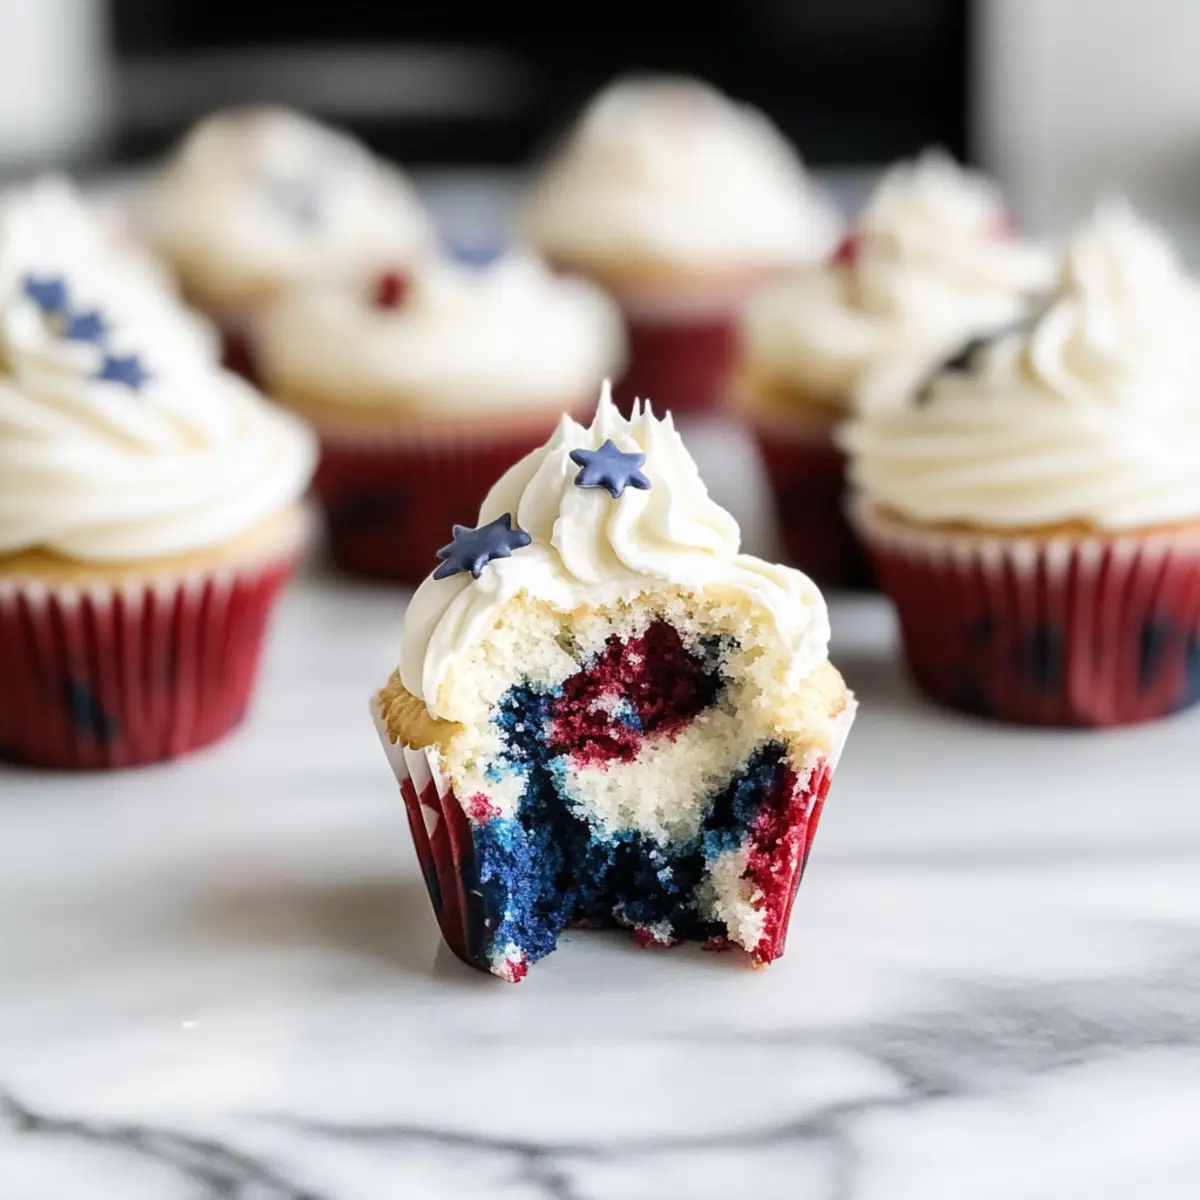
Take 1 cup of the prepared batter and mix it with 1/4 cup of cocoa powder in a separate bowl, ensuring it’s well combined. Divide the remaining batter evenly into three bowls: leave one bowl plain, dye one red using gel food coloring, and another blue. Stir in the food coloring until you achieve the desired vibrancy, keeping each bowl of batter ready for layering in the cupcake liners.
Step 4: Fill the Cupcake Liners
With a spoon or a piping bag, layer the colored batters into the cupcake liners. Start with a spoonful of white batter, then add red and blue in alternating layers, gently swirling with a toothpick to achieve the marbled effect. Make sure not to overfill the liners; they should be about two-thirds full to allow for rising. This marbling gives your 4th of July cupcakes that festive and patriotic flair.
Step 5: Bake the Cupcakes
Place the filled muffin tin into the preheated oven and bake for about 18 to 20 minutes, or until a toothpick inserted into the center comes out clean. Keep an eye on them as they bake! The tops should be lightly golden and spring back when gently pressed. This step is crucial for achieving the light, fluffy texture everyone loves in a cupcake.
Step 6: Cool the Cupcakes
Remove the cupcakes from the oven and let them cool in the tin for about 5 minutes. Then, transfer them to a wire rack to cool completely before frosting. Allowing them to cool is essential for preventing the frosting from melting, ensuring your vibrant colors stay intact for that festive presentation.
Step 7: Frost and Decorate
Once the cupcakes are completely cool, spread a generous dollop of vanilla buttercream frosting on top of each one. For a fun touch, you can also opt for cream cheese frosting if you desire a tangy flavor. Get creative with decorations—consider sprinkles, edible stars, or additional food coloring designs to enhance the 4th of July theme and make these cupcakes truly stand out at your celebration.
Expert Tips for 4th of July Cupcakes
Fluffier Batter: Make sure to cream the butter and sugar thoroughly to incorporate air; this step is crucial for achieving light and fluffy 4th of July cupcakes.
Vibrant Colors: Use gel food coloring instead of liquid for more intense colors without affecting the batter’s consistency.
Swirling Technique: Avoid overmixing your colored batters when creating swirls; a gentle swirl with a toothpick will ensure a beautiful marbling effect.
Cooling Time: Let the cupcakes cool completely on a wire rack to avoid melting the frosting, preserving your festive appearance.
Frosting Alternatives: If using cream cheese frosting, always ensure it’s at room temperature for easy spreading and a smooth finish.
Storage Tips: Keep your cupcakes in an airtight container at room temperature for up to 3 days to maintain their freshness.
4th of July Cupcakes Variations
Feel free to have fun and add your own twist to these festive cupcakes for an even more personalized treat!
-
Chocolate Chocolate: Swap out half of the flour for cocoa powder to create a rich chocolate cupcake base.
-
Lemon Zest: Add a tablespoon of lemon zest to the batter for a refreshing citrus kick that complements the sweetness.
-
Gluten-Free Option: Use a gluten-free flour blend in place of all-purpose flour for a scrumptious gluten-free treat that everyone can enjoy.
-
Nutty Addition: Fold in 1/2 cup of chopped nuts, like walnuts or pecans, to add a delightful crunch that contrasts beautifully with the soft cupcake texture.
-
Cream Cheese Frosting: Try using cream cheese frosting instead of buttercream for a tangy, scrumptious topping that’ll beautifully balance the sweetness.
-
Rainbow Surprise: Add small sprinkles into the vanilla batter before baking for a fun, colorful surprise in every bite!
Imagine how stunning these treat variations will look on your 4th of July table. And if you want a truly decadent dessert experience, don’t forget to check out these Black Velvet Cupcakes for another indulgent option!
Make Ahead Options
These 4th of July cupcakes are perfect for busy home cooks looking to save time without sacrificing flavor! You can prepare the cupcake batter up to 24 hours in advance. Simply mix the ingredients as directed, then refrigerate the batter in a covered bowl. Additionally, you can bake the cupcakes up to 3 days ahead; store them in an airtight container at room temperature to maintain that delightful moisture. For the frosting, make it ahead of time and refrigerate it until you’re ready to decorate; just let it sit at room temperature for about 30 minutes to soften before spreading. When you’re ready to impress your guests, frost the cooled cupcakes and enjoy the festive festive treat that tastes just as delicious as if made fresh!
Storage Tips for 4th of July Cupcakes
Room Temperature: Store your baked 4th of July cupcakes in an airtight container at room temperature for up to 3 days to maintain their freshness and flavor.
Fridge: If you’ve already frosted the cupcakes, they can be kept in the refrigerator for up to 5 days. Just make sure they’re in a sealed container to prevent them from drying out.
Freezer: For longer storage, freeze the unfrosted cupcakes in an airtight container for up to 2 months. Thaw them in the fridge overnight before frosting and serving.
Reheating: If you prefer your cupcakes warm, microwave them for about 10-15 seconds before enjoying. Just be careful not to overheat, as it can make them dry.
What to Serve with 4th of July Cupcakes
Indulge in a colorful spread that complements the festive spirit of your kitchen creation while enticing your guests with delightful pairings.
-
Refreshing Lemonade: A classic thirst-quencher, its citrusy zing balances the sweetness of the cupcakes perfectly.
-
Grilled Corn on the Cob: The smoky flavors and slight char offer a delightful contrast to your dessert’s sweetness, creating a classic BBQ feel.
-
Mixed Berry Salad: Fresh berries bring a burst of fruity freshness, enhancing the vibrant celebration of flavors in these 4th of July cupcakes.
-
Chocolate Dipped Fruit: The combination of luscious chocolate with fresh fruit creates a fun and sophisticated treat that complements the cupcakes.
-
Patriotic Punch: A vibrant drink with layers of red, white, and blue fruit juices and sparkling soda makes for a festive accompaniment.
-
Vanilla Ice Cream: Creamy and smooth, it pairs beautifully with the rich chocolate notes in your cupcakes, taking the dessert experience to a new level.
Elevate your gathering with these vibrant offerings alongside your stunning 4th of July cupcakes, ensuring a delightful feast that everyone will love!
4th of July Cupcakes Recipe FAQs
What kind of flour should I use for my cupcakes?
For these 4th of July cupcakes, all-purpose flour provides great structure. However, if you’re looking for a lighter texture, feel free to substitute it with cake flour for even fluffier results!
How should I store my cupcakes, and how long do they last?
Store your baked cupcakes in an airtight container at room temperature for up to 3 days. If frosted, they can last in the refrigerator for up to 5 days. Just make sure they’re well-sealed to keep them moist and flavorful!
Can I freeze my cupcakes? If so, how?
Absolutely! To freeze unfrosted 4th of July cupcakes, place them in an airtight container and store them for up to 2 months. When you’re ready to enjoy them, simply thaw in the fridge overnight before frosting and serving. This way, you can have fresh-tasting cupcakes whenever the craving strikes!
What can I do if my cupcakes don’t rise properly?
If your cupcakes don’t rise, the issue might be with your baking powder or baking soda. Always check that these ingredients are fresh and not expired. Additionally, be careful not to overmix the batter, as this can lead to denser cupcakes. For fluffy texture, gently fold the wet and dry ingredients together until just combined.
Can I make these cupcakes gluten-free?
Certainly! To make gluten-free 4th of July cupcakes, simply use a gluten-free flour blend as a 1:1 substitute for all-purpose flour. Most blends work well in baking, and your cupcakes will still turn out delicious and festive!
Indulge in Festive 4th of July Cupcakes Everyone Will Love
Ingredients
Equipment
Method
- Preheat your oven to 350°F (175°C) and line a muffin tin with cupcake liners. Cream together 1 cup of softened unsalted butter and 2 cups of granulated sugar until light and fluffy, about 3 to 5 minutes. Gradually add in 4 large eggs, one at a time, incorporating each fully before adding the next. In a separate bowl, whisk the dry ingredients and set aside.
- Slowly add the dry mixture to the creamed butter and sugar, alternating with 1 cup of sour cream and 1 cup of buttermilk. Start and end with dry ingredients, mixing until just combined.
- In a separate bowl, mix 1 cup of prepared batter with 1/4 cup of cocoa powder. Divide the remaining batter into three bowls: leave one plain, dye one red, and the other blue using gel food coloring.
- Layer the colored batters into the cupcake liners with a spoon or piping bag, starting with white, then red and blue in alternating layers, swirling gently with a toothpick.
- Bake for 18 to 20 minutes, or until a toothpick inserted into the center comes out clean. The tops should be lightly golden.
- Remove from the oven and let cool in the tin for about 5 minutes, then transfer to a wire rack to cool completely.
- Once cool, frost with vanilla buttercream. Optionally, use cream cheese frosting and decorate with sprinkles or edible stars.
Leave a Reply