
As I stood in my kitchen, the tantalizing scent of garlic and tomatoes wafted through the air, transporting me back to family dinners from my childhood. This Homemade Braised Catalina Chicken is more than just a meal; it’s a heartwarming embrace on a plate, blending tangy sweetness with tender, juicy chicken thighs slow-braised to perfection. Not only is this dish a comforting classic that elevates the simple into something extraordinary, but it’s also an effortless weeknight dinner that demands minimal prep without sacrificing flavor. Whether you’re navigating a busy schedule or hosting a cozy gathering, this recipe has you covered with options like boneless chicken for a quicker cook or a spicy kick for adventurous palates. Are you ready to bring a touch of nostalgia back to your table with this delightful creation?

Why is Braised Catalina Chicken a must-try?
Comforting and Nostalgic: This recipe brings back warm memories of cozy family dinners, delivering a satisfying taste that feels like home.
Effortless Preparation: With minimal prep work, it’s perfect for busy weeknights while still being impressive enough for gatherings.
Homemade Richness: The tangy-sweet homemade sauce truly elevates the dish and makes it stand out from takeout.
Versatile Variations: Adapt the recipe with boneless chicken for quick cooking or spice it up for those who crave a kick, catering to everyone’s taste preferences.
Serve with Ease: It pairs beautifully with rice, mashed potatoes, or crusty bread to soak up every delicious drop of sauce.
Braised Catalina Chicken Ingredients
For the Chicken
• Chicken Thighs – The star of the dish, yielding tender, juicy meat when slow-braised. Boneless thighs can be used for quicker cooking.
• Olive Oil – Essential for searing, adding richness and depth to flavor; stick with this for the best results.
• Salt & Pepper – Basic seasonings that enhance the dish’s overall flavor; adjust according to your taste preferences.
For the Catalina Sauce
• Ketchup – Creates the base with its tangy sweetness; it’s the secret behind that signature flavor.
• Vinegar – Adds a zesty kick that balances the sweetness; use apple cider for a fruitier note.
• Brown Sugar – Sweetens the sauce, helping to form a delicious glaze as it caramelizes. Adjust for personal preference.
• Garlic Powder – Infuses the sauce with savory warmth; fresh garlic can be substituted for a bolder flavor.
• Onion Powder – Complements the garlic, creating a well-rounded taste profile.
• Worcestershire Sauce – Introduces umami depth to the sauce, rounding out the flavor; essential for that homemade touch.
• Hot Sauce (optional) – For those who like it spicy, add this for an extra kick to your Braised Catalina Chicken.
This flavorful combination will not only bring comfort to your dinner table but will also make your kitchen smell incredible! Enjoy this classic recipe that is sure to please everyone.
Step‑by‑Step Instructions for Braised Catalina Chicken
Step 1: Preheat the Oven
Begin by preheating your oven to 350°F (175°C). This temperature is crucial for creating that tender, juicy texture in your Braised Catalina Chicken as it bakes. Make sure your oven has reached this temperature before moving to the next step to ensure even cooking.
Step 2: Prepare the Chicken
Pat the chicken thighs dry with paper towels, which helps achieve a nice sear later. Generously season both sides with salt and pepper, enhancing the overall flavor of the dish. This step is essential for ensuring each bite of your Braised Catalina Chicken is full of delightful taste.
Step 3: Sear the Chicken
In a Dutch oven or an oven-safe pan, heat a couple of tablespoons of olive oil over medium heat. Once shimmering, carefully add the chicken thighs skin-side down; sear for 4-5 minutes until golden brown and crisp. Turn them over and quickly sear the other side for about 2 minutes, locking in the flavors.
Step 4: Transfer Chicken to Plate
Once both sides of the chicken are beautifully browned, transfer the thighs to a plate. This step allows the chicken to rest while you prepare the Catalina sauce, ensuring optimal moisture retention during the slow-braising process that will follow.
Step 5: Mix the Catalina Sauce
In a bowl, whisk together the Catalina sauce ingredients until smooth and well combined. Taste the sauce and adjust the flavors as needed, whether adding more sweetness or tanginess. This rich, homemade sauce is what elevates the Braised Catalina Chicken to a comforting classic.
Step 6: Nestle Chicken in Sauce
Pour half of the prepared sauce into your Dutch oven, then gently nestle the seared chicken thighs back into the pan, arranging them skin-side up. Pour the remaining sauce over the chicken, ensuring it’s evenly coated. This will infuse incredible flavor as your chicken cooks.
Step 7: Bake Covered
Cover the Dutch oven with a lid or foil and place it in the preheated oven. Bake for 45 minutes, allowing the chicken to absorb the tangy-sweet flavors of the sauce. During this time, your kitchen will fill with an irresistible aroma that signals a comforting meal is on the way.
Step 8: Bake Uncovered
After 45 minutes, remove the lid or foil from the Dutch oven and continue baking for an additional 20-25 minutes. This step allows the sauce to thicken and caramelize beautifully, creating a sticky, rich glaze that coats the Braised Catalina Chicken perfectly.
Step 9: Serve and Garnish
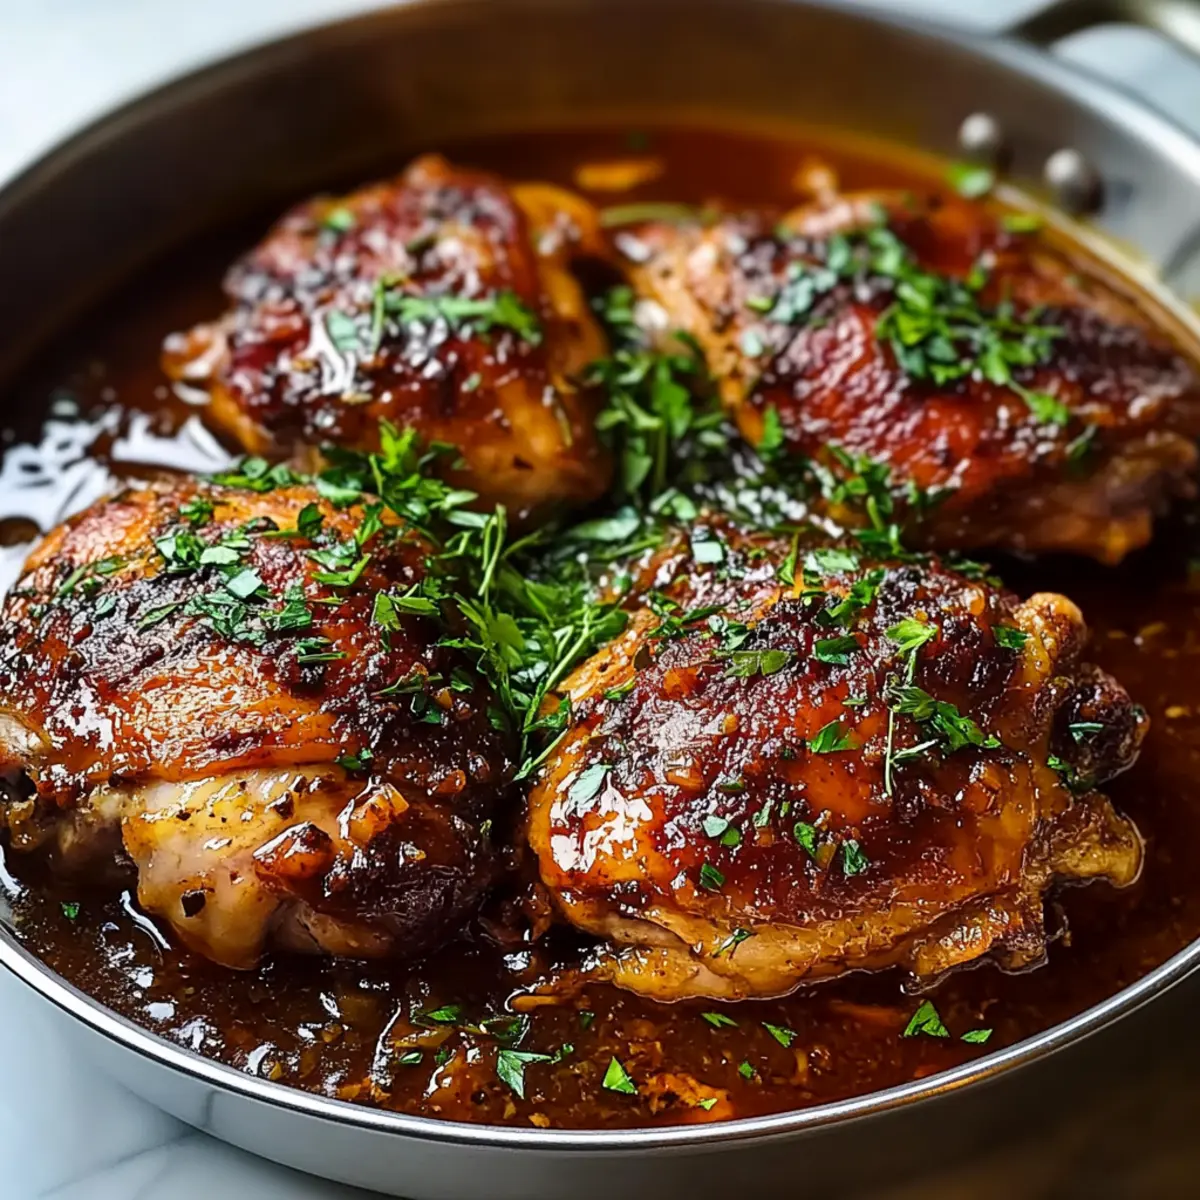
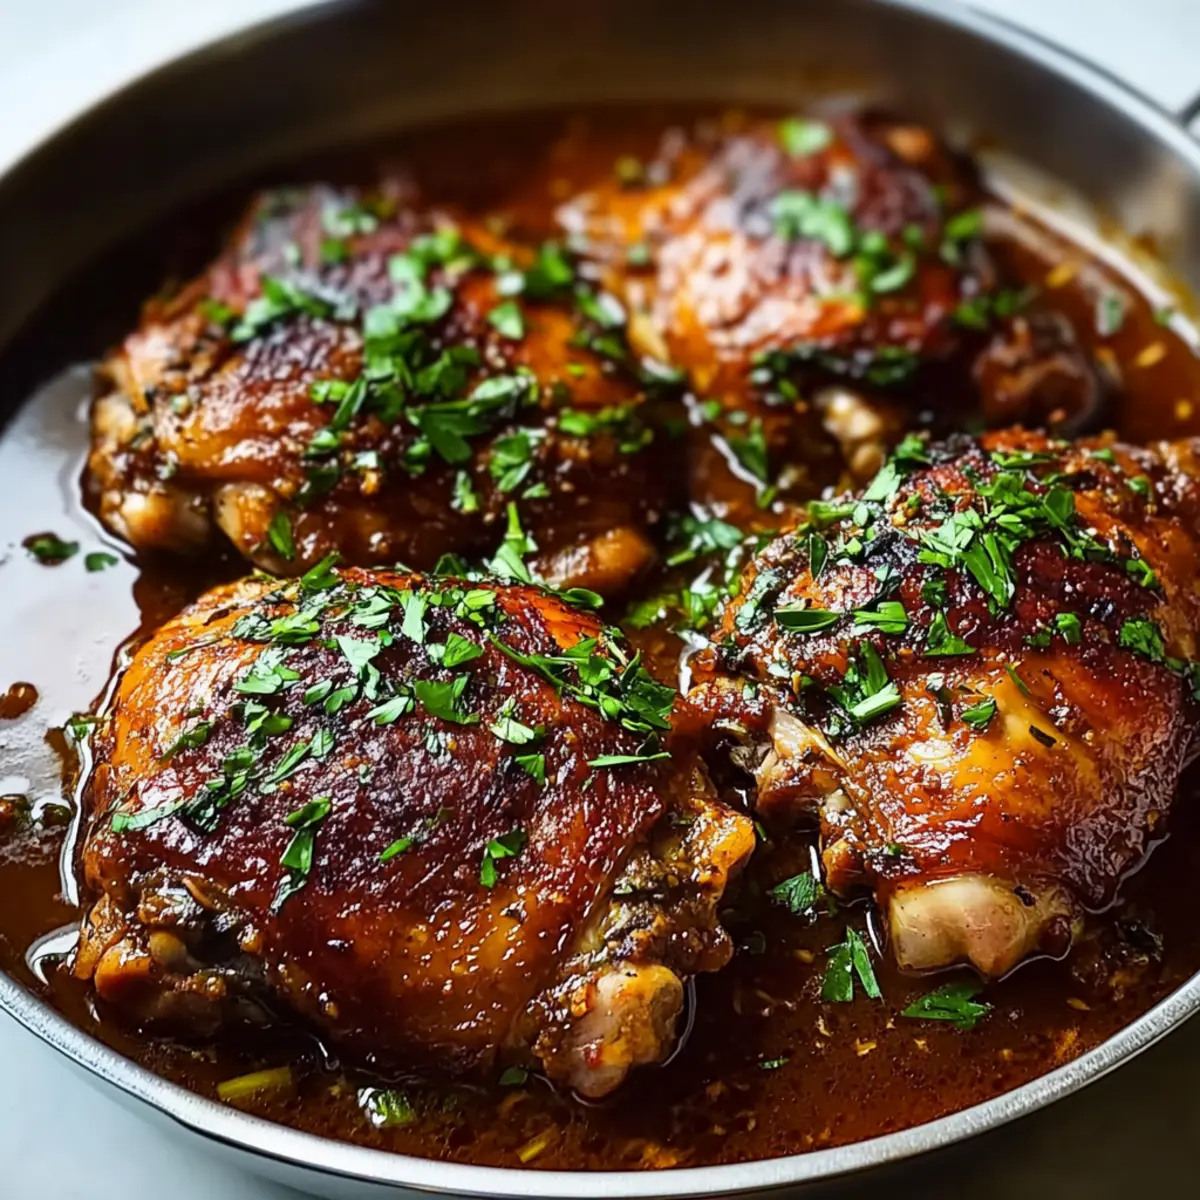
Once done baking, carefully remove the chicken from the oven. Serve the Braised Catalina Chicken hot, drizzling extra sauce over the top. For an added burst of freshness, garnish with chopped parsley if desired. This dish is ready to bring warmth to your dinner table, paired delightfully with rice or crusty bread.
What to Serve with Braised Catalina Chicken
Nothing completes a comforting dinner quite like delightful sides that enhance every bite of your savory chicken creation.
-
Creamy Mashed Potatoes: Their silky texture soaks up the delicious sauce, creating a decadent experience on your plate. Each scoop offers warmth and satisfaction, perfectly complementing the tangy-sweet chicken.
-
Steamed Green Beans: Bright and crisp, they provide a refreshing contrast to the rich flavors of the chicken. The vibrant green color brings a visual pop, making your meal feel lighter and more balanced.
-
Savory Rice Pilaf: Fluffy rice infused with aromatic herbs absorbs the luscious sauce, creating a match made in heaven. It’s a great base that allows you to savor every drop of that homemade goodness.
-
Crusty Bread: Ideal for dipping, its chewy outside yields to a soft center that’s perfect for mopping up the sauce. A slice of bread elevates your meal, turning each bite into a cozy hug.
-
Roasted Brussels Sprouts: These caramelized green jewels add a delightful crunch and earthy flavor, harmonizing beautifully with the sauce’s sweetness. Their slight bitterness balances the dish, bringing it all together perfectly.
-
Coleslaw: A tangy, crunchy slaw adds a refreshing element that cuts through the richness of the chicken. The acidity from the dressing brightens each bite, enhancing the overall dining experience.
Feel free to mix and match these delicious options to create your perfect meal alongside the Braised Catalina Chicken!
Make Ahead Options
Braised Catalina Chicken is an excellent choice for meal prep, saving you time on busy weeknights! You can season and sear the chicken thighs up to 24 hours in advance; simply pat them dry, season with salt and pepper, and refrigerate until you’re ready to cook. Additionally, you can mix the Catalina sauce and refrigerate it for up to 3 days, ensuring those rich flavors have time to meld together. To finish the dish, just nestle the chicken in the sauce and bake as instructed; it will turn out just as delicious, making dinner an effortless delight! Don’t hesitate to prepare ahead—your future self will thank you!
Expert Tips for Braised Catalina Chicken
-
Searing Matters: Sear the chicken skin-side down until golden brown to enhance flavor and texture. Avoid overcrowding the pan to ensure even cooking.
-
Sauce Adjustments: Taste the Catalina sauce before pouring it over the chicken; adjust sweetness or tanginess as desired. This can make a big difference in the final flavor.
-
Keep It Covered: Always cover the Dutch oven with a lid or foil during the initial bake. This steam helps keep your Braised Catalina Chicken tender.
-
Broil for Crispiness: For extra crispy skin, broil the chicken for 2-3 minutes after baking uncovered. Keep an eye on it to prevent burning.
-
Use the Right Pan: A heavy-bottomed Dutch oven is ideal for this recipe, but if you don’t have one, a large oven-safe skillet will work as long as it is covered tightly during baking.
-
Storing Leftovers: Refrigerate any leftover Braised Catalina Chicken in an airtight container for up to 4 days. Reheat gently in the oven for the best texture.
Braised Catalina Chicken Variations
Feel free to play with this recipe and tailor it to your taste; after all, cooking is all about creativity and love.
- Boneless Chicken: Use boneless thighs or breasts for a quicker baking time without sacrificing tenderness. Just reduce the baking time by 15-20 minutes for quick satisfaction.
- Make It Spicy: Add more cayenne pepper or a splash of hot sauce to the Catalina sauce for an exciting kick. Your taste buds will thank you for this flavor twist!
- Sweeten Up: Increase the brown sugar in the sauce if you enjoy a sweeter flavor profile. Balancing sweetness against the tanginess can create something truly delightful.
- Add Vegetables: Mix in chopped bell peppers, onions, or carrots before baking for a hearty, veggie-packed addition. They soak up the sauce beautifully!
- Herb Infusion: Adding fresh herbs like thyme or rosemary to the cooking process will elevate the aroma and enhance the overall flavor profile. A sprinkle of these fragrant herbs can make a world of difference.
- Lemon Zest: A dash of freshly grated lemon zest in the sauce introduces a refreshing brightness that cuts through the richness. It’s a simple way to make the dish feel lighter!
- Mediterranean Twist: Use Mediterranean spices like oregano and paprika, and swap ketchup for tomato sauce for a unique take on the sauce. Team this with a side of rice pilaf for a delicious dish.
- Serve with Sides: Pair your Braised Catalina Chicken with creamy mashed potatoes or a side of sautéed green beans for a complete comfort meal. You might also want to check out my Healthy Sticky Chicken for more delicious ideas!
Feel free to mix and match these variations, and bring your own flavors into this heartwarming dish!
Storage Tips for Braised Catalina Chicken
Fridge: Refrigerate leftovers in an airtight container for up to 4 days to maintain freshness and flavor.
Freezer: Freeze the cooked chicken in sauce for up to 2 months. Ensure it’s in an airtight container or heavy-duty freezer bag to prevent freezer burn.
Reheating: When ready to enjoy, thaw overnight in the fridge, then reheat gently in the oven at 325°F until warmed through for the best texture.
Serving Suggestion: Pair with rice or crusty bread to soak up the delicious sauce, making your Braised Catalina Chicken feel as comforting as the first time you made it.

Braised Catalina Chicken Recipe FAQs
What should I look for when selecting chicken thighs?
Absolutely! When choosing chicken thighs, look for ones with a rich, pink color and a little bit of marbling for extra juiciness. Avoid any that appear gray or have dark spots, as these can indicate spoilage. Fresh chicken should have a slight sheen, and the skin should be smooth and tight to the meat.
How should I store leftover Braised Catalina Chicken?
Refrigerate any leftovers in an airtight container for up to 4 days. Make sure they are cooled to room temperature before sealing to prevent condensation. If you’re not going to eat it within that timeframe, freezing is the way to go!
Can I freeze Braised Catalina Chicken?
Yes, you can freeze it! Just ensure it’s in an airtight container or a heavy-duty freezer bag. It will stay fresh for up to 2 months. When you’re ready to enjoy it, thaw it overnight in the fridge, then reheat gently in the oven at 325°F until warmed through. This method helps retain that delicious texture.
What if my Catalina sauce turns out too sweet or too tangy?
No worries; it’s a common challenge! If the sauce is too sweet, add a splash of vinegar to balance the flavors. Conversely, if it’s too tangy, try stirring in a bit more brown sugar to achieve your desired sweetness. Always taste as you go to find the right balance.
Is this recipe suitable for pets?
While chicken itself is safe for pets, it’s best to keep them away from the sauce. Ingredients like garlic and onion powder can be harmful to cats and dogs, so if you’re considering sharing this meal with them, serve plain chicken without the sauce.
How can I make the Braised Catalina Chicken spicier?
Very easily! To spice things up, add extra cayenne pepper to the sauce or mix in a dash of hot sauce before baking. If you love heat, don’t hesitate to adjust the spice levels to match your personal preference for a kick that elevates the flavor!
Savory Braised Catalina Chicken for Cozy Weeknight Dinners
Ingredients
Equipment
Method
- Preheat your oven to 350°F (175°C).
- Pat the chicken thighs dry with paper towels and season with salt and pepper.
- In a Dutch oven, heat olive oil and sear chicken thighs skin-side down for 4-5 minutes.
- Transfer the browned chicken to a plate.
- Whisk together all Catalina sauce ingredients until smooth and taste for adjustments.
- Pour half of the sauce into the Dutch oven, nestle chicken in sauce, and pour remaining sauce on top.
- Cover and bake for 45 minutes.
- Remove cover and bake for an additional 20-25 minutes to thicken the sauce.
- Serve hot, drizzling extra sauce over chicken.
Leave a Reply