
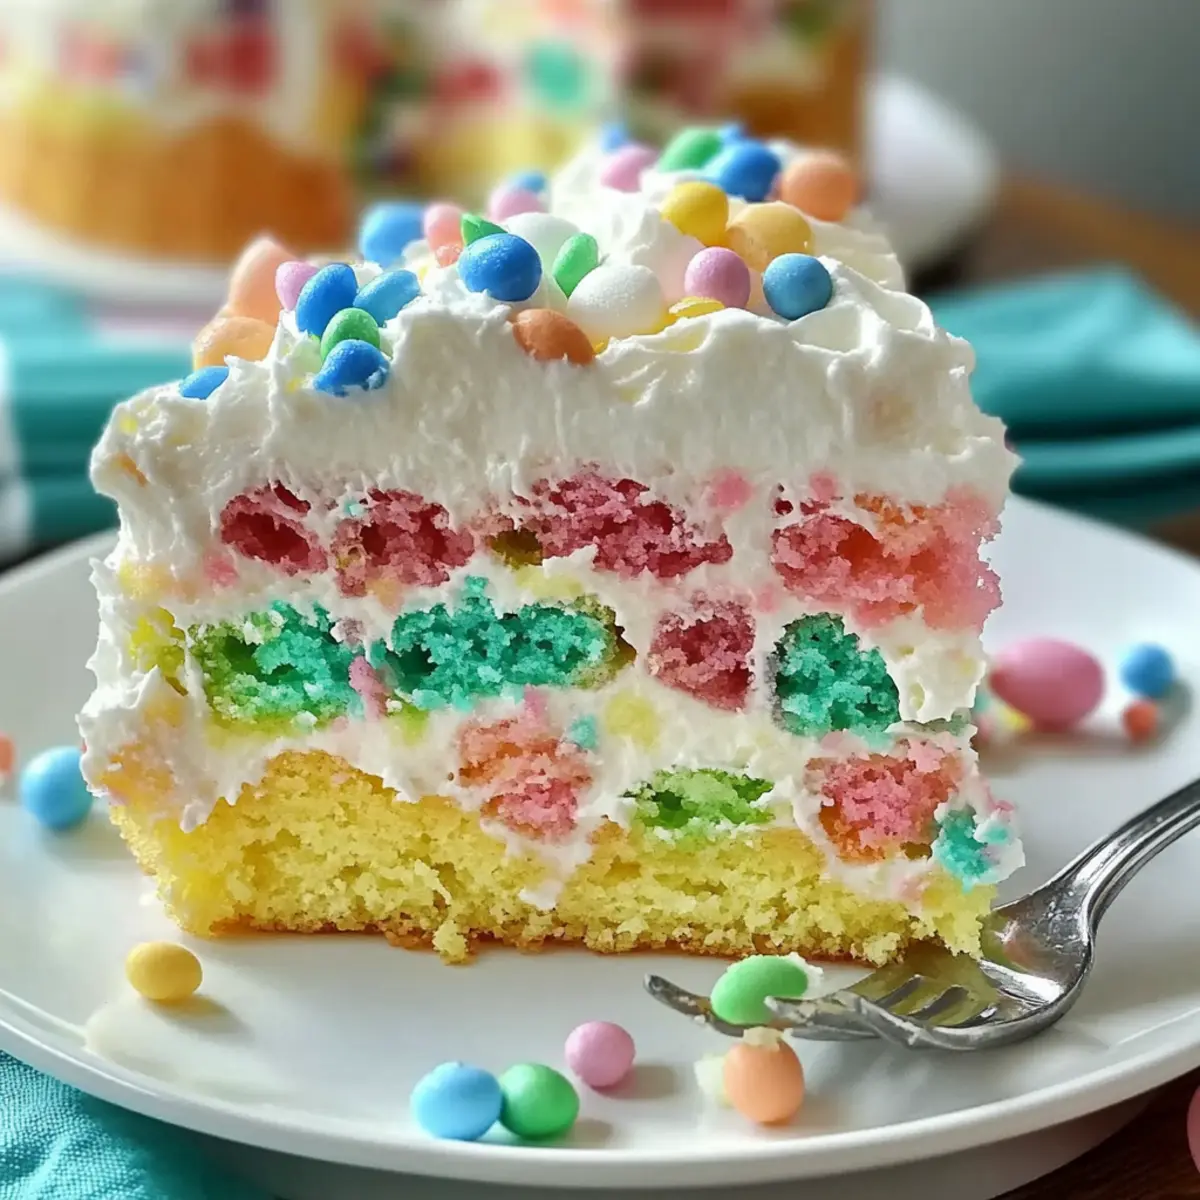
As I gathered around the table with family last Easter, I eagerly watched as this colorful Easter Poke Cake made its grand entrance—a delightful spectacle of vibrant colors and creamy layers. This eye-catching dessert not only turned heads but also won hearts, making it the perfect centerpiece for our festive gathering. The beauty of the Easter Poke Cake lies not just in its presentation; it’s also a make-ahead gem that lets you savor every moment with loved ones while delivering the sweet satisfaction of customizable flavors. Whether you choose white chocolate or a zesty lemon pudding, every bite is a cheerful reminder of springtime joy. Curious how to create this delightful treat that promises to elevate your holiday festivities? Let’s dive in!
Why is This Easter Poke Cake a Must-Try?
Celebratory Colors: The vibrant hues create a festive atmosphere, making it a feast for the eyes as well as the palate.
Ultimate Customization: Choose from delicious pudding flavors like white chocolate or tangy lemon to suit your family’s taste preferences!
Effortless Preparation: It’s a make-ahead dessert, allowing you to enjoy more time with your loved ones instead of stressing in the kitchen.
Perfect for Gatherings: This cake serves beautifully at brunch or holiday dinners, easily standing out as a crowd favorite.
Light and Creamy: The pudding-soaked cake coupled with airy whipped cream offers a delightful contrast in every bite, ensuring smiles all around.
If you love celebratory treats, make sure to check out our festive Berry Peach Cheesecake or the indulgent Iced Blueberry Cheesecake for more delicious options!
Easter Poke Cake Ingredients
• Gather these essentials for a joyful baking experience!
For the Cake
- White Cake Mix – This serves as the foundation of your Easter Poke Cake; feel free to swap with vanilla or lemon cake mix for a slightly different taste.
- Food Coloring – Create stunning, vibrant layers using gel or liquid food coloring for the ultimate festive effect.
For the Pudding
- Instant White Chocolate Pudding – Adds a creamy texture and richness; alternatives include vanilla, cheesecake, or lemon pudding for a tasty twist.
- Milk – Whole milk is best for achieving that luscious, creamy pudding consistency.
For the Whipped Cream
- Heavy Cream – Whipping this up will give your dessert an irresistibly light and airy topping.
- Powdered Sugar – Sweetens the whipped cream to perfection; adjust based on your preferred sweetness.
Optional Toppings
- Festive Sprinkles – Elevate the visual appeal of your Easter Poke Cake with colorful sprinkles, added just before serving!
- Easter Candies – A delightful addition for extra fun; think chocolate eggs or jelly beans to bring smiles to your guests.
Make this Easter unforgettable with your beautiful Easter Poke Cake!
Step‑by‑Step Instructions for Easter Poke Cake
Step 1: Prepare the Cake Mix
Start by preheating your oven to 350°F (175°C). In a large mixing bowl, combine the white cake mix according to the package instructions, typically mixing with eggs, water, and oil until smooth and well-blended. This fluffy mixture will serve as the foundation for your vibrant Easter Poke Cake, so ensure it’s lump-free and creamy before proceeding.
Step 2: Color the Batter
Once your cake batter is ready, divide it equally into four small bowls. Add a few drops of different food coloring to each bowl, mixing until you achieve vibrant hues. Consider cheerful pastel colors for a festive touch. This step is where the magic begins, as the colors transform a simple batter into an eye-catching delight waiting to be baked!
Step 3: Layer the Colors
Grease a 9×13 inch baking dish generously with cooking spray or butter. Begin dropping spoonfuls of each colored batter randomly into the dish, creating a beautiful patchwork of colors. Try not to overthink it; the aim is to create a fun, haphazard look! With each spoonful, imagine the stunning visual of your Easter Poke Cake as it bakes to perfection.
Step 4: Swirl Together
Grab a toothpick or a butter knife and gently swirl the colors together within the baking dish, creating a marbled effect. Be careful not to over-mix, as you want to maintain the vibrant streaks of color. This swirling will add lovely patterns to your Easter Poke Cake, enhancing both the visual and textural appeal as it bakes.
Step 5: Bake the Cake
Transfer the baking dish to your preheated oven and bake for 25-30 minutes, or until a toothpick inserted in the center comes out clean. Keep an eye on the cake as it approaches the end of the baking time; you’ll know it’s done when the top springs back lightly when touched. Once baked, remove the cake and let it cool in the pan for about 10 minutes.
Step 6: Poke Holes
After letting the cake cool slightly, take a wooden spoon handle and poke holes in the top of the cake, spacing them about an inch apart. Be sure to poke deep enough to allow the pudding mixture to penetrate the cake. This step is essential for allowing the pudding to soak in and infuse the Easter Poke Cake with creamy flavor.
Step 7: Mix the Pudding
In a separate mixing bowl, whisk together the instant white chocolate pudding and milk until smooth, ensuring there are no lumps. This creamy mixture will add richness and moisture to your cake. Once combined, pour the pudding evenly over the top of the cake, encouraging it to fill all the holes for maximum flavor infusion.
Step 8: Chill the Cake
Spread any remaining pudding on top of the cake, and cover it loosely with plastic wrap. Refrigerate for at least a few hours, or overnight, allowing the flavors to meld together beautifully. Chilling is crucial to let the pudding set and soak into the Easter Poke Cake, resulting in a wonderfully moist and flavorful treat.
Step 9: Top with Whipped Cream
Just before serving, prepare the whipped cream by whipping heavy cream and powdered sugar together until soft peaks form. Dollop this fluffy mixture generously over the chilled cake, spreading it evenly. For that festive touch, consider decorating with colorful sprinkles or cute Easter candies, making your Easter Poke Cake as delightful to look at as it is to eat!

Expert Tips for the Best Easter Poke Cake
-
Smooth Pudding: Whisk the pudding mixture until it’s completely lump-free. Using cold milk helps achieve this creamy consistency.
-
Careful Color Mixing: Add food coloring gradually; a little goes a long way. It’s important to not overmix to preserve the vibrant layers in your Easter Poke Cake.
-
Poking the Cake: Ensure you poke holes deep enough but not all the way through the cake. This allows the pudding to soak properly without making the cake fall apart.
-
Chill Time: Don’t skip the chilling step! Allowing the Easter Poke Cake to chill for several hours or overnight helps meld the flavors, making it irresistibly moist.
-
Toppings Timing: Add sprinkles or candies just before serving to maintain their freshness and avoid sogginess on the cake.
How to Store and Freeze Easter Poke Cake
Fridge: Store leftover Easter Poke Cake in an airtight container in the refrigerator for up to 3 days. This helps maintain its moisture and flavor while keeping it fresh.
Freezer: If you’d like to freeze your Easter Poke Cake, do so before adding the whipped cream topping. Wrap it tightly in plastic wrap and store it in a freezer-safe container for up to 2 months.
Thawing: When you’re ready to enjoy your frozen cake, transfer it to the fridge the night before to thaw gradually. Once thawed, top with whipped cream before serving.
Reheating: If you prefer warm cake, gently heat individual slices in the microwave for about 10-15 seconds, being careful not to overdo it.
What to Serve with Easter Poke Cake
A blissful gathering deserves an equally delightful spread to accompany your colorful indulgence, enhancing every sweet bite.
- Spring Salad: A light mix of fresh greens, strawberries, and feta adds a refreshing contrast, balancing the cake’s sweetness.
- Lemonade: Crisp lemonade, whether classic or sparkling, offers a zesty kick that complements the cake’s fruity notes beautifully.
- Roasted Veggies: Seasoned asparagus and baby carrots bring a savory depth, harmonizing the vibrant flavors of your festive dessert.
- Chocolate-Covered Strawberries: These decadent treats add a rich element, perfect for those who crave an extra layer of indulgence.
- Vanilla Ice Cream: A scoop of creamy vanilla ice cream alongside the cake creates a delightful temperature contrast that tantalizes the taste buds.
- Mimosa Bar: Create a fun mimosa bar with fruity juices for a playful, celebratory vibe that pairs perfectly with the colorful cake.
- Cheesecake Bites: These mini treats capture creamy richness with a touch of fruity tang, providing a dynamic dessert experience.
- Coffee or Tea: A warm mug of coffee or a fragrant herbal tea can beautifully round out the meal, enhancing the dessert’s flavors.
- Fruit Platter: A simple array of fresh seasonal fruits adds color and healthful freshness, balancing the richness of the poke cake.
Variations & Substitutions for Easter Poke Cake
Let your creativity shine while customizing this delightful Easter Poke Cake to match your tastes and seasonal themes!
-
Gluten-Free: Use a gluten-free cake mix to achieve the same fluffy texture without the gluten. It’s a delicious alternative that ensures everyone can indulge.
-
Pudding Flavor Swap: Replace white chocolate pudding with lemon or cheesecake for a fresh twist. Each flavor adds its own unique charm—it’s like enjoying a new dessert every time!
-
Seasonal Colors: Change the food coloring to fit different holidays or seasons. Try pastel shades for Easter, vibrant tones for summer, or rich hues for fall festivities, turning this cake into a year-round favorite.
-
Fruit Infusion: Mix in fresh fruits like strawberries or blueberries into the whipped cream for a burst of natural flavor. This adds a refreshing touch that pairs beautifully with the creamy pudding!
-
Chocolate Drizzle: Drizzle melted chocolate over the whipped cream topping for an extra layer of indulgence. This chocolatey addition creates a luscious contrast with the other flavors.
-
Nutty Crunch: Fold in chopped nuts, such as pecans or walnuts, into the cake batter for added texture. This twist can elevate the cake to a whole new level of deliciousness.
-
Extraction Excitement: For bolder flavor, add a splash of almond or lemon extract to the cake batter. A little goes a long way, making each bite unforgettable!
If you’re craving more delightful dessert ideas, don’t miss out on our scrumptious Black Velvet Cupcakes or the visually stunning Forest Blackberry Cheesecake for your next gathering!
Make Ahead Options
These Easter Poke Cakes are perfect for meal prep enthusiasts! You can bake the cake up to 24 hours in advance, allowing it to cool completely before poking the holes. Once cooled, wrap it tightly in plastic wrap and refrigerate. The pudding can be prepared the day before serving as well, ensuring rich flavor and moisture. Just mix the pudding with milk and store it in the fridge until you’re ready to cover the cake. To finish, pour the pudding over your cake and let it chill for a few hours (or overnight) before topping it with whipped cream and festive decorations. This method allows you to enjoy delicious, stress-free holiday gatherings with just as much joy!

Easter Poke Cake Recipe FAQs
How do I choose the right cake mix for my Easter Poke Cake?
Absolutely! A white cake mix serves as the perfect foundation for your Easter Poke Cake. However, feel free to substitute with vanilla or lemon cake mix if you want to tweak the flavor. Just ensure that the mix is fresh and check the expiration date for the best results!
How should I store my Easter Poke Cake after it’s been made?
It’s best to store any leftovers in an airtight container in the refrigerator, where it will stay fresh for up to 3 days. Keeping it covered helps retain moisture and keeps the flavors intact. Remember, if you’re making it ahead of time, chill it uncovered until you’re ready to add the pudding!
Can I freeze my Easter Poke Cake?
Yes, you can! For freezing, it’s best to do so before adding the whipped cream topping. Wrap the cake tightly in plastic wrap and store it in a freezer-safe container for up to 2 months. When you’re ready to enjoy it, transfer the cake to the fridge the night before to thaw it gradually, then top with whipped cream before serving.
What do I do if my pudding mixture gets lumpy?
If you find your pudding mixture isn’t coming together smoothly, don’t worry! Start by using cold milk, as this helps achieve a creamy texture. Whisk vigorously until combined, or you can switch to an electric mixer for a few moments to really beat out those lumps. If lumps persist, try pouring the mixture through a fine mesh strainer to salvage your pudding!
Are there any dietary considerations for the Easter Poke Cake?
Great question! If you’re catering to specific dietary needs, you can easily make your Easter Poke Cake gluten-free by using a gluten-free cake mix. Additionally, for those watching sugar intake, sugar-free pudding options and low-fat milk can be used without sacrificing that delightful creaminess we love! Always double-check ingredients for any allergies, especially when adding toppings.
How can I prevent my whipped cream from deflating?
To keep your whipped cream light and airy, make sure to whip it just until soft peaks form; over-whipping can lead to a grainy texture. Adding a tablespoon of cornstarch or instant pudding mix to the heavy cream before beating can also help stabilize your whipped cream for a longer-lasting fluffy topping.

Vibrant Easter Poke Cake: A Fun Twist for Your Holiday Table
Ingredients
Equipment
Method
- Preheat the oven to 350°F (175°C). Mix the white cake mix according to package instructions until lump-free.
- Divide the batter into four bowls and add food coloring to each, mixing until desired colors are achieved.
- Grease a 9x13 inch baking dish and drop spoonfuls of each colored batter randomly to create a patchwork effect.
- Gently swirl the colors together with a toothpick or knife to create a marbled effect, being careful not to over-mix.
- Bake for 25-30 minutes until a toothpick comes out clean. Cool in the pan for about 10 minutes.
- Poke holes in the top of the cool cake, spaced about an inch apart, to allow pudding to soak in.
- Whisk together pudding mix and milk until smooth, then pour over the cake, filling the holes for flavor infusion.
- Spread any remaining pudding on top, cover loosely with plastic wrap, and refrigerate for at least 4 hours or overnight.
- Whip heavy cream and powdered sugar together until soft peaks form, then dollop over the chilled cake before serving.
- Decorate with sprinkles or candies just before serving for a festive touch.
Leave a Reply