
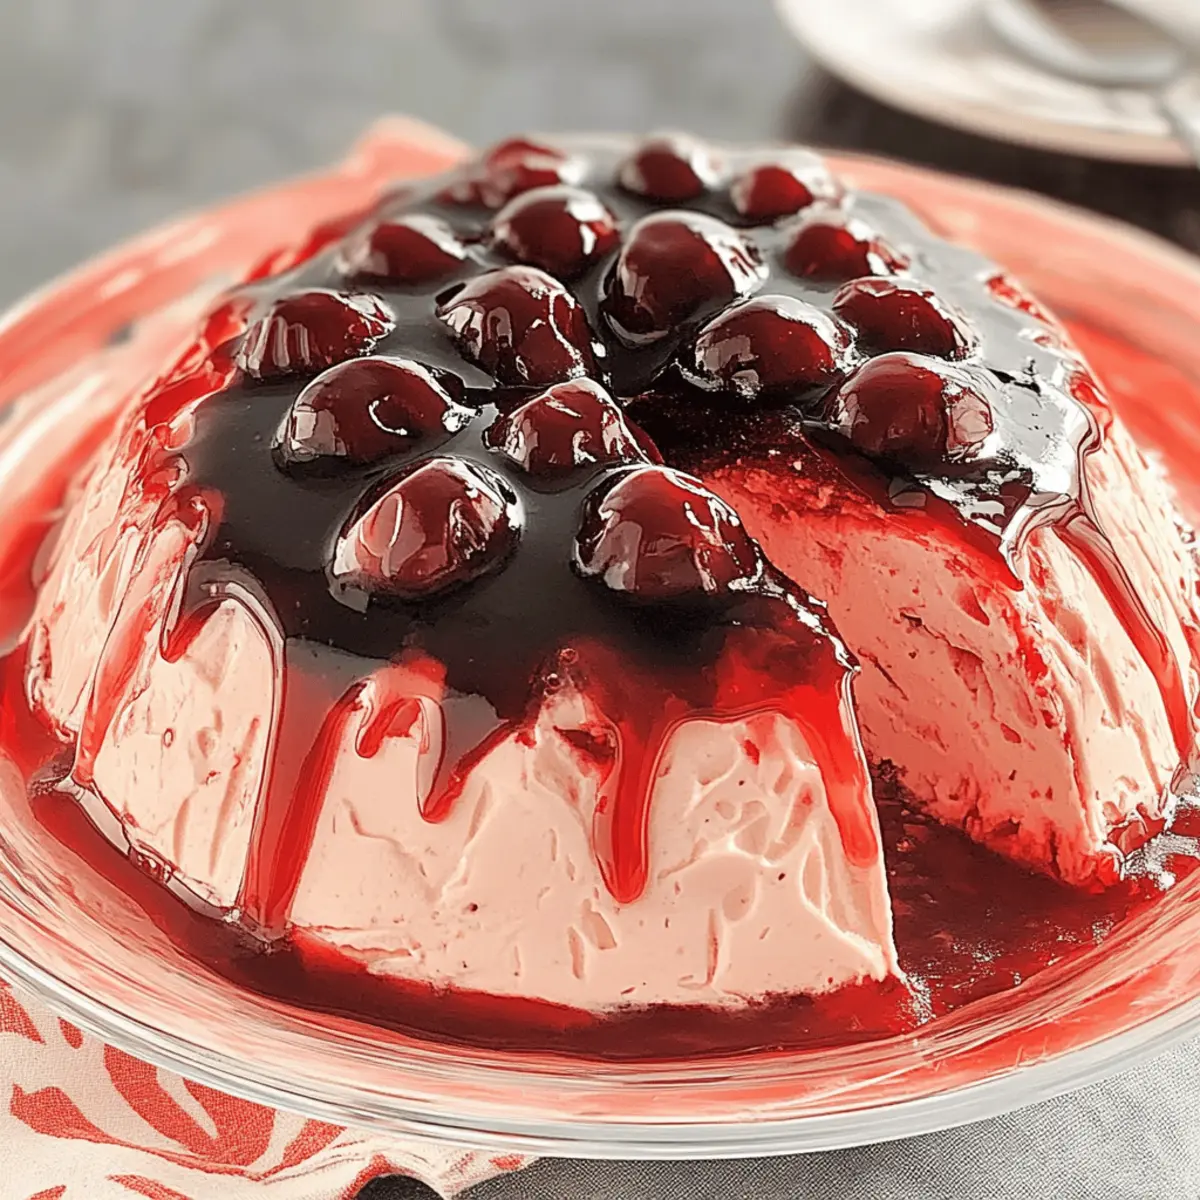
As I stood in the kitchen, the summer sun streaming through the window, I couldn’t help but feel a wave of nostalgia wash over me at the thought of Cherry Chiffon Gelatin. This vibrant, airy dessert evokes memories of family gatherings and potlucks, where smiles and laughter are served alongside every dish. The allure of this Cherry Chiffon Gelatin is not just its visual charm, but also the delightful balance of creamy whipped topping and the sweet burst of cherry flavor. In under 10 minutes, you can whip up this refreshing treat that’s perfect for any occasion—whether it’s a casual barbecue or a festive celebration. Plus, its make-ahead nature allows you to simply chill and enjoy the compliments when it’s finally time to serve. Are you ready to indulge in this light and satisfying dessert? Let’s dive into the recipe!
Why is Cherry Chiffon Gelatin a Must-Try?
Quick and Effortless: This recipe comes together in under 10 minutes, letting you create a delightful dessert without spending hours in the kitchen.
Nostalgic Appeal: Reminiscent of childhood family gatherings and potlucks, this Cherry Chiffon Gelatin brings comfort and joy to any table.
Versatile Flavor Combinations: While the recipe showcases cherry, you can easily swap in fresh fruits like strawberries or blueberries for a unique twist.
Visually Stunning: The vibrant colors and fluffy layers make this dessert a showstopper at parties, guaranteed to impress your guests.
Light Yet Satisfying: With only about 163 calories per serving, it offers a guilt-free treat that still feels indulgent, perfect for summer gatherings.
Make-Ahead Convenience: Prepare this delightful treat in advance, allowing you to chill it until it’s time to serve, taking the stress out of entertaining.
Cherry Chiffon Gelatin Ingredients
For the Gelatin Base
• Cherry Gelatin – 2 packages (3 ounces each) to create the vibrant, sweet flavor that defines this Cherry Chiffon Gelatin.
• Boiling Water – 1-1/2 cups total; this is crucial for properly dissolving the gelatin for a smooth texture.
• Cold Water – 2 cups total; essential for setting the gelatin correctly—measure accurately for best results.
For the Fruit Layer
• Dark Sweet Cherries – 1 can (15 ounces), well-drained; they add juicy texture and fruitiness to your gel dessert.
For the Creamy Layer
• Whipped Topping – 2 cups; this gives the dessert its fluffy, creamy texture—opt for homemade for an extra special touch.
Step‑by‑Step Instructions for Cherry Chiffon Gelatin
Step 1: Dissolve Cherry Gelatin
In a large mixing bowl, pour one package of cherry gelatin and add 3/4 cup of boiling water. Stir vigorously for about 2 minutes until the gelatin completely dissolves and you achieve a clear liquid. Then, incorporate 1 cup of cold water, mixing gently. Refrigerate the mixture for roughly 1 hour, or until it becomes slightly thickened and starts to set.
Step 2: Add Cherries
Once the gelatin has partially set, gently fold in the well-drained dark sweet cherries using a spatula. This step infuses a delightful fruity texture into your Cherry Chiffon Gelatin, ensuring even distribution of cherries throughout. Be careful not to overmix, as you want to keep some of the gelatin’s structure. Return the mixture to the refrigerator while you prepare the next layer.
Step 3: Prepare the Mold
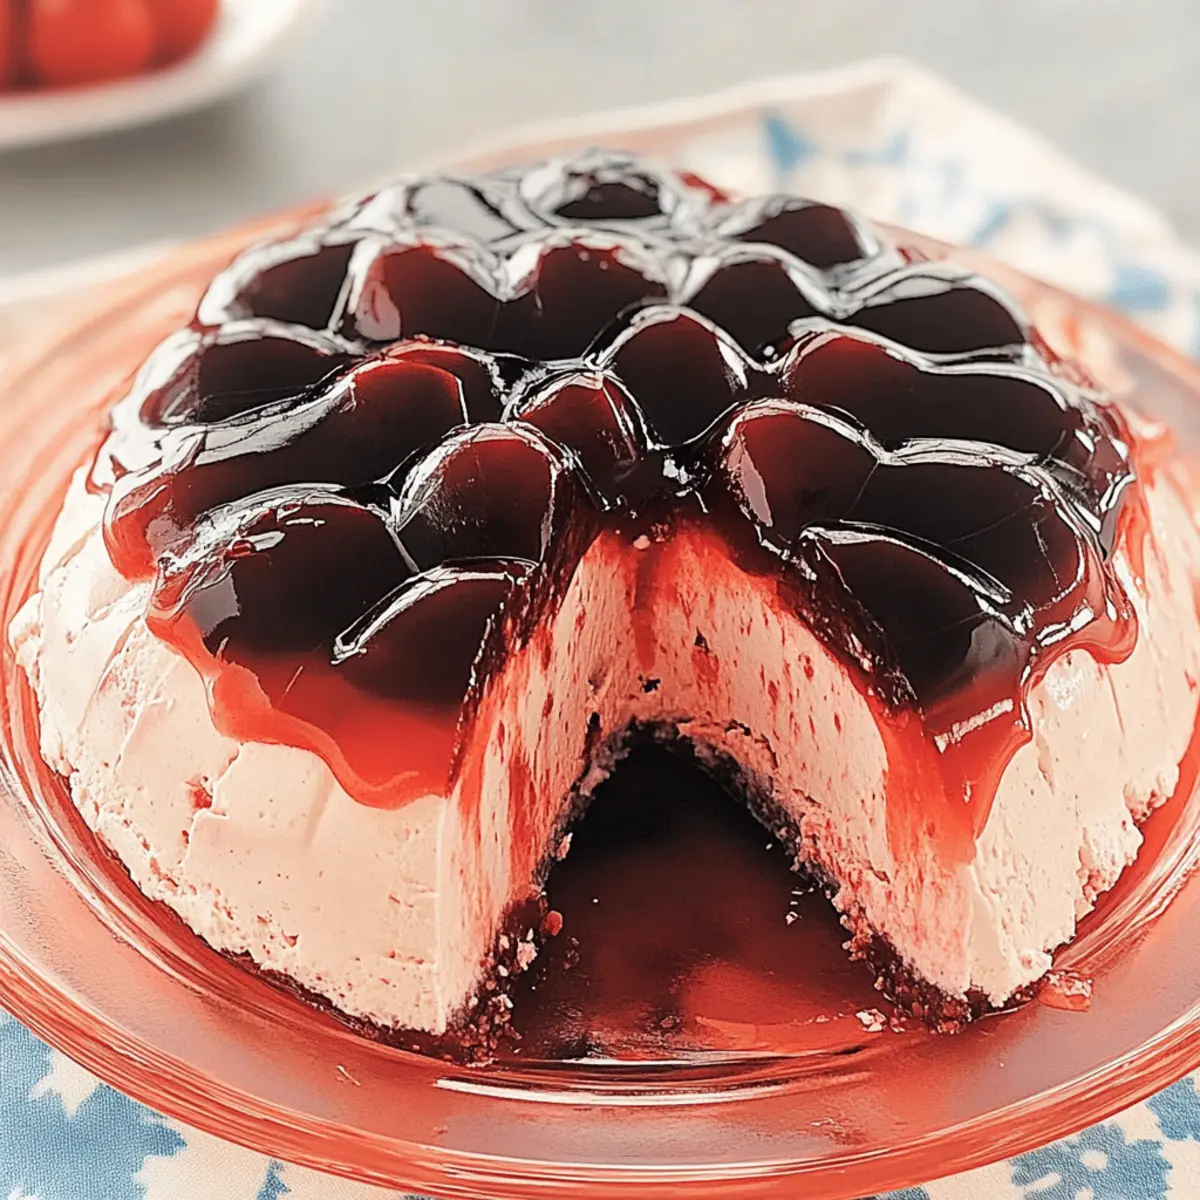
Spray a 7-cup mold with a light coating of cooking spray to prevent sticking during unmolding. Carefully pour the cherry and cherry gelatin mixture into the prepared mold. To create a beautiful presentation, make sure the layer is even. Chill the mold for about 1 hour, or until the mixture is firm enough to hold its shape when moved.
Step 4: Dissolve Remaining Gelatin
In a separate bowl, dissolve the second package of cherry gelatin in the remaining 3/4 cup of boiling water, stirring until completely clear. Then, add the remaining 1-1/4 cups of cold water, mixing well to combine. Let this mixture cool slightly before moving on, but do not refrigerate yet; it should be ready to be folded into the whipped topping shortly.
Step 5: Incorporate Whipped Topping
In a mixing bowl, gently fold in 2 cups of whipped topping into the cooled gelatin mixture. Use a spatula for a soft, airy texture, ensuring there are no lumps. This step adds lightness to your Cherry Chiffon Gelatin. Once fully combined, place this mixture over the chilled first layer in the mold, smoothing the top evenly.
Step 6: Final Chill
Return the filled mold to the refrigerator and allow it to chill for an additional 4 hours, or until completely firm. This firmness ensures it will hold its shape when served. Keep it covered to protect the texture and prevent any absorption of odors from the fridge.
Step 7: Unmold and Serve
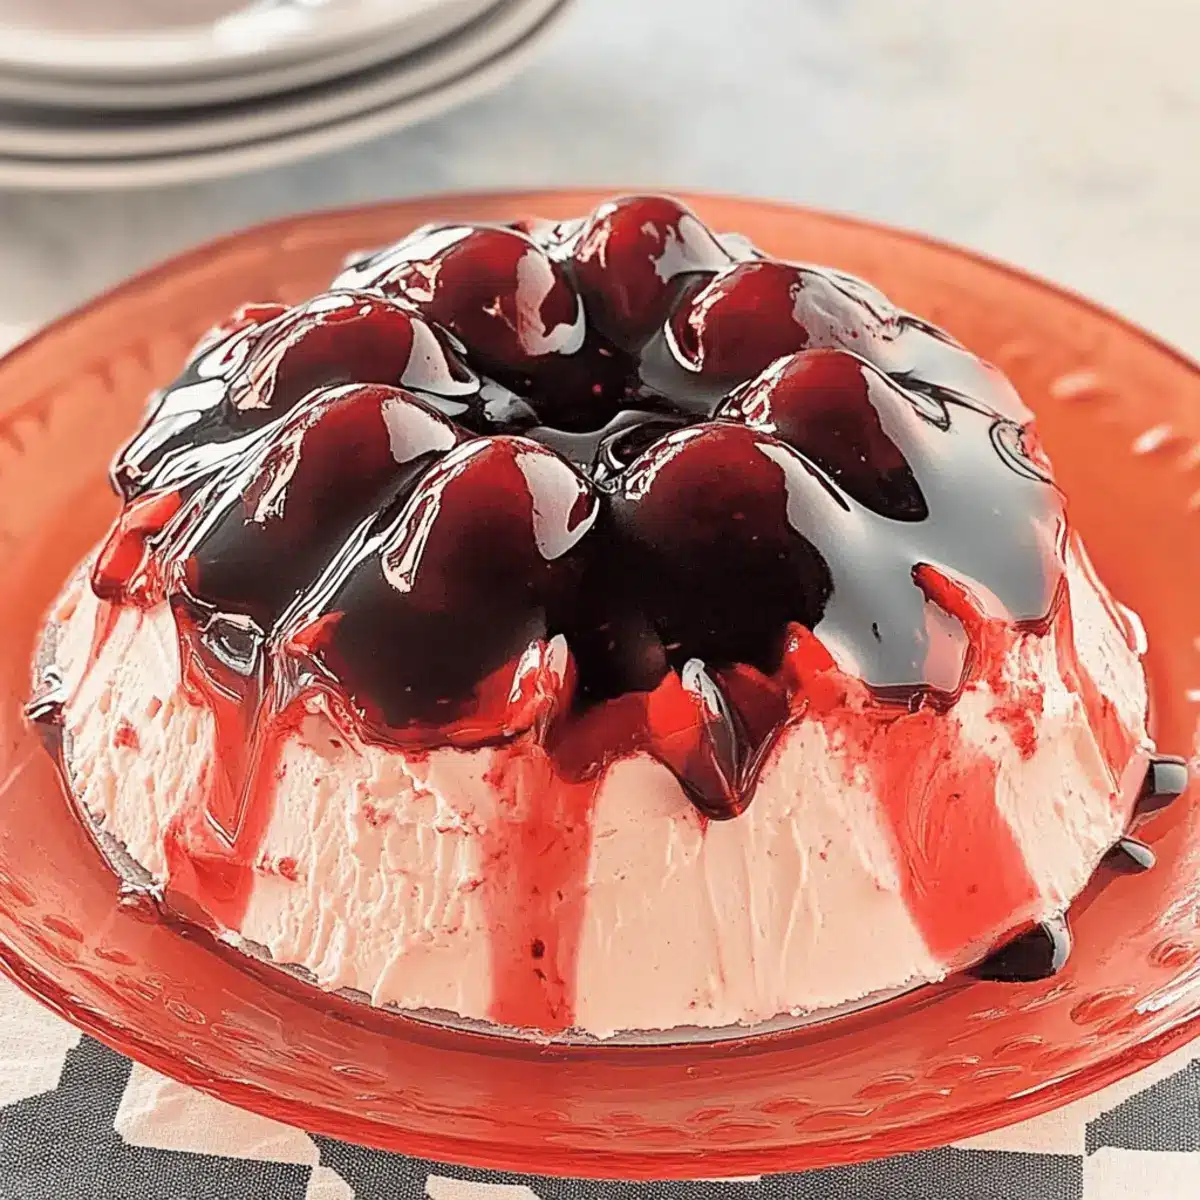
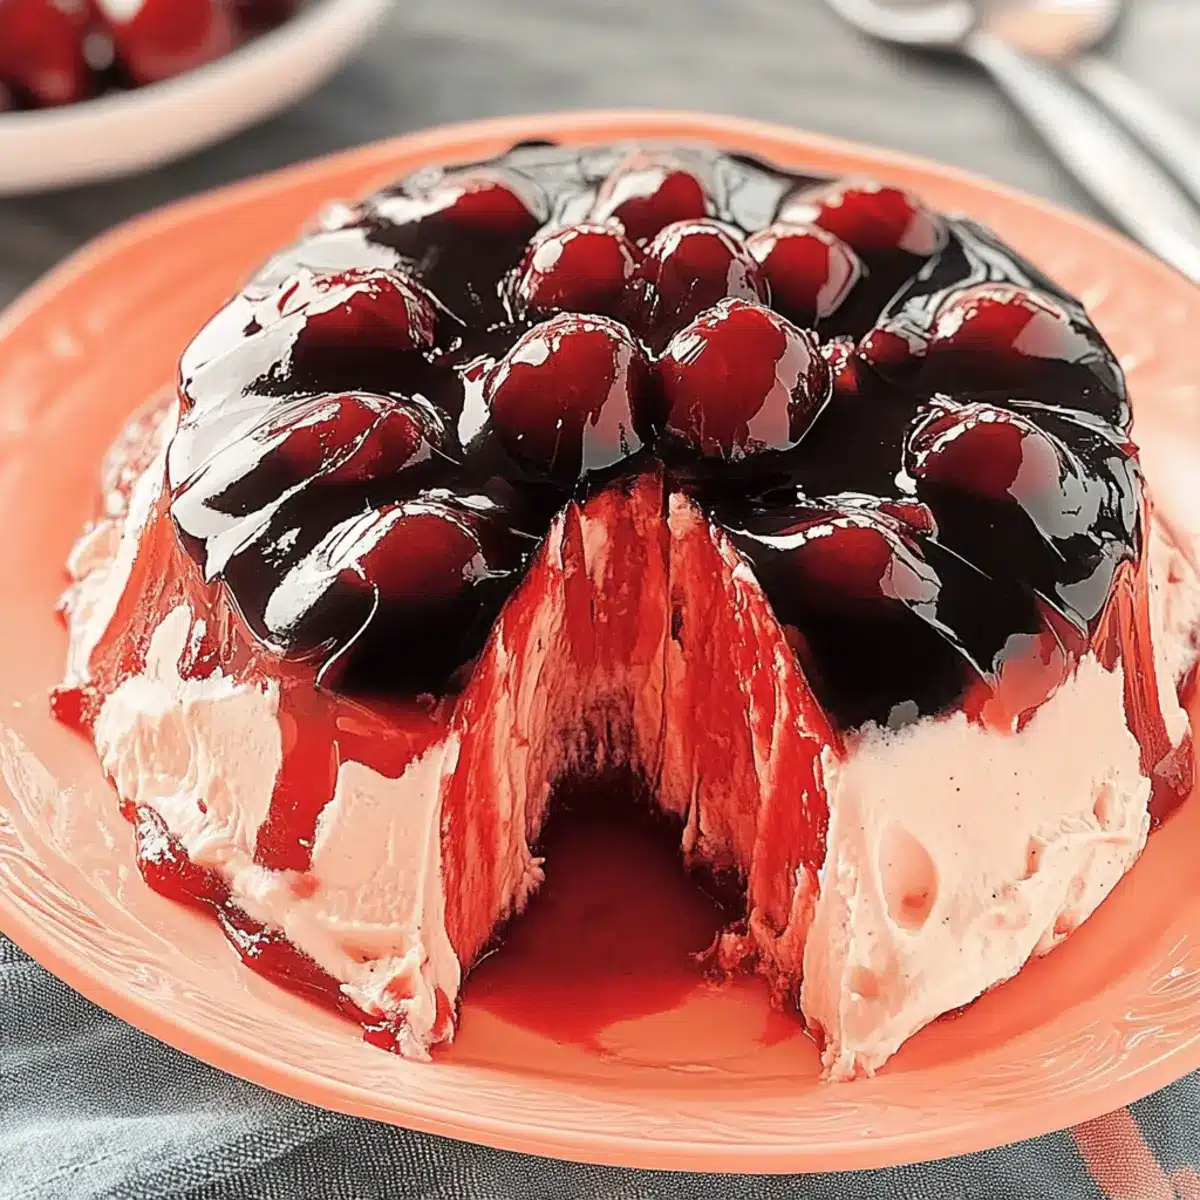
To serve, carefully run a butter knife around the edges of the mold to loosen the gelatin. Invert the mold onto a serving platter, gently shaking it to release the Cherry Chiffon Gelatin. For an added touch, you may garnish with fresh cherries or a dollop of whipped cream, bringing this nostalgic dessert to a delightful conclusion.
Expert Tips for Cherry Chiffon Gelatin
-
Dissolve Properly: Ensure the gelatin is completely dissolved in boiling water to prevent a gritty texture in your Cherry Chiffon Gelatin.
-
Use Quality Ingredients: For the best flavor, opt for quality cherry gelatin and fresh, well-drained cherries; this makes a noticeable difference in taste.
-
Watch Chilling Times: Pay close attention to chilling times; under-chilling could lead to a runny texture, while over-chilling might make it difficult to cut.
-
Grease the Mold: Lightly coat your mold with cooking spray to ensure a smooth unmolding process. This is key for a beautiful presentation.
-
Customize Flavors: Don’t hesitate to explore variations; try different fruits or flavored gelatins to make your Cherry Chiffon Gelatin unique!
Make Ahead Options
These Cherry Chiffon Gelatin preparations are ideal for busy home cooks! You can easily prepare the gelatin layers up to 24 hours in advance, allowing for stress-free entertaining. Begin by completing steps 1 through 3, chilling the mold as directed until firm. At this point, cover the mold tightly with plastic wrap to maintain freshness and prevent absorption of any fridge odors. Then, complete the dessert by folding the whipped topping into the second gelatin layer, spreading it over the set cherry layer. Chill for an additional 4 hours or until firm before serving, and you’ll enjoy this light, refreshing dessert just as delicious as if made fresh on the spot!
Cherry Chiffon Gelatin Variations & Substitutions
Feel free to let your imagination run wild and customize this luscious dessert to match your cravings!
- Fresh Fruit: Swap dark sweet cherries for strawberries or blueberries to introduce a refreshing twist and vibrant colors.
- Flavor Exploration: Substitute cherry gelatin with raspberry or lime gelatin for a unique flavor profile, experimenting with layers of taste.
- Homemade Whipped Cream: Replace whipped topping with homemade whipped cream for a fresh, richer taste that enhances the dessert’s texture.
- Added Crunch: Toss in some crushed graham crackers or nuts into the whipped topping layer for a delightful crunch and layer of texture.
- Citrus Zing: For a zesty touch, add a splash of lemon or lime juice to the gelatin mixture, brightening the flavor beautifully. This small change can completely elevate the dessert!
- Dairy-Free Option: Use a coconut whipped topping instead of traditional whipped cream for a creamy, dairy-free alternative that’s just as delightful.
- Fruity Layers: Create a beautiful layered effect by using different gelatin flavors for each layer, such as alternating cherry and orange or peach. It’s as much about aesthetics as it is about flavor!
- Vintage Vibe: For a throwback to retro potluck days, consider using a combination of flavored jello with fruit cocktail pieces for a fun, nostalgic twist that brings back family memories.
Remember, this Cherry Chiffon Gelatin is a canvas waiting for your creative touch. If you’re curious about other fruity combinations, check out my delightful Creamy Blueberry Gelatin Salad or the refreshing Apricot Gelatin Salad. Happy experimenting!
What to Serve with Cherry Chiffon Gelatin
Imagine a vibrant summer gathering where this delightful dessert graces your table, inviting smiles and sweet moments.
-
Creamy Fruit Salad: A mix of seasonal fruits drizzled with a light yogurt dressing complements the sweetness, adding freshness and crunch.
-
Savory Cheese Platter: Pairing with an assortment of cheeses balances the dessert’s sweetness and enhances flavor contrasts. A cheddar or goat cheese would be delightful alongside.
-
Lightly Roasted Veggies: Seasoned roasted vegetables, such as asparagus or bell peppers, provide a perfect savory counterbalance to the sugary notes of the gelatin.
-
Grilled Chicken Skewers: Juicy chicken skewers seasoned with herbs bring a hearty element to your meal, making the combination feel complete and satisfying.
-
Sparkling Lemonade: The citrusy zing of sparkling lemonade is a refreshing drink that harmonizes beautifully with the sweet cherry notes, quenching your thirst on warm days.
-
Vanilla Ice Cream: A scoop of creamy vanilla ice cream on the side elevates your dessert experience, adding an indulgent touch to every bite of the chiffon.
-
Chocolate-Dipped Strawberries: Elegant and indulgent, these add a touch of romance to the meal and a delightful contrast to the lightness of the gelatin.
-
Lemon Poppy Seed Muffins: Lightly sweet and nutty muffins make for an inviting side that pairs perfectly with the Cherry Chiffon Gelatin while serving as a charming brunch option.
How to Store and Freeze Cherry Chiffon Gelatin
Refrigerator: Store any leftovers in an airtight container for up to 3 days. Covering the dessert helps maintain its light texture and prevents it from absorbing fridge odors.
Freezer: For longer storage, you can freeze Cherry Chiffon Gelatin for up to 1 month. Wrap it tightly in plastic wrap and then in aluminum foil to prevent freezer burn.
Thawing: To enjoy your frozen Cherry Chiffon Gelatin, move it to the refrigerator for several hours to thaw slowly. Avoid refreezing after thawing for the best texture.
Serving After Storage: Once thawed, the gelatin may need a gentle stir; be mindful when serving to keep that delightful creamy layer intact!
Cherry Chiffon Gelatin Recipe FAQs
What should I look for when selecting cherries?
Absolutely! When choosing cherries, look for well-colored, plump fruit with no dark spots. If using canned cherries, ensure the can is not dented and select those packed in juice rather than syrup for better flavor and less sweetness.
How should I store leftover Cherry Chiffon Gelatin?
You can easily store any leftovers in an airtight container in the refrigerator for up to 3 days. Be sure to cover it tightly to maintain its airy texture and prevent it from absorbing any odors.
Can I freeze Cherry Chiffon Gelatin?
Certainly! You can freeze your Cherry Chiffon Gelatin for up to 1 month. To do this, wrap it tightly in plastic wrap and then wrap it again in aluminum foil to prevent freezer burn. When you’re ready to enjoy it, thaw it slowly in the refrigerator for several hours before serving.
What if my gelatin isn’t setting properly?
Very! If your gelatin isn’t setting, it might be due to insufficient chilling time or not dissolving the gelatin completely in boiling water. Make sure to stir the gelatin well until it’s fully dissolved. If it’s been sitting out too long and too warm, it may need extra time in the fridge. If it still hasn’t set, consider reheating it gently (while adding a bit more gelatin if needed) and then let it chill again.
Are there any dietary considerations I should keep in mind?
Great question! If you’re serving this to guests with dietary restrictions, be sure to use a whipped topping that’s dairy-free if someone is lactose intolerant. Additionally, check the gelatin packaging for any ingredients that might trigger allergies. Most cherry gelatins are gluten-free, but always read the labels to be safe.
What’s the best way to unmold my Cherry Chiffon Gelatin?
To unmold your Cherry Chiffon Gelatin with ease, use a butter knife to gently run it around the edges of the mold to loosen it. Then, invert the mold onto a serving platter; a gentle shake can help release the dessert. If it seems stuck, you can dip the mold in warm water for a few seconds before trying again. Happy serving!
Delightful Cherry Chiffon Gelatin for a Refreshing Treat
Ingredients
Equipment
Method
- In a large mixing bowl, pour one package of cherry gelatin and add 3/4 cup of boiling water. Stir vigorously for about 2 minutes until the gelatin completely dissolves and you achieve a clear liquid. Then, incorporate 1 cup of cold water, mixing gently. Refrigerate the mixture for roughly 1 hour, or until it becomes slightly thickened and starts to set.
- Once the gelatin has partially set, gently fold in the well-drained dark sweet cherries using a spatula. This step infuses a delightful fruity texture into your Cherry Chiffon Gelatin, ensuring even distribution of cherries throughout. Be careful not to overmix.
- Spray a 7-cup mold with a light coating of cooking spray to prevent sticking during unmolding. Carefully pour the cherry and cherry gelatin mixture into the prepared mold. Chill for about 1 hour, or until the mixture is firm enough to hold its shape.
- In a separate bowl, dissolve the second package of cherry gelatin in the remaining 3/4 cup of boiling water, stirring until completely clear. Then add the remaining 1-1/4 cups of cold water. Let this mixture cool slightly before proceeding.
- In a mixing bowl, gently fold in 2 cups of whipped topping into the cooled gelatin mixture. Once combined, place this mixture over the chilled first layer in the mold, smoothing the top evenly.
- Return the filled mold to the refrigerator for an additional 4 hours, or until completely firm. Keep it covered to protect the texture.
- To serve, carefully run a butter knife around the edges of the mold to loosen the gelatin. Invert the mold onto a serving platter and garnish with fresh cherries or a dollop of whipped cream.
Leave a Reply