
The moment the oven timer dings, a sweet aroma fills my kitchen, whisking me back to childhood springs spent crafting delightful confections. Today, I’m thrilled to share my rich recipe for Chocolate Meringue Easter Nests. These whimsical treats are not just a feast for the palate; they’re a creative twist on classic meringue that’s perfect for festive gatherings. With a crunchy exterior that gives way to a melt-in-your-mouth center, these nests are simplicity at its finest. Quick to prepare and easily customizable, they promise to bring joy to your holiday celebrations. Whether you choose to fill them with luscious whipped cream or rich chocolate ganache, topped with colorful mini eggs, these delightful nests will spark happiness in every bite. Are you ready to elevate your Easter dessert game? Let’s dive in!

Why Are Chocolate Meringue Nests Irresistible?
Festive Appeal: Perfect for Easter, these nests add a touch of whimsy to your spring celebrations.
Unforgettable Texture: Experience the delightful crunch paired with a soft, airy center that simply melts in your mouth.
Easy Recipe: With just a few simple ingredients, you’ll impress guests without spending hours in the kitchen.
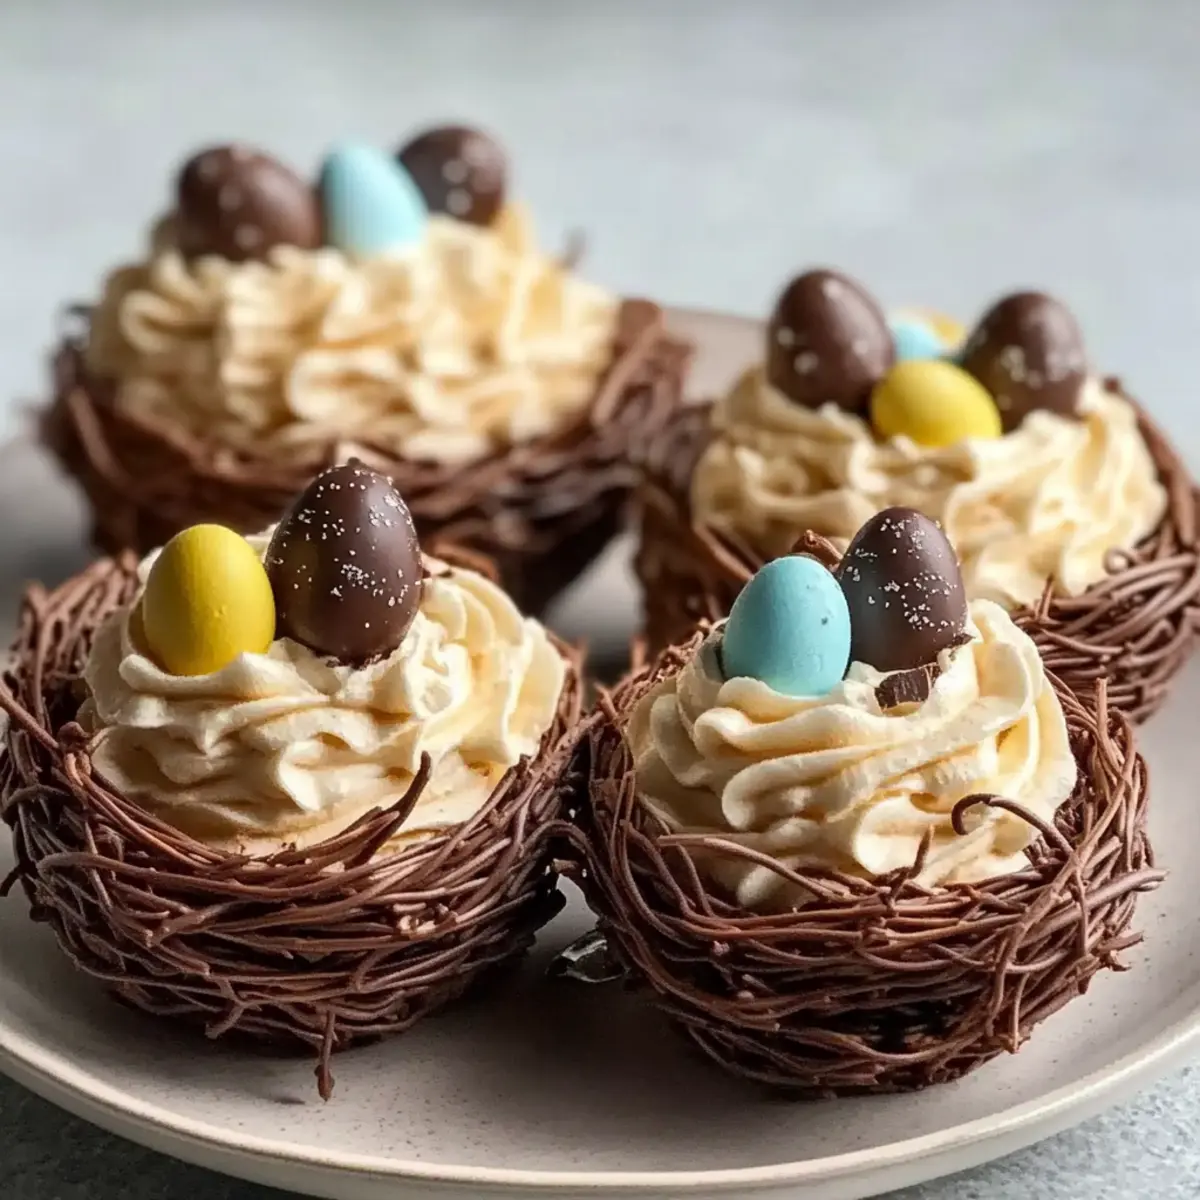
Customizable Delight: Fill with creamy ganache or whipped cream, and top with colorful candies for a personal touch.
Crowd Favorite: These treats are sure to delight both kids and adults, making them perfect for family gatherings or festive parties. Don’t forget to check out other fun desserts like Chocolate Chip Banana Bars for your sweet cravings!
Chocolate Meringue Easter Nests Ingredients
For your delicious Chocolate Meringue Easter Nests, gather these key ingredients:
For the Meringue
- Egg Whites – Essential for structure; make sure they’re room temperature for the best results.
- Granulated Sugar – Provides sweetness and stability; vital for achieving those stiff peaks in your meringue.
- Cream of Tartar – Helps stabilize egg whites; can be swapped with white vinegar if needed.
- Salt – Balances sweetness and enhances flavor for a delightful taste.
- Vanilla Extract – Adds a warm flavor; optional but enhances the overall taste.
- Cocoa Powder – Infuses your nests with rich chocolate flavor; opt for unsweetened for the best outcome.
For the Topping
- Semi-Sweet Chocolate – Ideal for drizzling over your nests; can be substituted with dark or white chocolate if desired.
- Whipped Cream or Chocolate Ganache – Your choice for the delicious filling; both add creaminess and flavor.
- Mini Chocolate Eggs – Perfect for garnishing; feel free to use any candy for a fun twist.
These Chocolate Meringue Easter Nests come together with these ingredients, promising both aesthetic beauty and mouthwatering delight—perfect for your spring celebrations!
Step‑by‑Step Instructions for Chocolate Meringue Easter Nests
Step 1: Preheat and Prepare
Begin by preheating your oven to 225°F (110°C). While it heats, line a baking sheet with parchment paper, ensuring it’s secured for a smooth meringue placement. This step is crucial for your Chocolate Meringue Easter Nests, giving them a stable base to bake on.
Step 2: Whisk the Egg Whites
In a clean mixing bowl, use an electric mixer to whisk the room temperature egg whites until they become foamy and soft peaks form, taking about 2-3 minutes. Slowly add in the cream of tartar and salt while continuing to whisk. This will ensure your meringue has a lovely, stable framework as it prepares for sweetness.
Step 3: Add Sugar Gradually
With the mixer on medium speed, gradually incorporate the granulated sugar, one tablespoon at a time. Continue beating for 5-7 minutes until the mixture turns thick, glossy, and can hold stiff peaks. This texture is essential for creating light and airy Chocolate Meringue Easter Nests that will hold their shape beautifully.
Step 4: Fold in Flavors
Cautiously fold in the vanilla extract and unsweetened cocoa powder using a rubber spatula. Do this gently to maintain the air incorporated in the meringue. This is where your nests gain their delightful chocolate flavor, adding to the overall whimsical experience they promise.
Step 5: Pipe Nest Shapes
Transfer the meringue mixture into a piping bag fitted with a large round tip. On the prepared baking sheet, pipe 3-inch circles, creating a nest shape with higher edges. Aim for a rough nest structure as this will add character to your finished Chocolate Meringue Easter Nests while ensuring ample space for fillings.
Step 6: Bake with Care
Place the baking sheet in the preheated oven and bake for 1 hour. Once the time is up, turn off the oven but leave the meringues inside to cool gradually for another hour. This gentle cooling period helps prevent cracking and ensures a delicate texture throughout your nests.
Step 7: Drizzle and Fill
After cooling, melt the semi-sweet chocolate in a microwave or double boiler until smooth. Drizzle this chocolate over each meringue nest, creating a decorative and delicious touch. Then, fill the center of each nest with whipped cream or rich chocolate ganache, letting your creativity shine through.
Step 8: Garnish for Festivity
Top each filled nest with colorful mini chocolate eggs or any seasonal candies you prefer, adding that festive flair perfect for Easter. The vibrant decorations contrast beautifully with the meringue, making your Chocolate Meringue Easter Nests as visually enticing as they are delicious.

How to Store and Freeze Chocolate Meringue Easter Nests
- Room Temperature: Unfilled nests can be stored at room temperature in an airtight container for up to 3 days. Keep them away from humidity to maintain texture.
- Fridge: Filled nests should be kept in the refrigerator and are best enjoyed the same day to prevent sogginess.
- Freezer: For longer storage, unfilled nests can be frozen in an airtight container for up to 1 month. Thaw in the fridge before filling.
- Reheating: If your meringues feel sticky after cooling, you can gently reheat them in the oven at a low temperature to restore their crunch before finishing your Chocolate Meringue Easter Nests.
Expert Tips for Chocolate Meringue Easter Nests
- Grease-Free Gear: Ensure bowls and utensils are completely grease-free. Any residue can prevent egg whites from reaching their full volume.
- Slow Cooling: Avoid rapid temperature changes during cooling. Open the oven door slightly after baking to prevent cracking of your Chocolate Meringue Easter Nests.
- Sticky Meringue Fix: If your meringue is sticky after cooling, put them back in the oven for an additional 15-20 minutes at a low temperature to dry them out.
- Quick Assembly: Fill the nests with whipped cream or ganache just before serving to keep them from getting soggy.
- Sift Cocoa: To avoid clumps, always sift your cocoa powder before folding it into the meringue mix. This ensures a smoother texture in your nests.
Chocolate Meringue Easter Nests Variations
Feel free to personalize these delightful nests to make them your own with a variety of swaps and twists!
- Dairy-Free: Use coconut cream instead of whipped cream for a vegan-friendly filling. This adds a subtle coconut flavor while keeping it delightfully rich.
- Flavor Boost: Add a splash of almond or hazelnut extract to the meringue for an extra layer of flavor that’ll surprise your taste buds.
- Seasonal Toppings: Replace the mini chocolate eggs with pastel-colored jellybeans or gummy candies for a fun, festive twist. Your nests will be just as cheerful with this sugary substitute!
- Spicy Kick: For those who love a bit of heat, sprinkle a pinch of cayenne pepper into the cocoa mixture to give a surprising depth of flavor. It’s an unexpected yet delightful twist!
- Nutty Texture: Fold in crushed nuts, like pistachios or hazelnuts, into the whipped cream or ganache for an added crunch and flavor contrast. The bit of crunch will pair wonderfully with the soft meringue!
- Vegan Ganache: Create a rich vegan ganache using dark chocolate and almond milk. This will keep your nests indulgent while ensuring everyone can enjoy them.
- Dark Chocolate Cocoa: Choose a high-quality dark chocolate cocoa powder; it provides a richer taste that elevates the nests’ chocolate flavor to another level. If you’re a chocolate lover, this option is sure to satisfy!
- Garnish Ideas: Experiment with edible flowers or colorful sprinkles on top of your nests for a whimsical and beautiful presentation. They make for stunning showstoppers at any spring gathering!
Want to try more delicious desserts? Don’t miss out on these fantastic recipes: Chocolate Chip Banana Bars or indulge in the rich taste of Dark Chocolate Coffin!
What to Serve with Chocolate Meringue Easter Nests
Elevate your holiday feast by pairing these whimsical treats with delightful sides and drinks that enhance their festive charm.
- Fresh Berries: A medley of strawberries, blueberries, and raspberries adds a vibrant, juicy contrast to the sweetness of the nests.
- Vanilla Ice Cream: Creamy and indulgent, the rich flavor of vanilla ice cream beautifully complements the light and airy texture of the meringues.
- Coffee or Espresso: The bold notes of coffee balance the sweetness, providing a sophisticated backdrop that enhances the overall dessert experience.
- Minty Pea Salad: Bright and refreshing, a cool salad can cut through the rich flavors, adding a hint of green that celebrates the spring season.
- Sparkling Lemonade: A bubbly, citrusy drink brings a festive sparkle to the table, making it a perfect match for the joyful Chocolate Meringue Easter Nests.
- Chocolate Fondue: For chocolate lovers, drizzle warm chocolate over your nests for an interactive dessert experience that everyone will adore.
- Lemon Tart: Bright and tangy, the tartness of lemon balances the sweetness of the meringues, creating a delightful contrast that’s refreshing.
Make Ahead Options
These Chocolate Meringue Easter Nests are perfect for meal prep enthusiasts! You can whip up the meringue nests up to 3 days in advance, storing them in an airtight container to keep them crisp. Just remember, don’t fill the nests until you’re ready to serve; this helps maintain their delicate texture and prevents any sogginess. You can also melt chocolate for drizzling and prepare the whipped cream or ganache up to 24 hours ahead—store them in the refrigerator for freshness. When it’s time to impress, simply drizzle the nests with chocolate, fill them with the creamy goodness, and garnish with mini chocolate eggs. Enjoy easy prep while delighting your guests with these whimsical treats!
Chocolate Meringue Easter Nests Recipe FAQs
What type of egg whites should I use for the meringue?
Absolutely! I recommend using room temperature egg whites for making Chocolate Meringue Easter Nests. They whip up to a greater volume and create a more stable meringue. Always make sure your mixing bowl is free from any grease, as that can interfere with the whipping process.
How should I store the filled and unfilled meringue nests?
Unfilled nests can be stored at room temperature in an airtight container for up to 3 days, away from humidity to keep their texture intact. However, filled nests are best kept in the refrigerator and should ideally be consumed the same day to prevent sogginess.
Can I freeze Chocolate Meringue Easter Nests?
Yes, you can! Unfilled nests can be frozen in an airtight container for up to 1 month. To freeze them, make sure each nest is completely cooled. Simply place them in a single layer within the container. When you’re ready to use them, thaw in the fridge and fill them with cream or ganache just before serving.
What should I do if my meringue is sticky after baking?
Very! If your meringue feels sticky after cooling, don’t worry—this can happen. Simply place them back in the oven for an additional 15-20 minutes at a low temperature (around 200°F or 93°C) to help dry them out. This adjustment will restore that fantastic crunchy texture you want in your Chocolate Meringue Easter Nests.
Are these nests safe for pets and allergy-sensitive individuals?
Definitely! Since the main ingredients are egg whites and sugar, Chocolate Meringue Easter Nests are vegetarian-friendly. However, if you or your guests have allergies to eggs or dairy (such as from whipped cream), consider substituting with dairy-free alternatives. Always check any decorative candies, like mini chocolate eggs, for allergens if you know someone has dietary restrictions.
What can I do if I don’t have cream of tartar?
You can easily substitute cream of tartar with white vinegar in a 1:1 ratio! It helps stabilize the egg whites just like cream of tartar does, ensuring your Chocolate Meringue Easter Nests turn out perfectly fluffy. Remember, every ingredient has its purpose—so embrace these little swaps!

Chocolate Meringue Easter Nests for a Whimsical Spring Treat
Ingredients
Equipment
Method
- Preheat your oven to 225°F (110°C) and line a baking sheet with parchment paper.

- Whisk the egg whites in a clean mixing bowl until foamy and soft peaks form, about 2-3 minutes.
- Gradually incorporate the granulated sugar, one tablespoon at a time, beating for 5-7 minutes until thick and glossy.
- Fold in the vanilla extract and cocoa powder gently using a rubber spatula.
- Transfer the meringue to a piping bag and pipe 3-inch circles on the prepared baking sheet.
- Bake for 1 hour, then turn off the oven and leave the meringues inside to cool for an hour.
- Melt the semi-sweet chocolate and drizzle over the cooled meringue nests, then fill with whipped cream or ganache.
- Top each nest with mini chocolate eggs or any seasonal candies.
Leave a Reply