
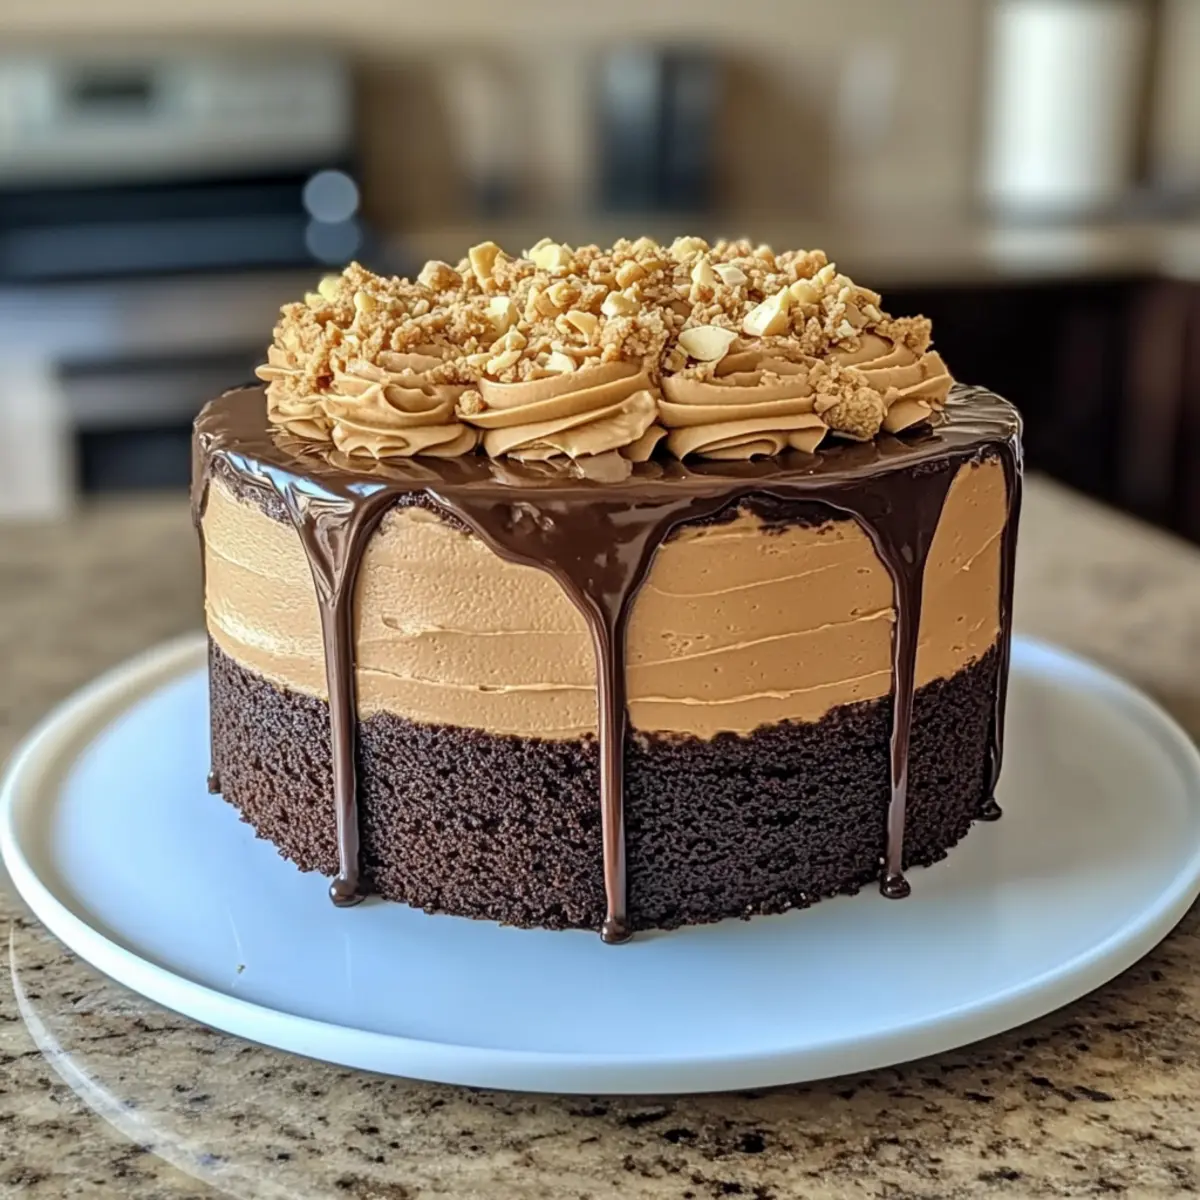
As I savored the last bite of a rich, chocolate dessert at a cozy café, I couldn’t shake the idea that I could recreate that bliss at home. Enter the Chocolate Peanut Butter Mousse Cake—a dessert that effortlessly combines the nostalgic comfort of chocolate cake with the creamy decadence of peanut butter mousse. This showstopper not only impresses with its stunning layers but is also super easy to make, making it the perfect treat for any occasion. Plus, it’s incredibly versatile; whether you’re looking for a gluten-free option or a lighter version to suit your dietary needs, this cake has got you covered. So, are you ready to whip up a dessert that will leave everyone asking for seconds? Let’s dive in!
Why is this cake a must-try?
Indulgence Awaits: Dive into layers of rich chocolate and creamy peanut butter that create an unforgettable taste experience.
Customizable Delight: Easily adapt this recipe to meet your dietary needs, whether you opt for gluten-free flour or reduced sugar alternatives.
Time-Saving Twist: With simple steps and minimal ingredients, you’ll have a show-stopping dessert in no time, leaving more moments to enjoy with loved ones.
Crowd-Pleasing Magic: Ideal for gatherings, this cake is sure to impress friends and family with its gorgeous layers and delightful flavors. Consider serving it alongside some delectable Garlic Butter Lobster for an elevated dinner experience!
Versatile Variations: Feeling adventurous? Substitute almond butter or try a dairy-free coconut cream mousse to suit your preferences.
Get ready to transform dessert time into something truly special!
Chocolate Peanut Butter Mousse Cake Ingredients
• Discover the foundation of your new favorite dessert!
For the Cake
- All-purpose flour – Provides structure to the cake. Substitution: Use gluten-free flour blend for gluten-free version.
- Unsweetened cocoa powder – Adds rich chocolate flavor. Note: Ensure it’s unsweetened for balanced taste.
- Baking powder – Helps the cake rise.
- Baking soda – Works with baking powder for leavening.
- Salt – Enhances flavor.
- Unsalted butter – Softened for moisture and richness. Note: For a lighter version, substitute with low-fat cream cheese.
- Granulated sugar – Sweetens the cake. Substitution: Use sugar alternatives if needed.
- Large eggs – Provide structure and moisture. Note: Use egg replacements for vegan option.
- Vanilla extract – Adds flavor.
- Buttermilk – Adds moisture and tang. Substitution: Use plain yogurt or dairy-free yogurt.
For the Mousse
- Heavy cream – For whipping into mousse.
- Creamy peanut butter – Main flavor of the mousse. Note: Natural peanut butter can be used for a healthier option.
- Powdered sugar – Sweetens the mousse.
For the Ganache
- Semi-sweet chocolate chips – For the ganache topping.
- Heavy cream (for ganache) – To make the ganache smooth.
Get ready to indulge in the incredible layers of this Chocolate Peanut Butter Mousse Cake, designed for everyone to enjoy, from chocolate lovers to those with dietary preferences!
Step‑by‑Step Instructions for Chocolate Peanut Butter Mousse Cake
Step 1: Preheat and Prepare
Begin by preheating your oven to 350°F (175°C) and generously greasing an 8-inch round cake pan with butter or non-stick spray. This preparation is essential to ensure the chocolate cake slides out effortlessly once baked. For added assurance, consider lining the bottom with parchment paper to avoid any sticking.
Step 2: Mix Dry Ingredients
In a spacious mixing bowl, whisk together the all-purpose flour, unsweetened cocoa powder, baking powder, baking soda, and salt until thoroughly combined. This step creates a uniform blend that will ensure your Chocolate Peanut Butter Mousse Cake rises beautifully. Take a moment to enjoy the rich chocolate aroma that fills your kitchen as you mix!
Step 3: Cream Butter and Sugar
Using an electric mixer, beat the softened unsalted butter and granulated sugar together on medium speed for 3-5 minutes, or until the mixture is light and fluffy. This process incorporates air into the mixture, contributing to the cake’s tender texture, which is a hallmark of a delightful chocolate cake.
Step 4: Incorporate Eggs and Vanilla
Add the large eggs one at a time, mixing well after each addition until fully incorporated. Follow with the vanilla extract, blending for an additional 30 seconds. The eggs provide structure and moisture, while the vanilla enhances the overall flavor of your Chocolate Peanut Butter Mousse Cake.
Step 5: Combine Wet and Dry Ingredients
Gradually mix the reserved dry ingredients into the butter mixture, alternating with the buttermilk. Start and end with the dry ingredients, mixing until just combined. Take care not to overmix, as this can lead to a dense cake rather than the light, airy texture you desire.
Step 6: Bake the Cake
Pour the prepared batter into the greased cake pan, smoothing the top with a spatula for even baking. Place in the preheated oven and bake for 25-30 minutes. To check for doneness, insert a toothpick into the center; it should come out clean or with a few moist crumbs.
Step 7: Cooling the Cake
Once baked, remove the cake from the oven and allow it to cool in the pan on a wire rack for about 10 minutes. After cooling slightly, carefully invert the cake onto the rack to cool completely. This step is crucial to ensure that your mousse does not melt when layered later.
Step 8: Whip the Cream for Mousse
In a separate bowl, whip the heavy cream using an electric mixer on medium-high speed until soft peaks form, which should take about 3-5 minutes. The whipped cream adds lightness and airiness to the peanut butter mousse, creating a delightful contrast with the rich chocolate cake.
Step 9: Prepare Peanut Butter Mixture
In another mixing bowl, combine creamy peanut butter, powdered sugar, and vanilla extract. Mix until smooth and creamy, then gently fold in the softened cream cheese until evenly blended. This mixture will form the base of your luscious mousse, adding that signature peanut butter flavor.
Step 10: Fold in Whipped Cream
Carefully fold the whipped cream into the peanut butter mixture using a spatula until just combined. This technique keeps the mousse light and airy, ensuring that your Chocolate Peanut Butter Mousse Cake has the perfect creamy texture. Avoid overmixing to maintain the fluffiness.
Step 11: Layer the Cake
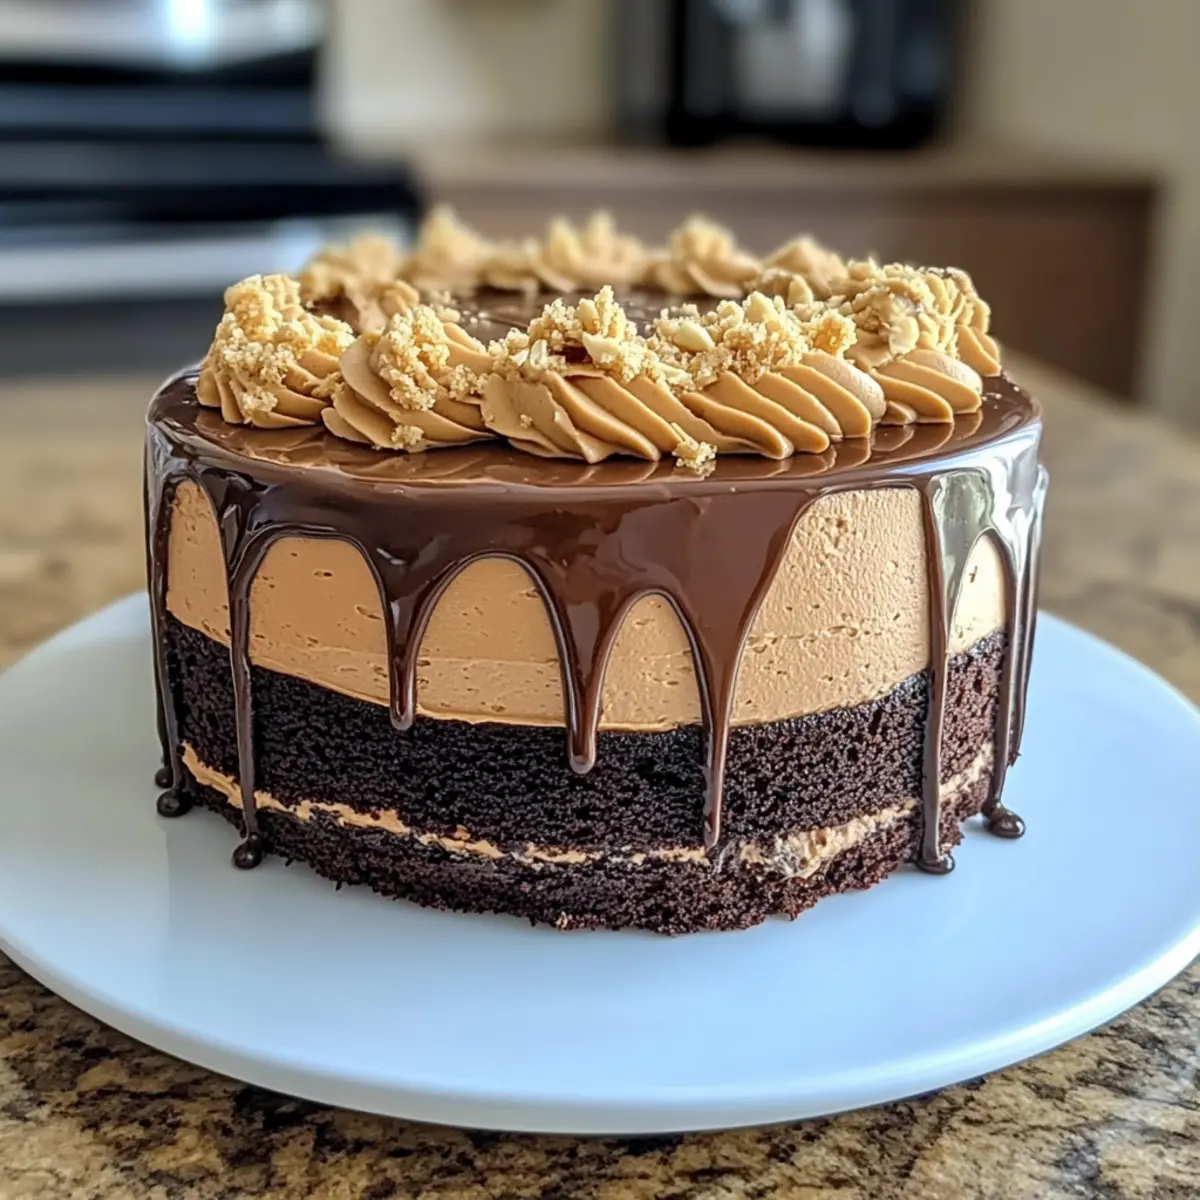
With the cooled cake, use a serrated knife to slice it horizontally into two equal layers. Place one layer on a serving plate, then spread half of the peanut butter mousse evenly over the top. Gently place the second layer on top, creating a beautiful layered effect.
Step 12: Top with Remaining Mousse
Spread the remaining peanut butter mousse generously on top of the second layer, smoothing it out with a spatula. Cover the cake loosely with plastic wrap and chill in the refrigerator for at least 2 hours or until set. This chilling time allows the flavors to meld beautifully, intensifying the experience.
Step 13: Prepare Ganache
For the ganache, heat heavy cream in a saucepan over medium heat until it reaches a simmer. Remove from heat and stir in the semi-sweet chocolate chips until fully melted and smooth. This glossy ganache will be the crowning glory of your Chocolate Peanut Butter Mousse Cake.
Step 14: Drizzle Ganache Over the Cake
Once the mousse has set, pour the ganache over the top of the mousse layer, allowing it to drip down the sides for a beautiful presentation. Take a moment to admire how the ganache glistens, enhancing the decadent look of your cake.
Step 15: Slice and Serve
Carefully slice the chilled cake using a serrated knife, which helps create clean edges for each piece. Serve each slice cool, perhaps garnished with a dollop of whipped cream or a sprinkle of chopped peanuts for added texture and flavor. Enjoy the delightful layers of your Chocolate Peanut Butter Mousse Cake!

Chocolate Peanut Butter Mousse Cake Variations
Feel free to play around with these ideas to make the recipe uniquely yours!
-
Gluten-Free: Substitute all-purpose flour with a gluten-free flour blend for a deliciously inclusive treat.
-
Lighter Option: Use low-fat cream cheese in place of butter and reduce sugar for a guilt-free indulgence.
-
Nutty Twist: Replace creamy peanut butter with almond or cashew butter for a fun flavor swap that still satisfies.
-
Dairy-Free Delight: Swap heavy cream for coconut cream in the mousse for a rich, dairy-free option that’s just as creamy.
-
Flavor Boost: Add a splash of espresso or coffee powder to the chocolate batter for an enhanced flavor that chocolate lovers will adore.
-
Fruit Fusion: Layer fresh raspberries or strawberries between the cake and mousse layers for a refreshing burst of flavor and color.
-
Heat and Sweet: Sprinkle a pinch of cayenne pepper into the mousse for a surprising heat that balances the sweetness.
-
Chocolate Lovers Extra: Fold in mini chocolate chips into the mousse for added texture and chocolatey goodness that elevates each bite.
These adaptations open up a world of possibilities! You might even enjoy pairing your cake with a delightful side of Spicy Peanut Chicken for a fun flavor contrast or serve it alongside some irresistibly buttery Garlic Butter Lobster to create a memorable meal. Enjoy the sweet versatility this cake offers!
Expert Tips for Chocolate Peanut Butter Mousse Cake
-
Avoid Overmixing: Gently fold the batter to maintain a light texture; overmixing can lead to a dense chocolate cake.
-
Cool Completely: Allow the cake to cool fully before adding the mousse—this helps prevent it from melting and losing that beautiful layered look.
-
Serrated Knife Advantage: Use a serrated knife for slicing the cake; it ensures clean edges and enhances presentation.
-
Chill the Knife: For an even smoother slicing experience, chill your knife in hot water before cutting through the layers of cake and mousse.
-
Customize with Confidence: Feel free to adapt the recipe for dietary needs, making it gluten-free or swapping ingredients for a lighter version without compromising flavor!
Make Ahead Options
These Chocolate Peanut Butter Mousse Cake preparations are perfect for busy home cooks looking to save time! You can bake the chocolate cake up to 24 hours in advance; just let it cool completely before wrapping it in plastic wrap to maintain its moisture. You can also whip the peanut butter mousse a day ahead; store it in an airtight container in the fridge. On the day you plan to serve, simply layer the mousse between the cooled cake layers, chill for at least 2 hours to set, and pour the ganache over the top. This way, you can enjoy a delightful, restaurant-quality dessert with minimal effort on the big day!
What to Serve with Chocolate Peanut Butter Mousse Cake?
Elevate your dessert experience by pairing it with complementary sides and drinks that balance its rich flavors.
-
Vanilla Ice Cream: A classic pairing that brings a creamy, cool contrast to the chocolate richness, enhancing every bite.
-
Fresh Berries: Juicy raspberries or strawberries provide a refreshing tartness that cuts through the sweetness, making for a balanced treat.
-
Espresso or Coffee: The boldness of a strong cup of coffee enhances the chocolate flavors beautifully, creating a delightful after-dinner experience.
-
Whipped Cream: A dollop of light, airy whipped cream adds a touch of elegance while enhancing the cake’s creamy texture.
-
Chopped Nuts: Sprinkle some crushed peanuts on top for a delightful crunch that complements the mousse and adds extra peanut flavor.
-
Chocolate Sauce Drizzle: For the ultimate indulgence, top each slice with a drizzle of warm chocolate sauce for added decadence.
-
Milkshake: A creamy chocolate or peanut butter milkshake makes a fun, nostalgic drink that pairs perfectly with this dessert.
-
Dairy-Free Yogurt: For a healthier twist, a dollop of dairy-free yogurt brings tanginess and creaminess, catering to those with dietary preferences.
-
Mint Tea: A refreshing cup of mint tea offers a light finish, cleansing the palate after indulging in the rich cake.
How to Store and Freeze Chocolate Peanut Butter Mousse Cake
Fridge: Store leftovers in an airtight container in the refrigerator for up to 3-4 days. This will help maintain the cake’s moisture and flavors.
Freezer: If you want to save some slices for later, wrap individual pieces tightly in plastic wrap and aluminum foil. They can be frozen for up to 2-3 months without losing their delicious taste.
Thawing: To enjoy the frozen slices, transfer them to the refrigerator and let them thaw overnight. Serve chilled for the best experience of your Chocolate Peanut Butter Mousse Cake!
Reheating: Generally, this cake is best enjoyed cold, but if you prefer it slightly warm, briefly microwave a slice for about 10-15 seconds.

Chocolate Peanut Butter Mousse Cake Recipe FAQs
How do I select ripe ingredients for my cake?
Absolutely! For the best flavor and moisture, use fresh eggs and high-quality, unsweetened cocoa powder to enhance the chocolate richness. If you’re using buttermilk, it should be fresh and slightly tangy; alternatively, plain yogurt can be a great substitute for that nice moisture balance. Always check for any dark spots on butter or cream, which can indicate spoilage.
How should I store the leftover cake?
Very well! Once your Chocolate Peanut Butter Mousse Cake is complete, store any leftovers in an airtight container in the refrigerator for up to 3-4 days. This keeps it fresh and tasty. For optimal results, let the layer cake sit at room temperature for about 30 minutes before serving to allow its flavors to come alive.
Can I freeze the cake for later enjoyment?
Certainly! To freeze your cake, first, slice it into individual portions. Wrap each piece tightly in plastic wrap, followed by a layer of aluminum foil to prevent freezer burn. You can freeze the slices for up to 2-3 months. For the best taste, thaw them overnight in the refrigerator before indulging.
What should I do if the cake sinks in the middle?
If this happens, don’t worry—it’s a common issue! Sinking can occur if the batter is overmixed or if the cake isn’t baked long enough. Make sure to mix until just combined and always check doneness with a toothpick. If you find your cake has sunk, you can fill in the center with a bit of the peanut butter mousse for a delicious fix!
Are there any dietary considerations I should be aware of?
Yes! This delightful Chocolate Peanut Butter Mousse Cake can be tailored to meet various dietary needs. For gluten-free options, substitute all-purpose flour with a gluten-free blend. If you want to make a lighter version, consider using low-fat cream cheese instead of butter and reducing sugar with alternatives. Always remember to check for allergies related to peanuts or dairy in your guests.
Irresistible Chocolate Peanut Butter Mousse Cake Recipe
Ingredients
Equipment
Method
- Preheat your oven to 350°F (175°C) and grease an 8-inch round cake pan with butter or non-stick spray.
- In a mixing bowl, whisk together the all-purpose flour, cocoa powder, baking powder, baking soda, and salt until combined.
- Beat the butter and sugar together on medium speed for 3-5 minutes until light and fluffy.
- Add the eggs one at a time, mixing well after each, then blend in the vanilla extract.
- Gradually mix in the dry ingredients with the buttermilk, starting and ending with the dry ingredients.
- Pour the batter into the cake pan, smoothing the top, and bake for 25-30 minutes.
- Let the cake cool in the pan for 10 minutes, then invert it onto a wire rack to cool completely.
- Whip the heavy cream until soft peaks form, about 3-5 minutes.
- In another bowl, mix the peanut butter, powdered sugar, and vanilla until smooth, then fold in whipped cream.
- Slice the cooled cake horizontally into two layers, place one layer on a serving plate, and spread half of the mousse over it.
- Top with the second layer and spread the remaining mousse on top, then chill for at least 2 hours.
- Heat heavy cream for ganache and stir in chocolate chips until melted and smooth.
- Pour ganache over the cake and let it drip down the sides.
- Slice and serve garnished with whipped cream or chopped peanuts.
Leave a Reply