
The tantalizing aroma wafting through the kitchen reminds me of bustling izakayas in Japan, where sizzling dishes beckon from every corner. Today, I’m excited to share my Crispy Chicken Karaage recipe—a delightful twist on traditional Japanese fried chicken that combines juicy, marinated chicken with a perfectly crisp coating. This dish is not only a crowd-pleaser that’s sure to impress friends and family, but it also offers quick prep-time options with both deep-fried and air-fried methods to suit your cooking preferences. Whether you serve it over a bed of fluffy rice or as a tasty appetizer, this karaage is designed to bring joy and flavor to your table. Ready to dive into a delicious journey of taste? Let’s get cooking!
Why Is Chicken Karaage So Special?
Crispy Perfection: The crunchy coating of this Chicken Karaage is an experience on its own! Paired with juicy, marinated chicken, every bite is a flavor explosion.
Versatile Cooking Methods: Whether you prefer the traditional deep-fried version or a healthier air-fried option, this recipe caters to your cooking style seamlessly.
Quick & Easy: With minimal prep time, you’ll have a stunning dish ready in no time, perfect for busy weeknights or entertaining guests.
Crowd-Pleasing Delight: Serve it as an appetizer, main dish, or even sliders; it’s versatile enough to fit any occasion! For more delicious chicken recipes, check out Wonton Rotisserie Chicken and Sweet Spicy Chicken.
Authentic Flavor: Utilizing ingredients like dark soy sauce and fresh ginger imparts a true taste of Japan right in your kitchen!
Crispy Chicken Karaage Ingredients
Here’s everything you need to create that perfect crispy chicken karaage at home!
For the Marinate
- Dark Soy Sauce – Provides savory depth and umami flavor; regular soy sauce can be a lighter alternative.
- Honey (or Sugar) – Adds sweetness and aids caramelization; for a lighter option, consider using agave syrup.
- Garlic Cloves – Imparts a strong aromatic flavor; fresh minced garlic is preferred over garlic powder.
- Fresh Ginger – Contributes a zesty kick; ground ginger can substitute, but fresh is recommended for authenticity.
- Sake (or Dry Sherry/Vermouth) – Enhances flavor complexity; you can omit it, but it may alter the taste.
For the Coating
- Skinless Boneless Chicken Thighs – The main protein source for juicy bites; chicken breasts can be used for a leaner alternative, but may yield drier results.
- Potato Starch (or Cornstarch) – Essential for achieving that delightful crisp coating; cornflour or rice flour can work as substitutes.
- All-Purpose Flour – Aids in providing texture to the coating; gluten-free flour can be swapped in for those with dietary restrictions.
For Frying
- Sunflower Oil – Used for frying and has a high smoke point to create a crispy texture; neutral oils like canola can also be used.
These ingredients are key to creating your own Crispy Chicken Karaage that will transport your taste buds straight to Japan!
Step‑by‑Step Instructions for Crispy Chicken Karaage
Step 1: Prepare the Chicken
Begin by cutting the skinless boneless chicken thighs into small, even pieces, about 1-2 inches in size. This ensures even cooking and crispy texture. Trim any excess fat to avoid unwanted greasiness. Set the chicken aside while you prepare the marinade ingredients for your Crispy Chicken Karaage.
Step 2: Marinate the Chicken
In a mixing bowl, combine minced garlic, grated ginger, dark soy sauce, and honey (or sugar), and add sake if using. Mix well to create a flavorful marinade. Add the chicken pieces to the bowl, ensuring they are fully coated. Cover the bowl and let it marinate in the fridge for at least 1 hour, bringing the chicken to room temperature before cooking.
Step 3: Prepare the Coating
In a separate bowl, mix together the potato starch and all-purpose flour. This combination will create that delightful crispiness essential for the perfect Crispy Chicken Karaage. Once the chicken has marinated, remove it from the bowl and coat each piece evenly with the flour-starch mixture, shaking off any excess to avoid clumping.
Step 4: Heat the Oil
In a sturdy pot, heat sunflower oil over medium heat until it reaches 160-165°C (320-329°F). Use a digital thermometer to check the temperature for accurate frying. Once ready, carefully lower the coated chicken pieces into the hot oil in batches, ensuring not to overcrowd the pan, which can lower the oil temperature.
Step 5: First Frying
Fry the chicken pieces for about 90 seconds or until they turn a light golden color. This initial fry helps to cook the chicken through while starting to develop that coveted crispy layer. After frying, transfer the chicken to a wire rack to drain excess oil while you prepare for the second frying step.
Step 6: Increase Oil Temperature
Raise the oil temperature to 190°C (375°F) to achieve an extra crispy texture. This higher heat is key to sealing in moisture while crisping up the outside. Allow the oil to reach the new temperature before adding the chicken back in for the second fry.
Step 7: Second Frying
Return the partially cooked chicken to the hot oil, frying for an additional 45 seconds to 1 minute. Keep an eye on the chicken—it should turn a deep golden brown at this stage. This second frying step enhances the crispiness and ensures the chicken is fully cooked and juicy inside.
Step 8: Check for Doneness
To ensure your Crispy Chicken Karaage is fully cooked, check the internal temperature using a thermometer. It should read 75°C (165°F). If needed, you can fry the chicken for an extra minute. Once cooked through, remove the chicken from the oil and let it rest on a wire rack.
Step 9: Serve & Enjoy
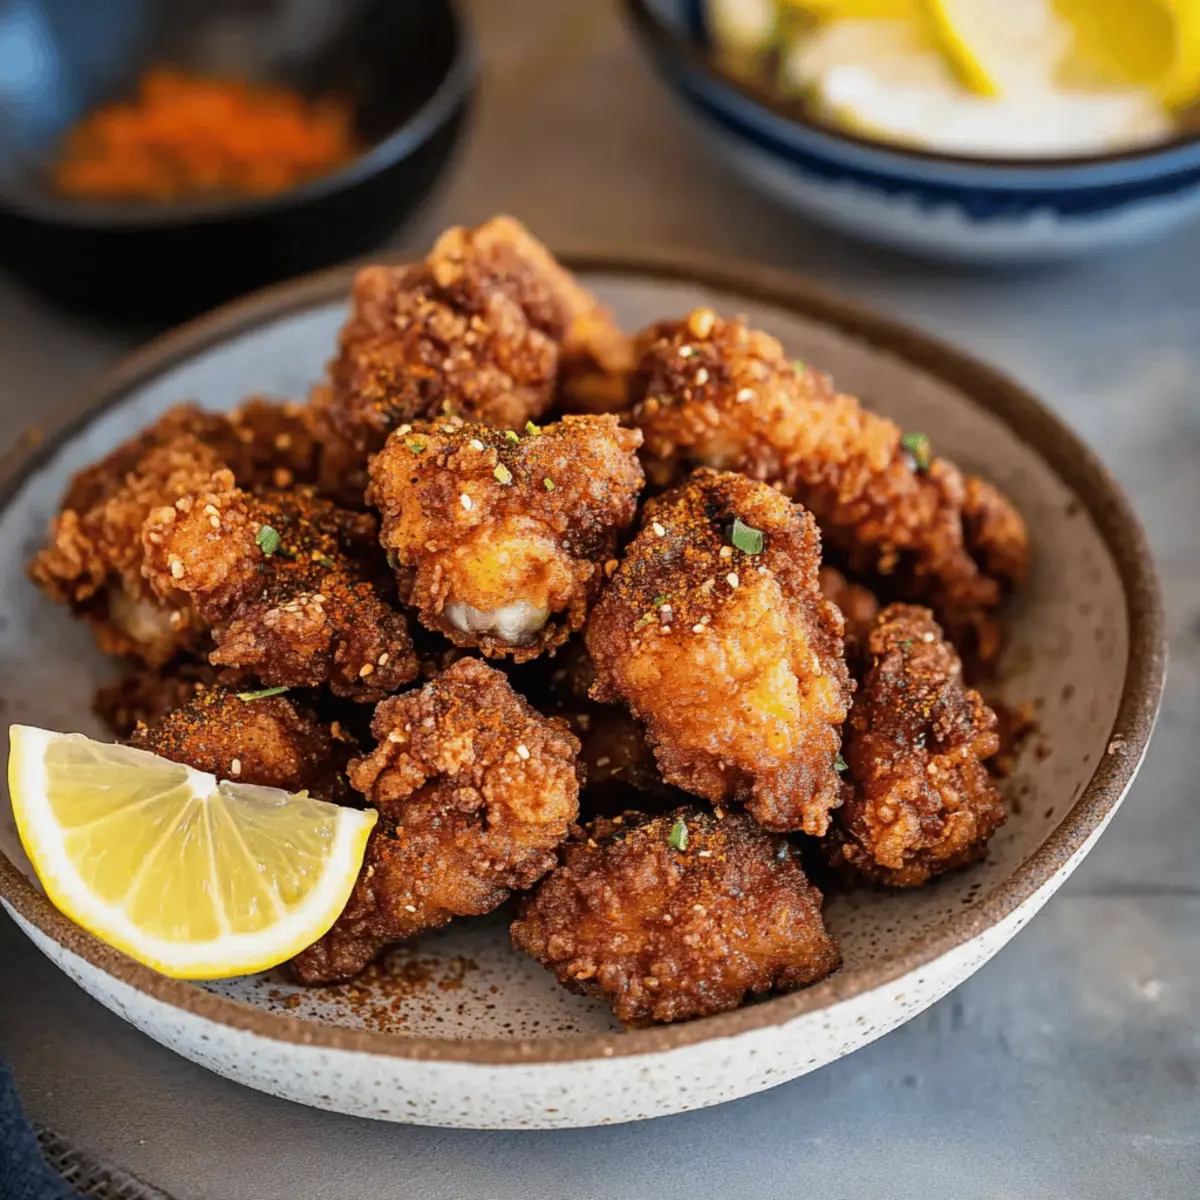
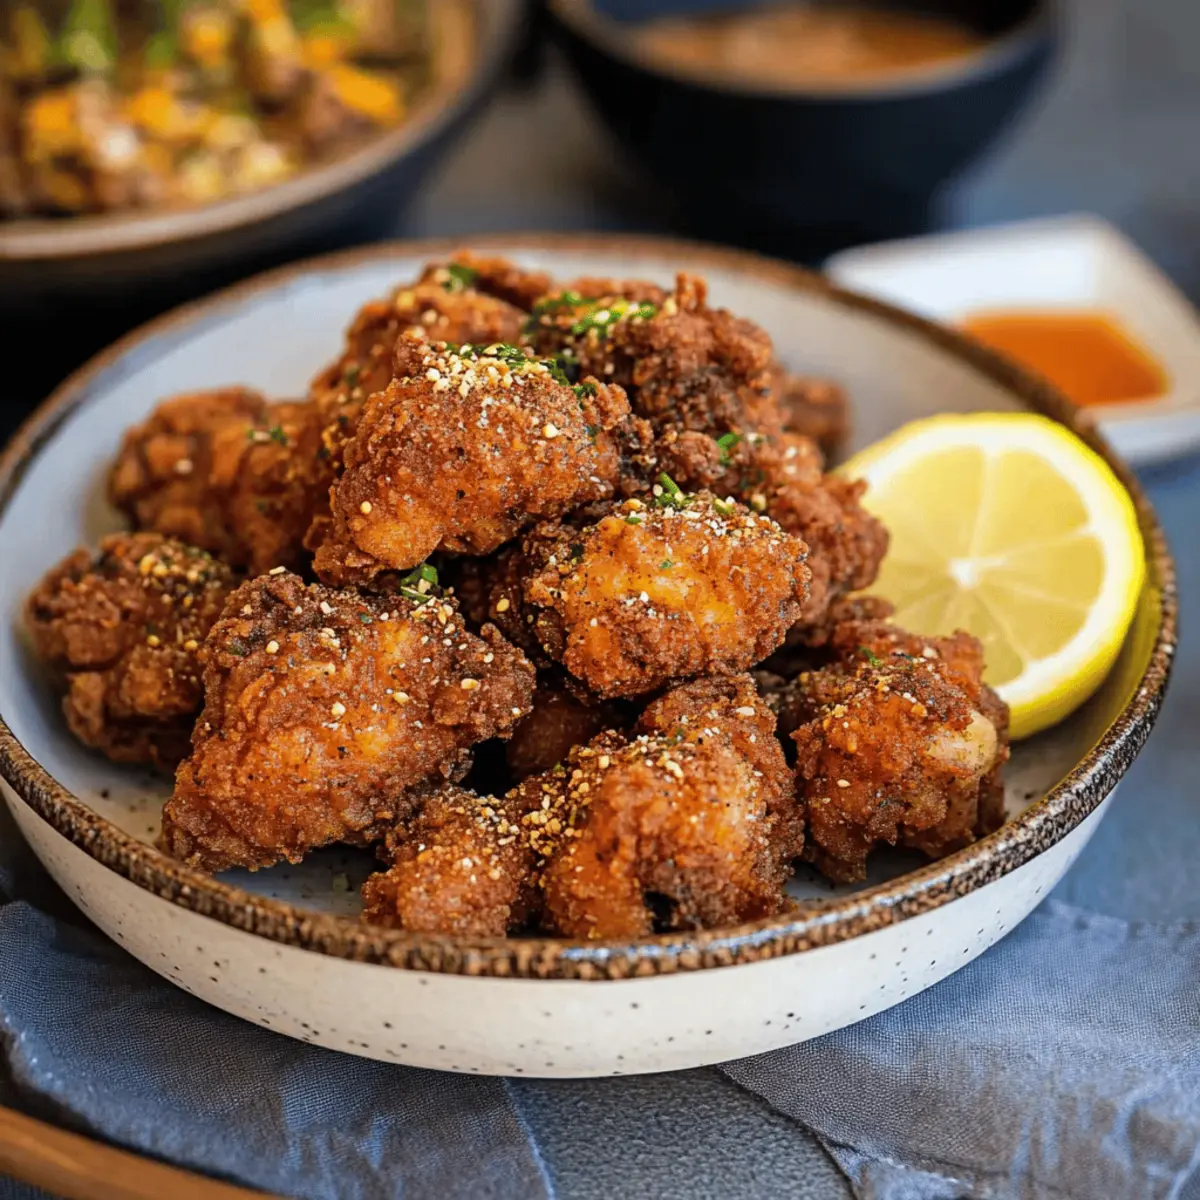
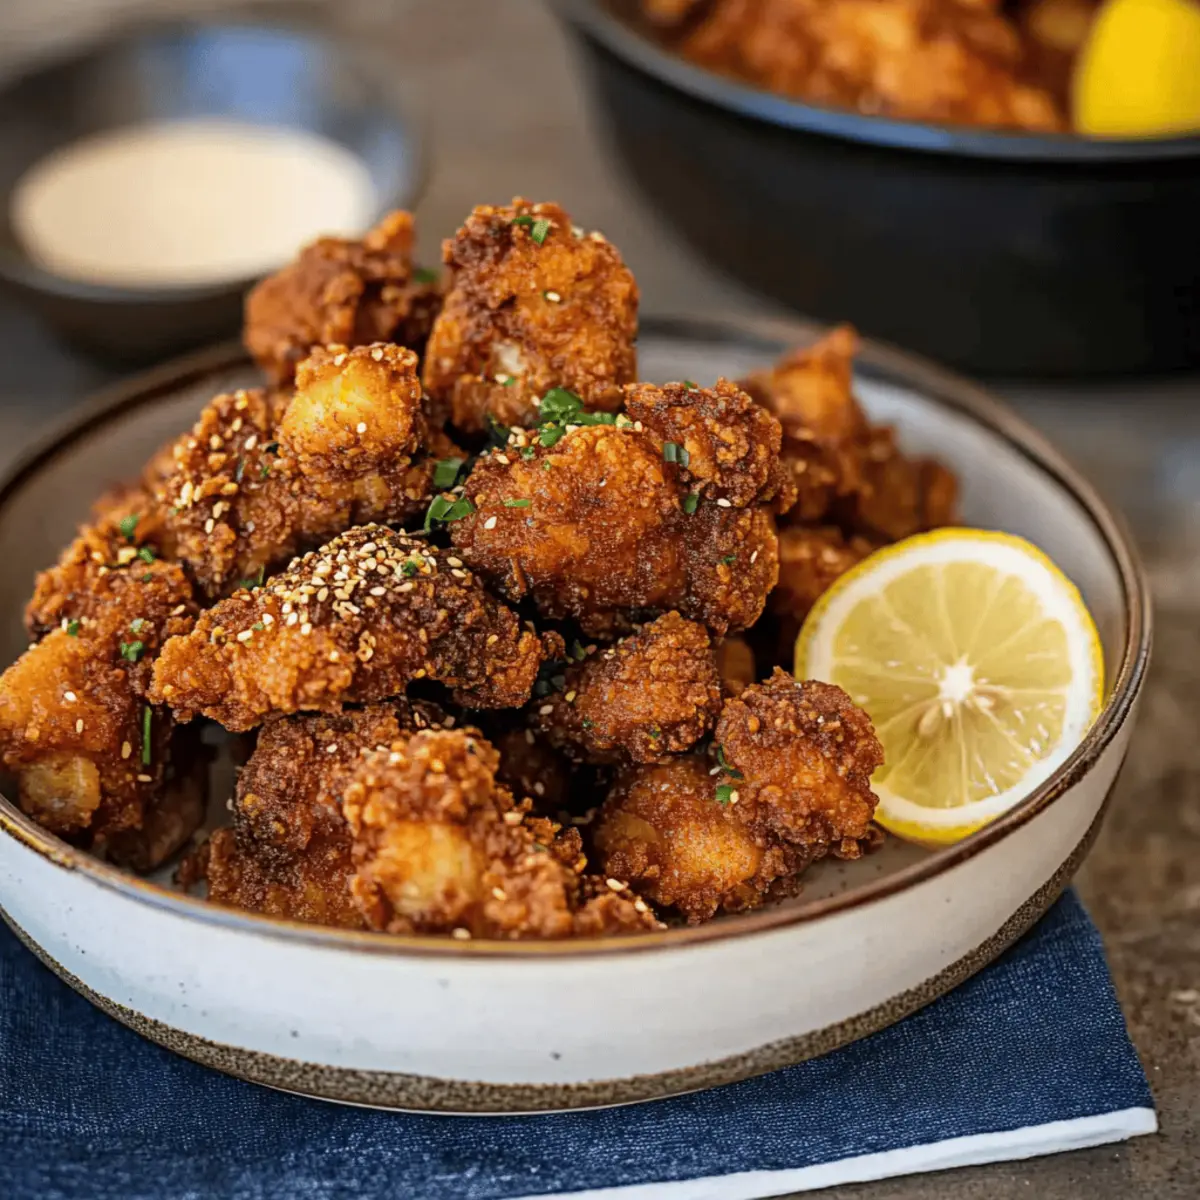
Serve your Crispy Chicken Karaage hot, garnished with lemon wedges, and consider adding Japanese Seven Spice (Shichimi Togarashi) and wasabi mayo on the side for an extra flavor kick. Enjoy this delicious dish as part of a meal or as a delightful snack!

Expert Tips for Crispy Chicken Karaage
-
Monitor Oil Temperature: Keeping the oil at the right temperature is essential. Use a thermometer to ensure oil stays between 160-165°C (320-329°F) for the first fry.
-
Batch Frying: Don’t overcrowd the chicken in the oil. Frying in small batches helps maintain consistent heat, ensuring the crispy texture you crave.
-
Double Fry for Crunch: The secret to extra crispy chicken karaage lies in the double frying technique! Don’t skip this step for the best crunch.
-
Resting Is Key: After frying, let the chicken rest on a wire rack to prevent it from getting soggy. This helps retain that delightful crispiness.
-
Try Air Frying: For a lighter version, use the air fryer. Preheat to 200°C (395°F) and cook for 12 minutes, flipping halfway for even crispiness.
-
Flavor Variations: Experiment with the marinade by adding lime juice for tanginess or chili flakes for a spicy kick, enhancing the flavors of your crispy chicken karaage.
How to Store and Freeze Crispy Chicken Karaage
Fridge: Store leftover Chicken Karaage in an airtight container for up to 3 days. This helps maintain the flavors, although its signature crispiness is best enjoyed fresh.
Freezer: If you want to keep it longer, freeze the chicken in a single layer on a baking sheet until solid, then transfer to an airtight container for up to 2 months.
Reheating: For best results, reheat in the oven at 180°C (350°F) for about 10-15 minutes to restore its crispy texture. Avoid microwaving, as it can make the coating soggy.
Thawing: When ready to enjoy your frozen Crispy Chicken Karaage, thaw it overnight in the fridge before reheating for the best flavor and texture.
Make Ahead Options
These Crispy Chicken Karaage are perfect for busy home cooks looking to save time during the week! You can marinate the chicken for up to 24 hours in advance. Simply combine the garlic, ginger, soy sauce, and honey in a sturdy bowl, add the chicken, cover, and refrigerate. You can also prepare the coating mixture (potato starch and flour) and store it in an airtight container for up to 3 days. When you’re ready to impress your family, simply take the marinated chicken out of the fridge, coat it in the flour mixture, and fry it until golden. This method ensures your chicken maintains its crispy texture and delicious flavor, making your meal prep effortless!
Crispy Chicken Karaage Variations
Feel free to play with your ingredients and make this dish your own; there are endless possibilities to explore!
-
Air Fryer Alternative: Switch to the air fryer for a lighter version! Preheat to 200°C (395°F) and cook for 12 minutes, flipping halfway through for an even crisp.
-
Zesty Twist: Add lime juice or zest to the marinade for a refreshing, tangy flavor. This brightens the dish and adds an unexpected kick!
-
Spicy Kick: Introduce chili flakes or sriracha to the marinade for those who love heat. Adjust the spice level to your preference.
-
Asian Fusion: Serve chicken karaage as sliders or in bao buns for a fun, modern twist. You can even drizzle with spicy mayo for extra flair!
-
Crispy Coating Variations: For added texture, try panko breadcrumbs for the ultimate crunch! Combine panko with the flour mixture for a delightful twist.
-
Herbal Infusion: Incorporate fresh herbs, like basil or cilantro, into the marinade for a fresh flavor boost that complements the savory chicken beautifully.
-
Sweet and Savory: Mix a touch of maple syrup into the marinade for a wonderful sweet contrast against the salty flavors of soy sauce. This balance creates a unique taste experience!
-
Nutty Notes: Add ground sesame seeds or a touch of sesame oil to the marinade for added depth and a nutty flavor that enhances this Japanese favorite.
These suggestions will allow you to discover new layers of flavor in your Crispy Chicken Karaage. For more delicious chicken inspirations, don’t miss out on Bang Bang Chicken or Chinese Honey Chicken!
What to Serve with Crispy Chicken Karaage
Creating a delightful meal starts with the perfect sides that enhance the succulent flavors of your crispy chicken delight.
-
Steamed Jasmine Rice: This fragrant rice is the ideal canvas for soaking up the savory juices of the chicken. Its light fluffiness complements the crunchy texture beautifully.
-
Asian Slaw Salad: A refreshing blend of crunchy cabbage, carrots, and a tangy sesame dressing provides a contrast to the chicken. It adds a crisp, vibrant touch to your meal, making each bite more exciting.
-
Miso Soup: The warm umami-rich broth envelops you with comfort, balancing the richness of the fried chicken. It’s a staple in Japanese cuisine that rounds out the dining experience.
-
Pickled Vegetables: Traditional Japanese pickles, or tsukemono, offer a refreshing zesty bite to cut through the richness of the chicken. Their crunchiness will keep your palate engaged from start to finish.
-
Japanese Potato Salad: Creamy and slightly sweet, this salad adds a delightful contrast in texture and flavor. It’s a comforting side that pairs exceptionally well with the crispy chicken.
-
Chilled Sake or Green Tea: Complement your meal with a glass of chilled sake, which enhances the flavors of the chicken, or opt for refreshing green tea that cleanses the palate beautifully.
-
Sesame Noodles: Tender noodles tossed with a sesame dressing offer a delightful and flavorful way to enjoy your chicken. Their nutty taste wraps around the crispy bits for a perfect bite.
Each of these accompaniments is designed to enhance the flavors of your crispy Chicken Karaage, creating a joyful and satisfying meal for you and your loved ones.
Crispy Chicken Karaage Recipe FAQs
How do I select the best chicken for Karaage?
Absolutely! For the juiciest results, I recommend using skinless boneless chicken thighs, as they stay moist and tender during cooking. If you prefer a leaner option, chicken breasts can be used, but be aware they may result in drier bites. Always choose meat that is fresh with a firm texture and no discoloration for the best flavor.
How long can I store leftover Chicken Karaage in the fridge?
You can keep leftover Chicken Karaage in an airtight container in the refrigerator for up to 3 days. To retain its delightful crunch, reheat it in the oven instead of the microwave, as this helps restore its crispy texture.
Can I freeze my Crispy Chicken Karaage?
Very! If you have leftovers you’d like to save, freeze them in a single layer on a baking sheet until solid, then transfer them to an airtight container. They can be stored for up to 2 months. When you’re ready to enjoy, thaw them overnight in the fridge before reheating to keep the flavors intact.
What’s the best way to reheat Chicken Karaage?
To ensure your Chicken Karaage remains crispy after freezing, preheat your oven to 180°C (350°F) and bake for about 10-15 minutes. This method works wonders as it revives the crunchiness that makes this dish so delightful. Avoid using a microwave as it can make the coating soggy.
Can I make this recipe gluten-free?
Absolutely! To cater to gluten sensitivities, opt for gluten-free all-purpose flour and cornstarch as substitutes. Make sure your soy sauce is also gluten-free; there are many options available. With these simple swaps, you can still enjoy a deliciously crispy Chicken Karaage without compromising on taste.
What should I do if my Karaage doesn’t turn out crispy?
If your Karaage isn’t as crispy as desired, check a couple of factors: make sure you used enough potato starch in your coating, as this is crucial for that crispy exterior. Additionally, if the oil temperature is too low when frying, the chicken can absorb too much oil, leading to sogginess. Maintaining the right frying temperature is key—aim for 160-165°C (320-329°F) for the first fry, then increase it for the second fry.
Crispy Chicken Karaage: Irresistibly Crunchy Japanese Delight
Ingredients
Equipment
Method
- Prepare the Chicken: Cut the chicken thighs into small, even pieces, about 1-2 inches in size. Trim any excess fat.
- Marinate the Chicken: Combine minced garlic, grated ginger, dark soy sauce, honey, and sake in a bowl. Add chicken and coat well, then marinate in the fridge for at least 1 hour.
- Prepare the Coating: Mix potato starch and all-purpose flour together. Coat marinated chicken pieces with the flour-starch mixture.
- Heat the Oil: Heat sunflower oil over medium heat until it reaches 160-165°C (320-329°F). Use a thermometer for accuracy.
- First Frying: Fry the chicken pieces for about 90 seconds until light golden. Drain on a wire rack.
- Increase Oil Temperature: Raise oil temperature to 190°C (375°F) for the second fry.
- Second Frying: Fry the chicken for an additional 45 seconds to 1 minute until deep golden brown.
- Check for Doneness: Ensure the internal temperature reads 75°C (165°F) using a thermometer.
- Serve & Enjoy: Serve hot, garnished with lemon wedges and consider adding Japanese Seven Spice and wasabi mayo.
Leave a Reply