
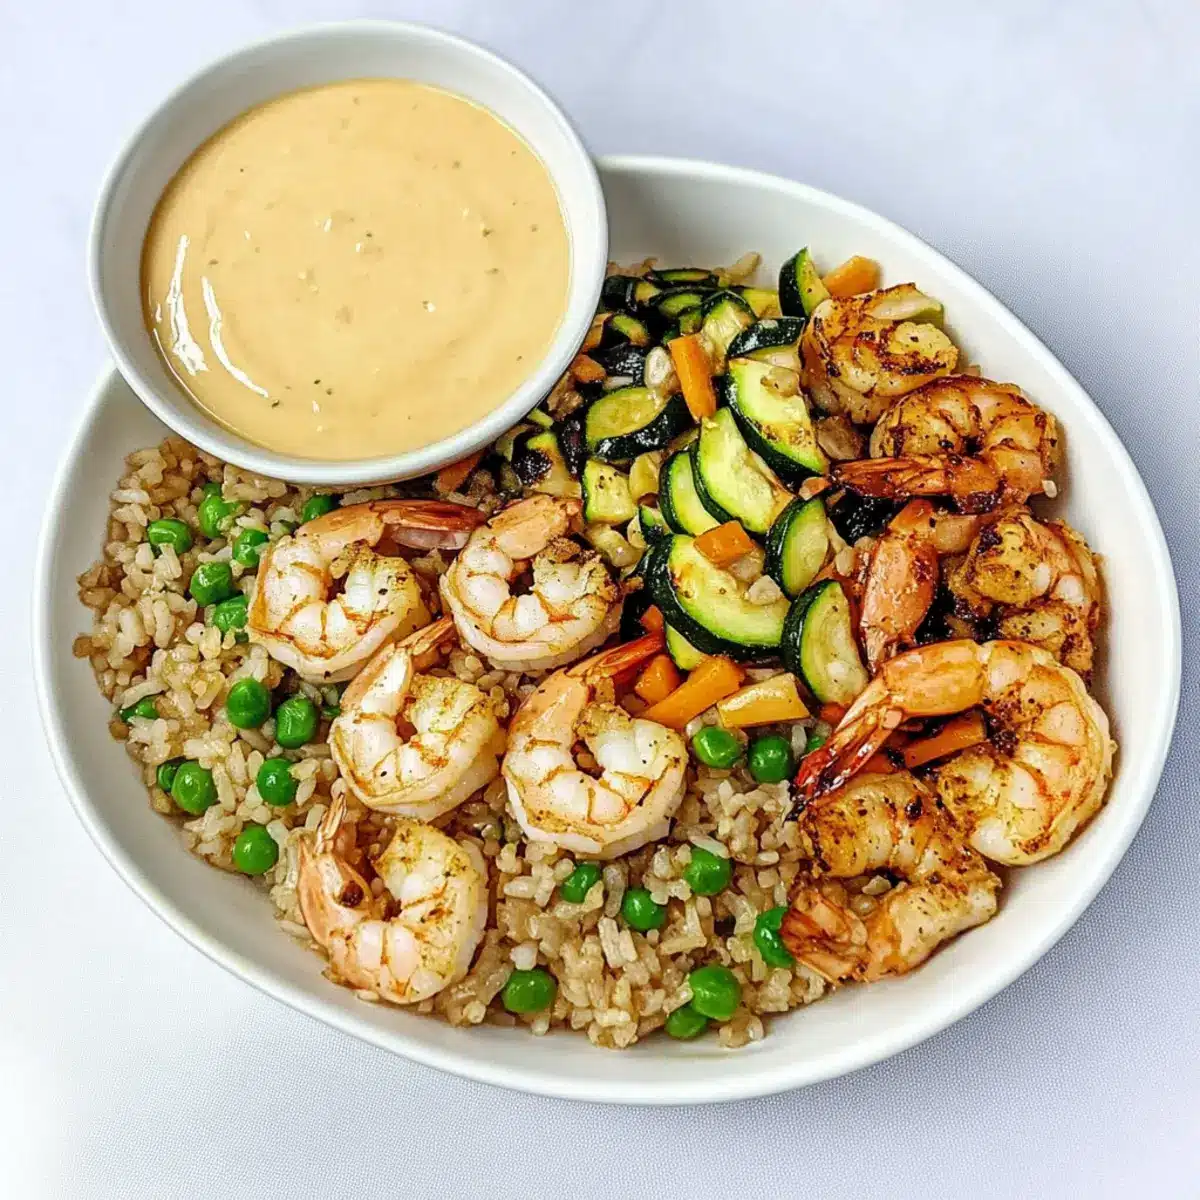
As I stood in my kitchen, the sizzle of shrimp hitting the skillet filled the air with anticipation—nothing beats the aroma of hibachi cooking! These Hibachi Shrimp Rice Bowls are my go-to for a quick, satisfying meal, and they capture that beloved Japanese-American steakhouse vibe in a fraction of the time. Perfect for busy weeknights or meal prep, this dish combines tender shrimp, colorful veggies, and creamy yum yum sauce in a delightful medley. Plus, with minimal prep and easy variations, you can customize your bowls to suit any taste! Ready to whip up a restaurant-quality dish in your own home? Let’s dive into the delicious details!
Why are Hibachi Shrimp Rice Bowls amazing?
Flavor Explosion: Each bite bursts with savory goodness from juicy shrimp and fresh vegetables, accompanied by a creamy yum yum sauce that elevates this dish beyond the ordinary.
Quick and Easy: Perfect for busy weeknights, these bowls come together in no time, making them an ideal choice for those avoiding fast food.
Meal Prep Friendly: Ideal for meal prep, you can separate the components for easy grab-and-go lunches throughout the week. Just reheat the rice and veggies, and you’re set!
Customizable: Want to switch things up? Replace shrimp with chicken or tofu, or choose different veggies like bell peppers or broccoli for endless variations!
Restaurant Experience at Home: Enjoy a hibachi-style meal in the comfort of your own kitchen, reminiscent of your favorite steakhouse without the hefty price tag. Dive into a world of delightful flavors and textures with these Hibachi Shrimp Rice Bowls!
Hibachi Shrimp Rice Bowls Ingredients
Discover the essential ingredients for your Hibachi Shrimp Rice Bowls!
For the Yum Yum Sauce
- Mayo – Creaminess for the yum yum sauce; substitute with Greek yogurt for a lighter option.
- Ketchup – Adds sweetness to the sauce; consider a sugar-free variant if preferred.
- Garlic Powder – Provides aromatic flavor; fresh minced garlic makes an excellent substitute.
- Paprika – Adds mild spice and color; smoked paprika gives a different flavor profile.
For the Shrimp Bowl
- Unsalted Butter – Cooks shrimp, vegetables, and rice; use salted butter if needed but reduce added salt.
- Raw Shrimp – The star protein, peeled and deveined for convenience; chicken or tofu work as great alternatives.
- Soy Sauce – Infuses umami flavor; tamari offers a gluten-free option.
- Zucchini – Brings freshness and texture; swap with bell peppers or snap peas for variation.
- Onion – A flavor base for sautés; green onions can provide a milder taste.
- Egg – Binds the rice and adds richness; leave it out for an egg-free option and add extra veggies instead.
- Frozen Peas and Carrots – Convenient and colorful; fresh veggies can be used but may need longer cooking times.
- Cooked Rice – The bowl’s foundation; use cooled rice for better frying, and brown rice for a healthier twist.
Now you have everything you need to create your delicious Hibachi Shrimp Rice Bowls! Enjoy the journey of flavors as you prepare this satisfying dish.
Step‑by‑Step Instructions for Hibachi Shrimp Rice Bowls
Step 1: Make the Yum Yum Sauce
In a small bowl, mix together ½ cup mayo, ¼ cup ketchup, 1 tsp garlic powder, 1 tsp paprika, and a splash of hot sauce for desired heat. Stir until all ingredients are well combined. Once done, cover the bowl and refrigerate the sauce while you prepare the rest of your Hibachi Shrimp Rice Bowls, allowing the flavors to meld together.
Step 2: Cook the Shrimp
Heat 1 tablespoon of unsalted butter in a large skillet over medium-high heat until melted and bubbly. Add the peeled and deveined raw shrimp, cooking for about 1 minute per side until they turn pink and opaque. Pour in 2 tablespoons of soy sauce, stirring until mostly evaporated. Once cooked, remove the shrimp from the skillet and set aside while you continue to the next step.
Step 3: Sauté the Vegetables
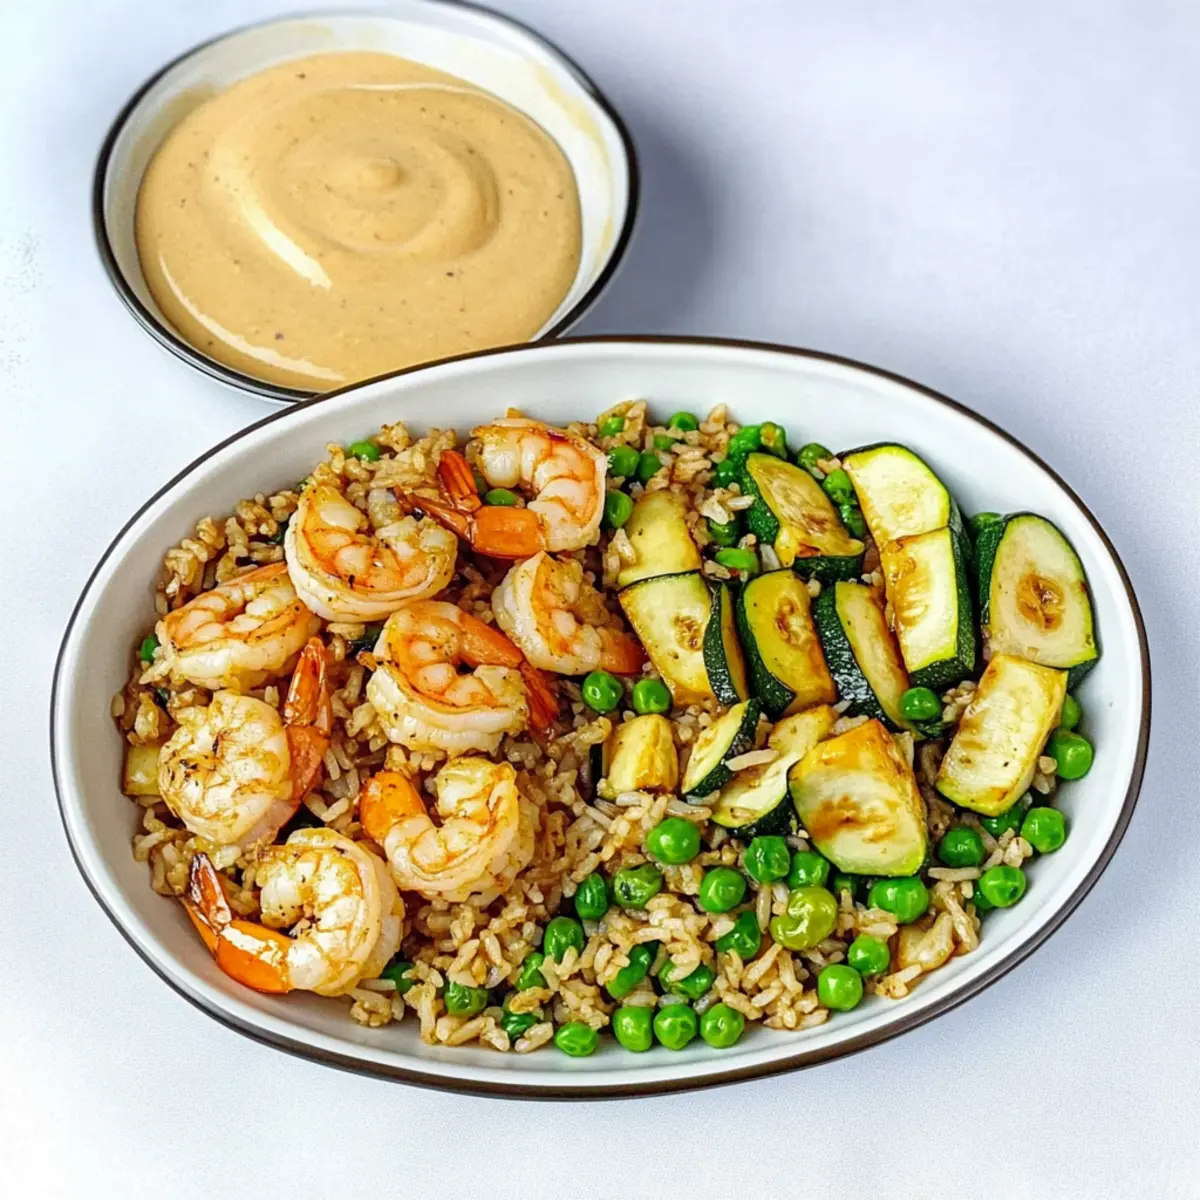
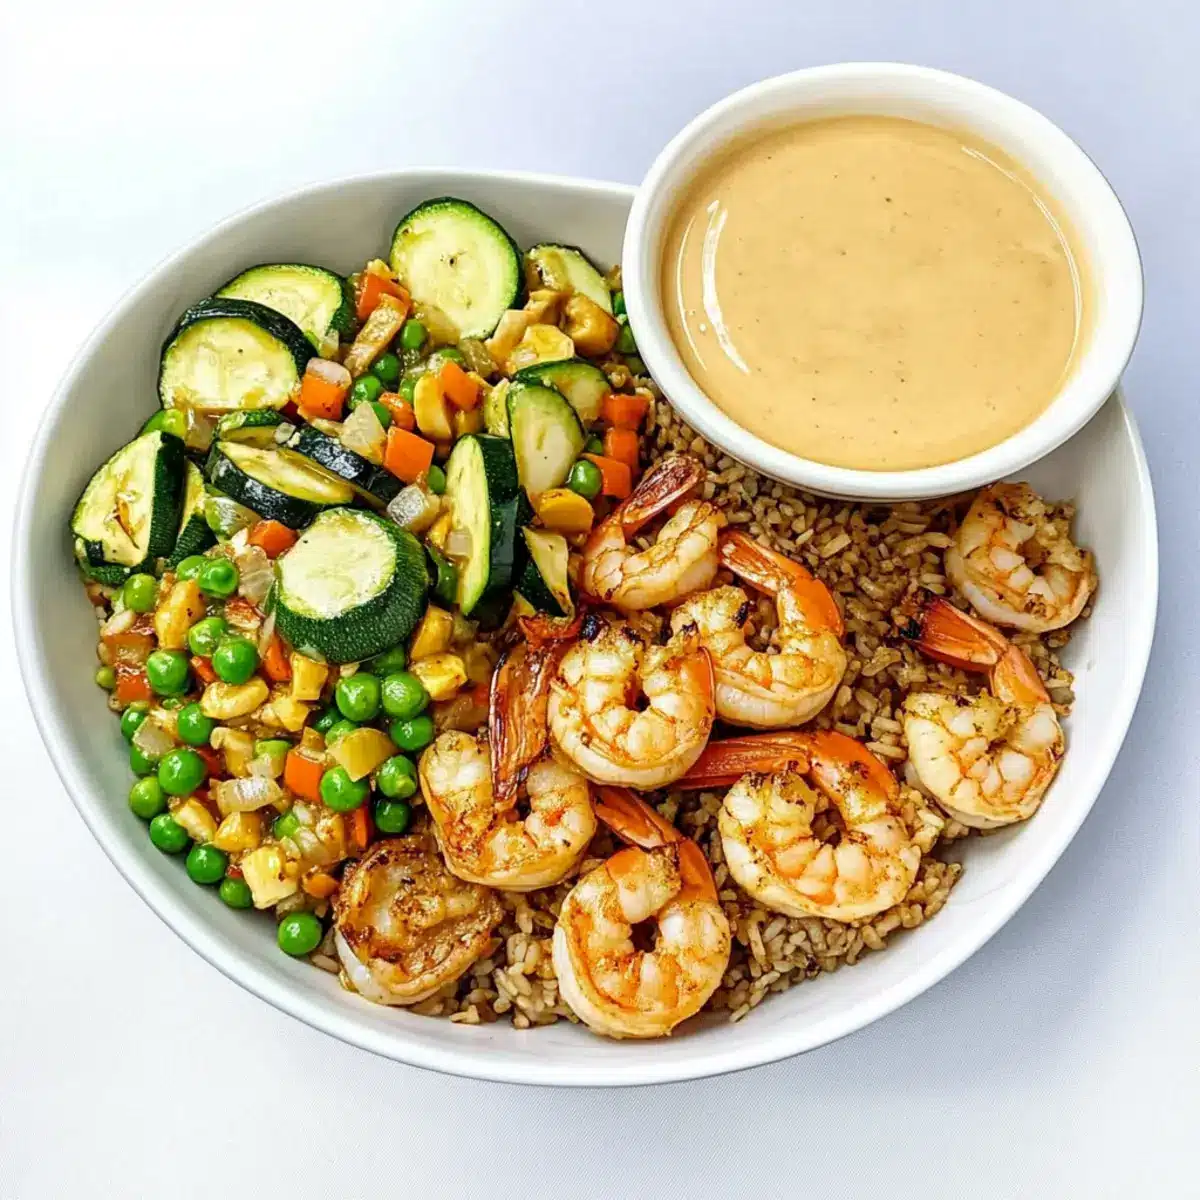
In the same skillet, add another tablespoon of butter over medium heat, allowing it to melt. Add diced onion and zucchini, sautéing for about 4-5 minutes until softened and slightly caramelized. Pour in 2 tablespoons of soy sauce, cooking until this mixture thickens and evaporates. Once finished, remove the vegetables from the skillet and set them aside with the shrimp.
Step 4: Prepare the Fried Rice
Add the remaining tablespoon of butter to the skillet and let it melt completely. Crack an egg into the pan and scramble it for about 1 minute, then quickly stir in 3 cups of cooled cooked rice along with 1 cup of frozen peas and carrots. Drizzle with 2 tablespoons of soy sauce, stirring continuously for about 2-3 minutes until everything is heated through and the rice begins to crisp slightly.
Step 5: Assemble the Bowl
To assemble each Hibachi Shrimp Rice Bowl, start by adding a generous scoop of the fried rice to the bottom of each bowl. Layer on the sautéed vegetables and top with the cooked shrimp. Finally, drizzle your homemade yum yum sauce over the entire dish for added flavor before serving. Enjoy your delicious creation that brings the hibachi experience right to your home!
Hibachi Shrimp Rice Bowls Variations
Feel free to unleash your creativity and customize your Hibachi Shrimp Rice Bowls just the way you like them!
-
Dairy-Free: Replace mayo with avocado or a plant-based alternative for a creamy yet dairy-free sauce.
-
Spicy Kick: Add a tablespoon of sriracha to the yum yum sauce for a zesty twist that wakes up your taste buds.
-
Protein Swap: For a heartier meal, swap shrimp for diced chicken or even tofu for a vegetarian option—both will taste fantastic!
-
Veggie Boost: Mix in more vegetables like carrots, bell peppers, or broccoli to amp up the nutrition and flavor balance in your bowl.
-
Brown Rice: Use brown rice instead of white for a healthier, nutty flavor base that complements the shrimp perfectly.
-
Citrus Twist: Squeeze some fresh lime juice over the finished dish for a refreshing burst that brightens the umami flavors.
-
Crispy Texture: Top your bowls with crunchy fried onions or toasted sesame seeds for delightful texture and added flavor.
-
Herbaceous Touch: Include fresh herbs like cilantro or green onions as a garnish to bring freshness and a hint of color to your dish.
With these easy variations, you’ll find that each bowl of Hibachi Shrimp Rice can be a new and exciting experience, making meal prep a fun adventure! For even more creative seafood dishes, check out my Thai Shrimp Curry or explore flavorful options like Fish Taco Bowls. Enjoy experimenting!
Make Ahead Options
These Hibachi Shrimp Rice Bowls are perfect for meal prep, allowing you to streamline your weeknight cooking! You can prepare the yum yum sauce up to 3 days in advance and store it in the refrigerator for maximum flavor. Cooked shrimp can also be made ahead and refrigerated for up to 2 days—just ensure they are completely cooled before sealing in an airtight container to maintain their texture. For the fried rice, cook and cool the rice up to 24 hours prior, then reheat it with a splash of water to prevent it from drying out. When ready to serve, simply warm the rice and shrimp, sauté the veggies fresh, and assemble your bowls for a quick and satisfying dinner that feels just as delicious as if it were cooked from scratch!
Expert Tips for Hibachi Shrimp Rice Bowls
-
Dry the Shrimp: Pat the shrimp dry before cooking to ensure a better sear and prevent excess moisture during frying, enhancing the flavor.
-
Use Cooled Rice: Always use cold, pre-cooked rice for frying. Freshly made rice tends to stick together, resulting in a clumpier texture.
-
Avoid Overcrowding: Don’t overcrowd your skillet when cooking the shrimp and vegetables. This allows even cooking and gives a lovely sear on each component.
-
Separate Components: For meal prep, store each ingredient separately in airtight containers. This helps maintain the texture and flavor of your delicious Hibachi Shrimp Rice Bowls.
-
Experiment with Veggies: Don’t hesitate to play with different vegetables like bell peppers, broccoli, or snap peas to find your favorite combination!
How to Store and Freeze Hibachi Shrimp Rice Bowls
Fridge: Store the prepared components in separate airtight containers for up to 4 days. This helps maintain freshness and texture, ensuring your hibachi shrimp rice bowls taste fantastic.
Freezer: You can freeze the cooked shrimp and fried rice for up to 3 months. Allow them to cool completely before transferring to freezer bags, ensuring you remove as much air as possible.
Reheating: When ready to enjoy, thaw overnight in the fridge for the best results. Reheat the rice and shrimp in a skillet over medium heat until heated through, adding a splash of water or soy sauce to help steam.
Meal Prep Tip: Keep components like the shrimp, rice, and sauce separate for easier assembly and to maintain the perfect flavors of your hibachi shrimp rice bowls!
What to Serve with Hibachi Shrimp Rice Bowls
Create the perfect dining experience to complement your vibrant and savory rice bowls with just a few delicious sides.
-
Simple Green Salad: A refreshing salad with mixed greens and a light vinaigrette balances the rich flavors of the shrimp bowls.
-
Steamed Broccoli: Tender broccoli offers a lovely crunch and pairs well with the creamy sauce, adding a nutritious element to your meal.
-
Egg Drop Soup: This warm, comforting soup enhances the Japanese-American vibe and provides a delightful, savory start to your dinner.
-
Cucumber Salad: A light, crisp cucumber salad with sesame dressing adds a refreshing contrast to the hearty rice bowls, perfect for cleansing the palate.
-
Miso Soup: Warm miso soup brings umami depth and is an ideal companion to the hibachi theme, further elevating your dining experience.
-
Sushi Rolls: Small sushi rolls filled with avocado or cucumber can serve as a delightful side, adding variety and a touch of fun to your meal.
-
Cold Soba Noodles: These chilled noodles dressed with sesame dressing are a fantastic choice to cool down the palate and mirror the flavors in your rice bowls.
-
Fruit Platter: A light dessert of seasonal fruits offers a sweet finish that wonderfully contrasts the savory elements of the main dish.
Hibachi Shrimp Rice Bowls Recipe FAQs
What’s the best way to select shrimp for my Hibachi Shrimp Rice Bowls?
Absolutely! When choosing shrimp, look for those that are firm and have a slightly translucent appearance. Fresh shrimp should have little to no odor. If you’re buying frozen shrimp, ensure they are kept solid and not stuck together in a clump, as this indicates they may have thawed and refrozen.
How can I store leftovers of my Hibachi Shrimp Rice Bowls?
Very good question! To keep your Hibachi Shrimp Rice Bowls fresh, store the components in separate airtight containers in the fridge. They’ll stay delicious for up to 4 days. Just reheat the rice and veggies before adding your shrimp and yum yum sauce for the best flavor.
Can I freeze my Hibachi Shrimp Rice Bowls?
Absolutely! You can freeze the cooked shrimp and fried rice for up to 3 months. Just make sure to let everything cool completely before transferring it to freezer bags. Remove as much air as possible to prevent freezer burn. When you’re ready to enjoy, thaw overnight in the fridge and reheat gently.
What should I do if my fried rice turns out mushy?
Don’t worry—this happens! If your fried rice is mushy, ensure you’re using cold, cooked rice next time. Freshly made rice tends to clump together. For a quick fix, try reheating the mushy rice in a skillet on medium heat without adding any liquid, allowing it to dry out a bit.
Are there any dietary considerations for my Hibachi Shrimp Rice Bowls?
Very much so! If you’re serving this dish to someone with shellfish allergies, you can easily substitute the shrimp with chicken or tofu. Additionally, use tamari instead of soy sauce for a gluten-free option. For those watching sodium intake, consider low-sodium soy sauce and adjusting seasoning as needed.
Can I customize the veggies in my Hibachi Shrimp Rice Bowls?
The more the merrier! Feel free to swap zucchini with bell peppers, broccoli, or snap peas based on your preference. Just be aware that different vegetables might have varying cooking times, so adjust accordingly to ensure everything is perfectly tender!
Savory Hibachi Shrimp Rice Bowls for Easy Weeknight Dinners
Ingredients
Equipment
Method
- In a small bowl, mix together the mayo, ketchup, garlic powder, paprika, and a splash of hot sauce for desired heat. Stir until well combined, then refrigerate.
- Heat the unsalted butter in a large skillet over medium-high heat. Add the raw shrimp, cooking for about 1 minute on each side until pink and opaque. Pour in the soy sauce and remove shrimp from skillet.
- In the same skillet, add another tablespoon of butter. Add diced onion and zucchini, sautéing for 4-5 minutes until softened. Pour in soy sauce and cook until thickened.
- Add remaining tablespoon of butter. Crack an egg into the pan and scramble. Stir in cooled cooked rice and frozen peas and carrots, drizzling with soy sauce and heating through.
- To assemble the bowls, add a scoop of fried rice, layer sautéed vegetables, top with shrimp, and drizzle with yum yum sauce.
Leave a Reply