
As I wandered through a bustling market in Dubai, the tantalizing aroma of rich pastries wrapped around me like a warm hug. This memory inspired me to create my version of Dubai Chocolate Kataifi, a mouthwatering Middle Eastern dessert that marries the crispy texture of kataifi pastry with a luscious chocolate surprise inside. What I love most about this treat is how quick and easy it is to whip up, making it a fantastic option for both novice bakers and seasoned pros looking to impress. Plus, it can easily be customized with different chocolates or even made dairy-free with simple swaps! Ready to dive into this delightful recipe that will leave your friends and family asking for seconds?
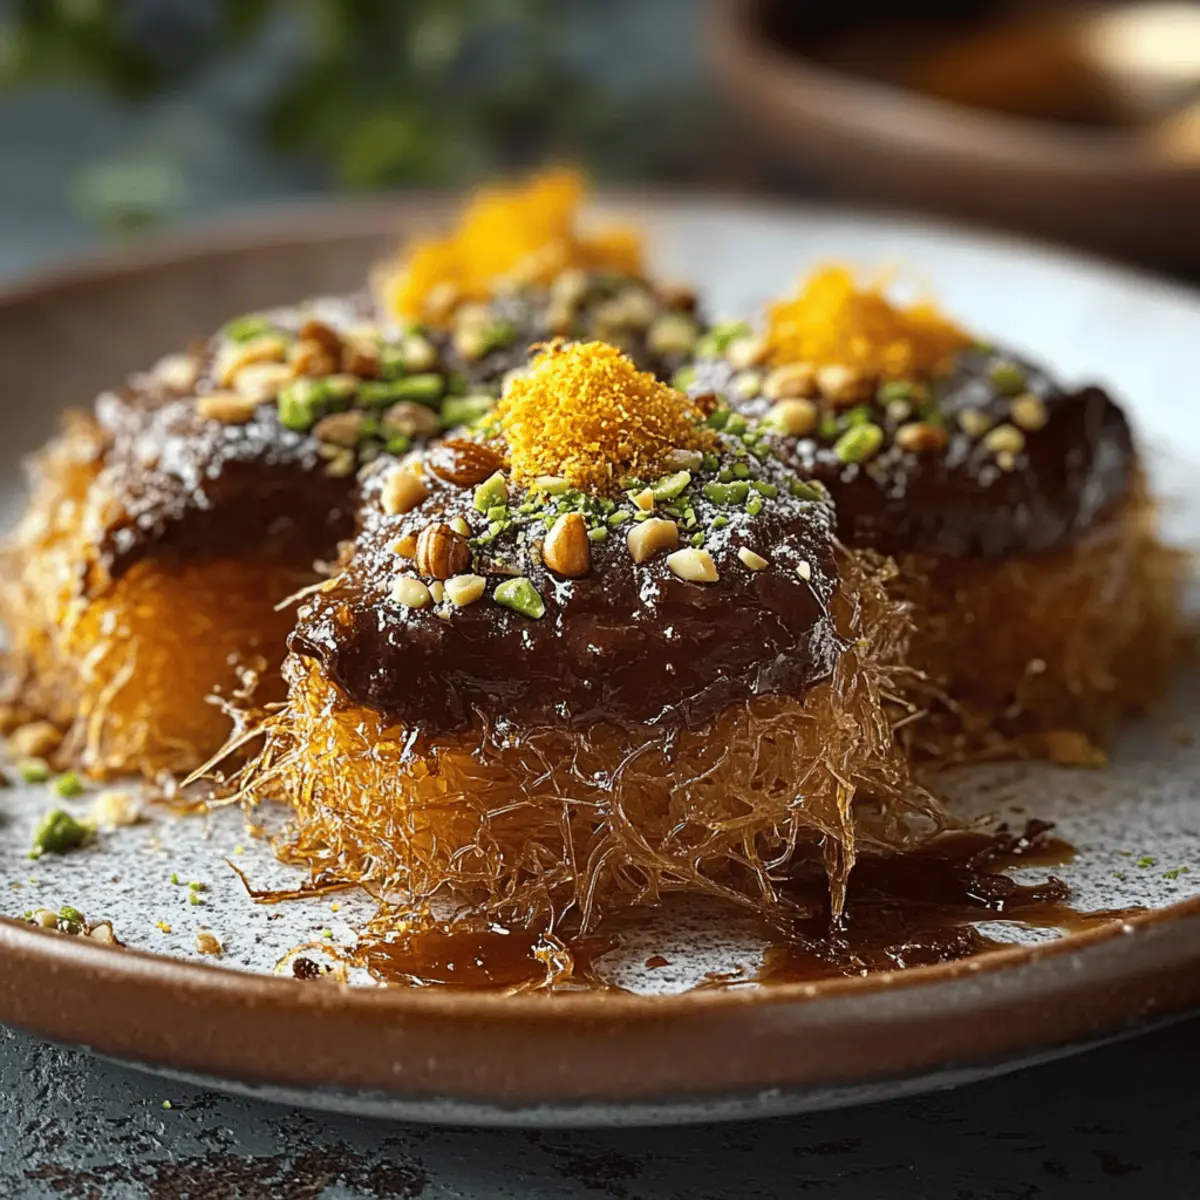
Why Is Dubai Chocolate Kataifi So Irresistible?
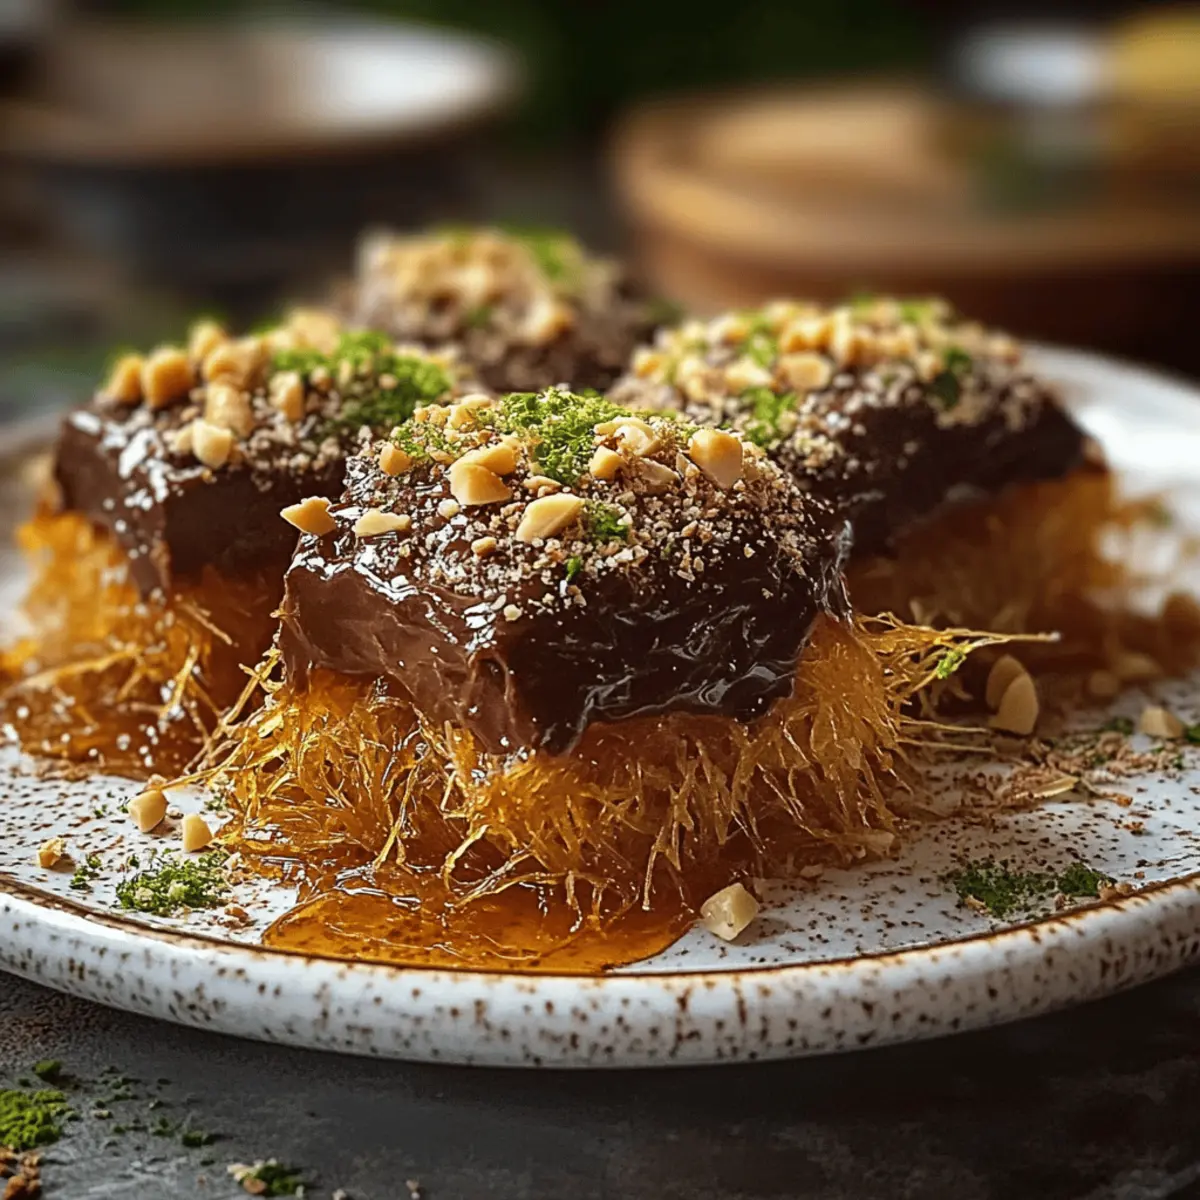
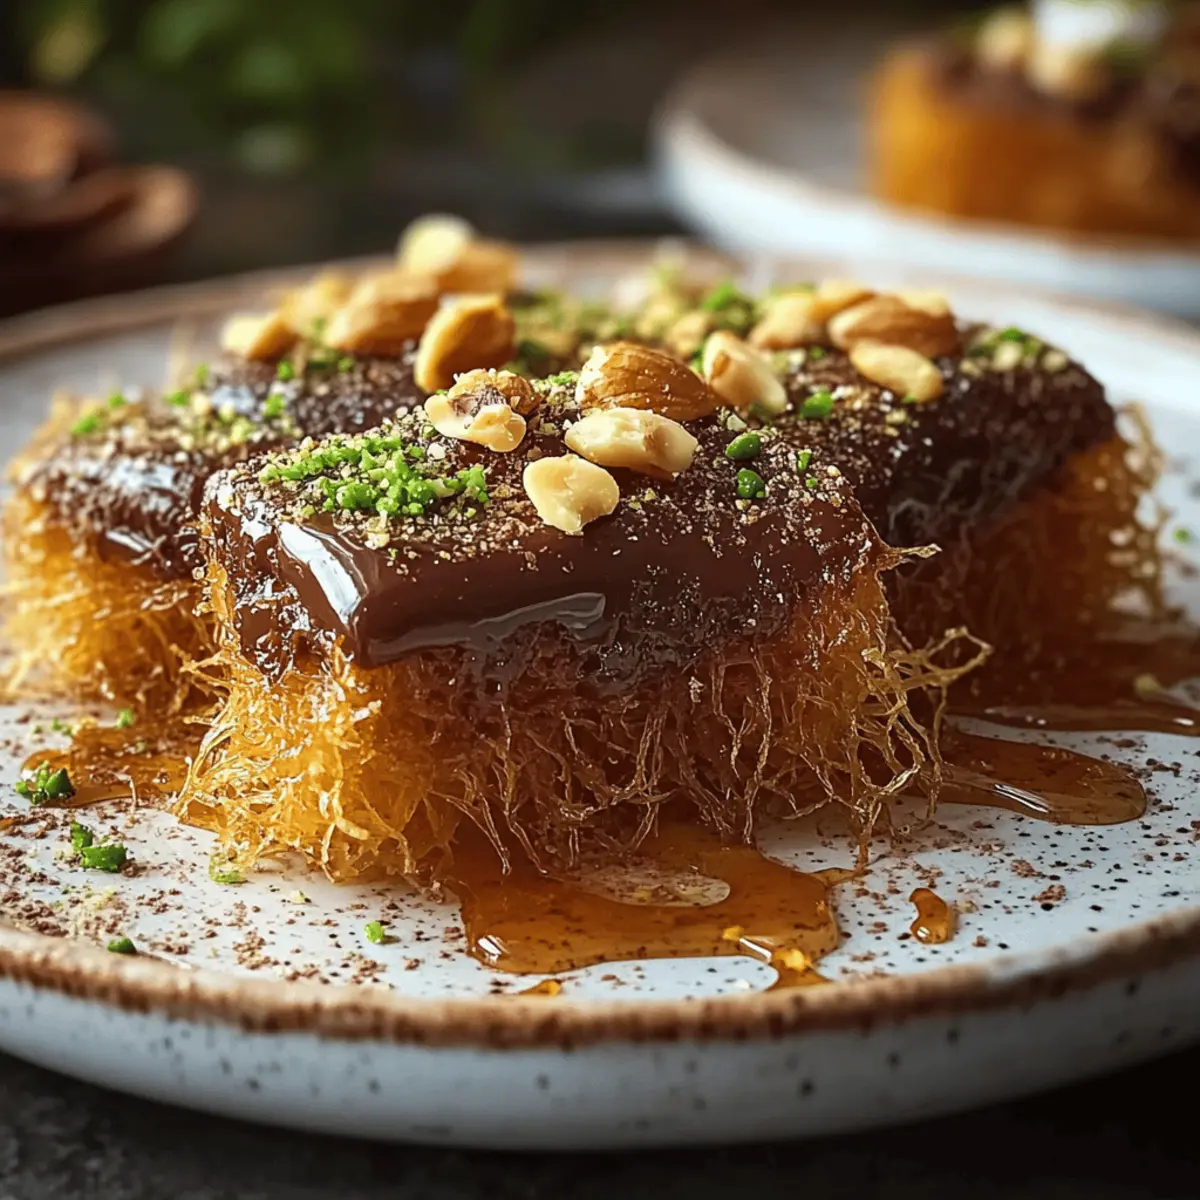
Crispy Delight: This dessert features kataifi pastry that provides a unique, crispy layer, making each bite a delightful crunch.
Effortless Preparation: With just a few simple steps, you can create this stunning dessert, appealing even to budding bakers.
Customizable Flavors: Whether you prefer dark, milk, or a mix of chocolates, the options are endless, allowing personalization for every palate.
Gourmet Touch: Serve alongside coffee or ice cream for an elevated dessert experience that’s sure to wow any crowd!
Vegan-Friendly: It’s easily adaptable, with options for dairy-free ingredients, ensuring everyone can enjoy this decadent treat!
Serve it chilled or at room temperature, and enjoy the unforgettable taste of the Middle East. If you’ve enjoyed this recipe, why not check out my Dark Chocolate Coffin for another chocolate indulgence?
Dubai Chocolate Kataifi Ingredients
• Here’s everything you need to create this decadent treat!
For the Pastry
- Kataifi pastry – This provides the crispy base; make sure it’s thawed if frozen.
- Unsalted butter – Binds the kataifi for richness; swap with vegan butter for a dairy-free version.
For the Filling
- Chocolate – The star of the dessert; choose dark, milk, or a blend in chips or chopped form for your Dubai Chocolate Kataifi.
- Chopped nuts (pistachios or walnuts) – Adds crunch and a nutty flavor; feel free to replace with seeds for a nut-free alternative.
- Orange zest – Optional to enhance with a fresh citrus twist.
For the Sweetness
- Honey or simple syrup – This adds lovely sweetness and shine; ensure alternatives like agave syrup for a vegan option.
For Garnishing (Optional)
- Coconut flakes – A tropical touch for garnish if you’re feeling adventurous!
- Cinnamon or cardamom – Optional spices to deepen the flavor and add warmth.
Gather these ingredients, and prepare to embark on a culinary journey that transports you straight to the bustling markets of Dubai!
Step‑by‑Step Instructions for Dubai Chocolate Kataifi
Step 1: Prep the Kataifi
Begin by gently separating the kataifi strands in a large bowl, taking your time to fluff them up. This step is crucial as it helps to create the light, crispy texture essential for your Dubai Chocolate Kataifi. Make sure the strands are not clumped together so they evenly absorb the butter in the next step.
Step 2: Combine Butter
Melt the unsalted butter in a small saucepan over low heat until completely liquid. Pour the melted butter over the fluffed kataifi strands while tossing them together to coat evenly. This should take about 2-3 minutes, ensuring every strand is beautifully glossy and ready for baking.
Step 3: Layer
Preheat your oven to 350°F (175°C) and grease a 9×13-inch baking dish. Press half of the buttery kataifi mixture firmly into the bottom of the dish, creating a uniform base. This layer will provide a sturdy foundation for your chocolate filling, so be sure to pack it down well for stability and subsequent crunch.
Step 4: Add Chocolate
Sprinkle your choice of chocolate evenly over the pressed kataifi base, allowing it to melt beautifully during baking. If you’re adding optional ingredients like chopped nuts or orange zest for flavor and texture, now is the time to sprinkle these on as well. Ensure an even distribution to enhance each luscious bite of your Dubai Chocolate Kataifi.
Step 5: Top and Bake
Spread the remaining kataifi mixture evenly over the chocolate layer, gently pressing it down to secure it. Place the baking dish in the preheated oven and bake for 25-30 minutes or until the top is a golden brown color and the smell of baked pastry fills your kitchen. This creates that perfect crispy finish!
Step 6: Finish and Cool
Once baked, remove the Dubai Chocolate Kataifi from the oven and immediately drizzle honey or simple syrup on top for a glossy finish. If desired, add further garnishes like coconut flakes. Let the dessert cool for about 20 minutes before cutting it into bars or squares, ensuring that they hold their shape while still warm and irresistible.
Expert Tips for Dubai Chocolate Kataifi
-
Keep It Covered: Always keep the kataifi dough covered until you’re ready to use it, as it dries out quickly and can make the final pastry tough.
-
Dairy-Free Swap: To make a delicious dairy-free Dubai Chocolate Kataifi, just use vegan butter and ensure your chocolate is dairy-free as well.
-
Flavored Chocolates: Experiment with different chocolate types like orange-infused or caramel for a fun twist that elevates the classic chocolate flavor.
-
Chill Before Serving: Let the dessert cool for at least 20 minutes after baking; this helps set the layers and ensures clean cuts for beautiful presentation.
-
Storage Tips: Store any leftovers in an airtight container at room temperature for up to three days to keep that crispy texture intact, but avoid refrigeration.
Dubai Chocolate Kataifi Variations
Feel free to explore these delightful twists to make the recipe your own and cater to your taste buds!
-
Nut-Free: Swap walnuts for sunflower seeds, keeping the same delightful crunch in a nut-free version. This option ensures everyone can partake and enjoy without worry!
-
Vegan-Friendly: Replace honey with agave syrup or maple syrup for a fully vegan-friendly sweetener. This simple swap keeps the richness while accommodating various diets.
-
Flavorful Chocolates: Experiment by adding cocoa powder to the filling for an even richer chocolate experience. If you’re a chocolate lover, this twist will intensify the flavor wonderfully!
-
Citrus Burst: Incorporate lemon or grapefruit zest instead of orange zest for a fresh, lively flavor. This change adds a bright note that beautifully complements the sweetness of the chocolate.
-
Herbal Infusion: Sprinkle fresh mint leaves on top before serving. This adds a refreshing contrast to the sweet dessert and a touch of gourmet flair!
-
Decadent Toppings: Top with a drizzle of melted chocolate over the cooled kataifi for an extra layer of indulgence. Your taste buds will thank you for this luscious addition!
-
Tropical Twist: Garnish with toasted coconut flakes and a splash of pineapple juice right before serving. This combination transports you straight to a sunny paradise!
As you explore these variations, be sure to check out my Chocolate Chip Banana Bars and Dark Chocolate Coffin for even more delectable ideas to savor.
Make Ahead Options
These Dubai Chocolate Kataifi are perfect for meal prep, allowing you to enjoy a delectable dessert with minimal last-minute effort! You can prepare the kataifi layers and layer them up to 24 hours in advance. Simply fluff the kataifi, mix it with melted butter, and layer half of it in your baking dish with chocolate and any optional ingredients. Cover tightly with plastic wrap and refrigerate. When you’re ready to bake, just top with the remaining kataifi and pop it in the oven. This not only saves you time but ensures your dessert is just as delicious and crispy when you serve it! Enjoy the luxury of dessert without the last-minute rush.
What to Serve with Easy Dubai Chocolate Kataifi
Indulge in a multisensory experience by pairing this delightful dessert with complementary flavors and textures.
-
Creamy Vanilla Ice Cream: A scoop of velvety ice cream adds a smooth contrast to the crispy pastry, creating a luscious mouthfeel.
-
Rich Espresso: The robust flavor of a well-brewed coffee balances the sweetness of the kataifi while sharpening your taste buds for each bite.
-
Fresh Berries: Sweet and tart berries bring a refreshing burst that cuts through the richness, enhancing the overall dessert experience.
-
Mint Tea: The soothing warmth of mint tea adds an aromatic element that complements the chocolate without overwhelming it.
-
Chocolaty Hot Chocolate: For a truly decadent pairing, serve your kataifi with a rich hot chocolate, elevating the chocolatey experience.
-
Pistachio Baklava: Enjoy a classic Middle Eastern treat alongside your kataifi for a feast of textures and flavors that celebrates cultural heritage.
-
Coconut Flakes: Sprinkle toasted coconut on top for an additional crunchy texture and tropical twist that harmonizes beautifully with the dessert.
Let these pairings transform your Dubai Chocolate Kataifi into an unforgettable culinary experience that transports you straight to the heart of the Middle East!
How to Store and Freeze Dubai Chocolate Kataifi
Room Temperature: Store leftover Dubai Chocolate Kataifi in an airtight container at room temperature for up to 3 days to maintain its crispy texture.
Fridge: If you need to store it longer, you can refrigerate, but be aware that this may soften the kataifi. Consume within 5 days for the best experience.
Freezer: For longer storage, freeze the kataifi tightly wrapped in plastic wrap and then placed in a freezer bag for up to 2 months. Thaw in the fridge overnight before reheating.
Reheating: To enjoy its original crispiness, reheat in a preheated oven at 350°F (175°C) for about 10 minutes before serving; this helps revive the crunch.
Dubai Chocolate Kataifi Recipe FAQs
How do I select the perfect kataifi pastry?
Absolutely! When choosing kataifi pastry, look for options that are fresh and pliable. If frozen, ensure it’s fully thawed before use. Avoid any packages that have ice crystals forming inside, as this indicates freezer burn, which can affect the texture and flavor.
What’s the best way to store Dubai Chocolate Kataifi?
For the best results, store any leftover Dubai Chocolate Kataifi in an airtight container at room temperature for up to 3 days. This maintains its crispy texture and delicious taste. If you absolutely need to refrigerate it, consume within 5 days, but keep in mind that the kataifi may lose some of its crunchiness.
Can I freeze Dubai Chocolate Kataifi?
Yes, you can! To freeze your Dubai Chocolate Kataifi, first allow it to cool completely. Wrap it tightly in plastic wrap, then place it in a freezer bag to avoid freezer burn. It can last up to 2 months. When you’re ready to enjoy it, thaw the kataifi in the fridge overnight and reheat it in a preheated oven at 350°F (175°C) for about 10 minutes for that delightful crunch.
What are common troubleshooting tips if my kataifi pastry isn’t crispy?
Very! If your kataifi isn’t getting that pleasing crispness, it could be due to moisture. Make sure to keep it covered while preparing to prevent it from drying out too much. Additionally, it’s important to bake it until it’s golden brown, as slight underbaking can lead to a chewy texture. Always check its color and aroma to ensure optimal results.
Are there any dietary adjustments I need to consider for Dubai Chocolate Kataifi?
Of course! If you’re adjusting for dietary needs, you can easily make Dubai Chocolate Kataifi dairy-free by substituting regular butter with vegan butter and using dairy-free chocolate. For nut allergies, feel free to replace those with seeds like sunflower or pumpkin seeds. Always double-check packaging for cross-contamination if you’re cooking for someone with allergies.
How do I know when my Dubai Chocolate Kataifi is done baking?
When your Kataifi is fully baked, it should be a beautiful golden brown on top, exuding a mouthwatering aroma. Normally, this takes around 25 to 30 minutes at 350°F (175°C). If you notice a darker color or a lovely scent filling your kitchen, it’s sure to be a delightful treat worth sharing!

Irresistible Dubai Chocolate Kataifi – A Sweet Middle Eastern Twist
Ingredients
Equipment
Method
- Begin by gently separating the kataifi strands in a large bowl, fluffing them up for texture.
- Melt the unsalted butter in a saucepan and pour it over the kataifi strands, tossing to coat.
- Preheat the oven to 350°F (175°C). Grease a baking dish and press half of the kataifi mixture into the bottom.
- Sprinkle chocolate over the pressed kataifi base, adding optional ingredients like nuts or zest.
- Spread the remaining kataifi mixture over the chocolate layer and bake for 25-30 minutes until golden brown.
- Remove from oven and drizzle honey or syrup on top, cool for 20 minutes before cutting.
Leave a Reply