
While flipping through an old family recipe book, I stumbled upon a dish that instantly took me back: Crunchy Chicken Thighs, a comforting staple that has brightened countless weeknight dinners. This easy recipe not only results in irresistibly juicy chicken cloaked in a golden, crispy crust, but it’s beginner-friendly, making it perfect for both seasoned chefs and newcomers alike. Just imagine the satisfying crunch that comes with every bite! Plus, it requires minimal prep and lets your oven do most of the work, freeing you up for more quality time with your loved ones. So, are you ready to savor this classic comfort food with a crispy twist that your entire family will adore? Let’s dive into the recipe together!

Why Are Crunchy Chicken Thighs So Irresistible?
Ease of Preparation: With minimal steps and simple ingredients, this recipe is perfect for beginners and seasoned cooks alike.
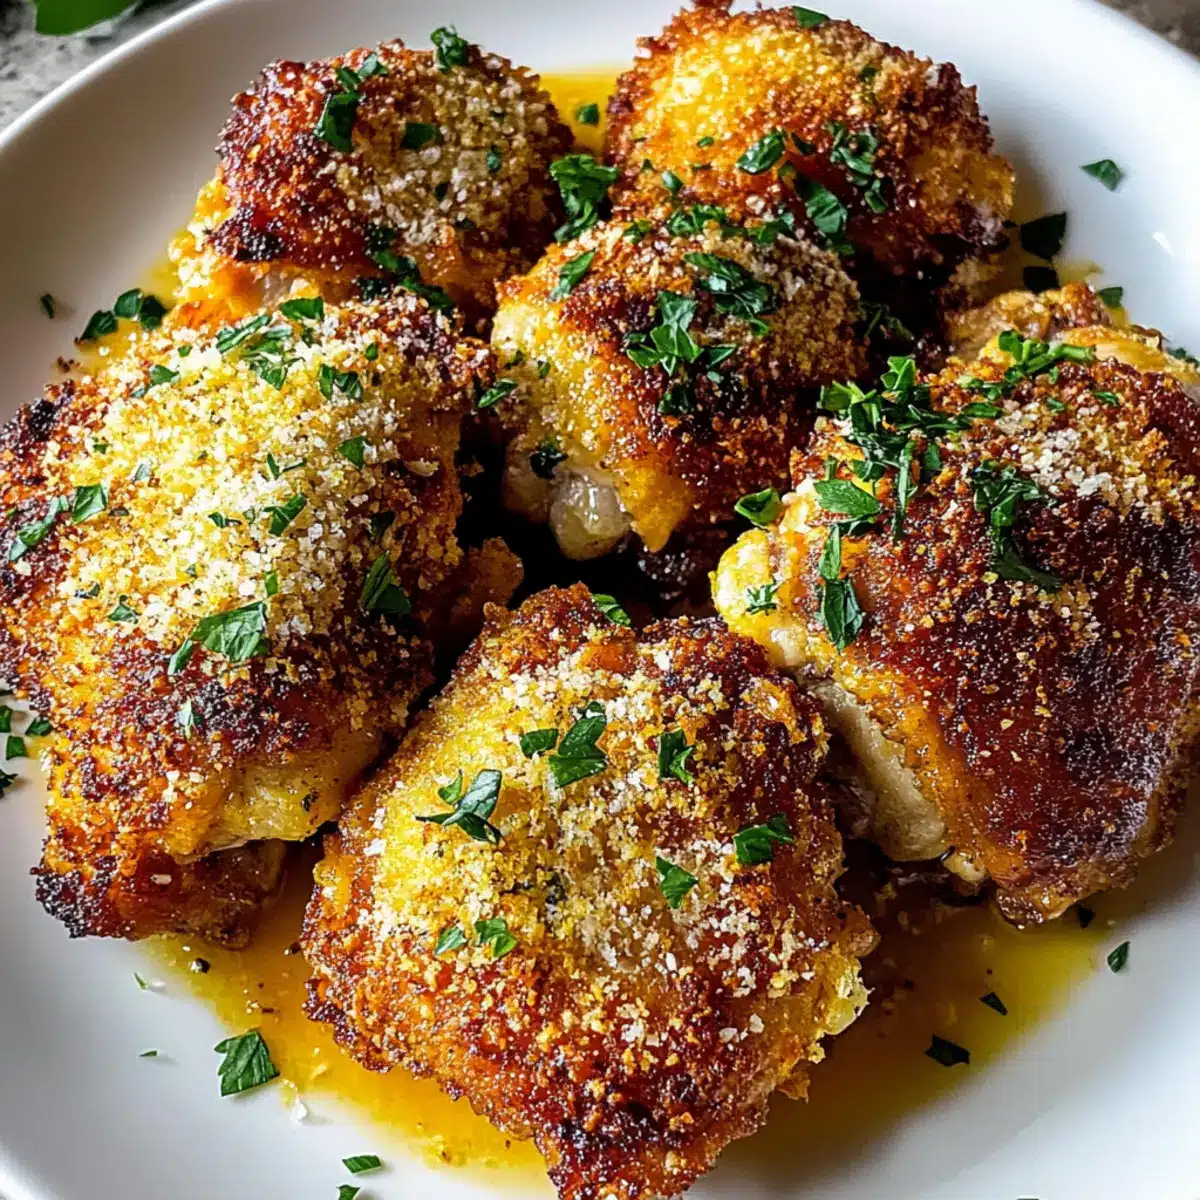
Crunchy Texture: The panko breadcrumbs create a light, crispy coating that elevates your chicken thighs to a whole new level of deliciousness.
Flavorful Experience: Each bite bursts with seasoned goodness, thanks to a flavorful blend of spices and Parmesan cheese—truly a crowd-pleaser!
Versatile Pairing: These crunchy delights can be served alongside creamy mashed potatoes, roasted vegetables, or a fresh salad for a balanced meal. For a lighter option, check out my Healthy Sticky Chicken Bowls or the refreshing Strawberry Pecan Chicken Salad for some variety!
Oven-Baked Convenience: Let your oven handle the heavy lifting while you enjoy quality time with loved ones—no frying mess or complicated techniques here!
Crunchy Chicken Thighs Ingredients
For the Chicken Coating
• Chicken Thighs – Bone-in, skin-on thighs keep the meat juicy and flavorful.
• All-Purpose Flour – Provides structure for the coating; feel free to substitute with gluten-free flour for a gluten-free version.
• Salt – A must-have for enhancing the flavors; no substitutes needed.
• Black Pepper – Adds a hint of heat; perfectly balances the dish.
• Garlic Powder – Imparts aromatic flavor; fresh garlic can give a bolder taste.
• Onion Powder – Contributes savory richness that complements the chicken.
• Paprika – Offers both color and smoky flavor; swap with cayenne for extra spice.
For the Binding
• Eggs – Essential for binding the coating to the chicken.
• Milk – Makes the egg wash richer; can be replaced with plant-based milk for a dairy-free option.
For the Crunchy Exterior
• Panko Breadcrumbs – Creates a light and crispy texture; opt for regular breadcrumbs if needed, but expect a denser finish.
• Parmesan Cheese – Infuses a cheesy flavor; use nutritional yeast for a dairy-free alternative.
For Cooking
• Olive Oil – Adds moisture and enhances flavor during frying; cooking spray is a lighter alternative.
Dive into this simple recipe for Crunchy Chicken Thighs and enjoy a delightful dinner that will have everyone asking for seconds!
Step‑by‑Step Instructions for Crunchy Chicken Thighs
Step 1: Preheat the Oven
Begin by preheating your oven to 400°F (200°C). This ensures that when you place your chicken thighs inside, they will cook evenly and achieve that irresistible crispy finish. Meanwhile, prepare your workspace and gather all the necessary ingredients to streamline the cooking process.
Step 2: Prepare the Chicken
Pat your bone-in, skin-on chicken thighs dry with paper towels; this step is crucial for achieving those crunchy chicken thighs. The drier skin allows for better browning and crispiness. Once dried, set the thighs aside while you prepare the coating mixture.
Step 3: Mix the Seasoned Flour
In a shallow dish, combine all-purpose flour, salt, black pepper, garlic powder, onion powder, and paprika. Use a whisk or fork to blend the ingredients well, ensuring an even distribution of seasonings. This flavorful mixture will help create a solid base for your crispy coating.
Step 4: Whisk the Egg Wash
In another bowl, whisk together the eggs and milk until fully combined. This will serve as the binding agent for the coating of your crunchy chicken thighs. The milk enriches the egg wash, enhancing the moisture and flavor.
Step 5: Combine the Panko Mixture
In a third bowl, mix together the panko breadcrumbs and grated Parmesan cheese. This combination will create the crispy exterior for your chicken. Press the breadcrumbs and cheese together slightly so they stick better to the chicken when coating.
Step 6: Dredge the Chicken
Take each chicken thigh and first dredge it in the seasoned flour mixture, making sure to coat it completely. Shake off any excess flour as you want a light coating. This initial layer provides structure for the following layers, setting up your crunchy chicken thighs for success.
Step 7: Dip in Egg Wash
Next, dip the floured chicken thigh into the egg wash, allowing any excess to drip off. This wet layer is essential for helping the panko mixture adhere properly, ensuring that each bite remains crispy even after baking.
Step 8: Coat with Panko Mixture
Now, coat each thigh with the panko-Parmesan mixture, pressing down gently to ensure the crumbs stick well. The more you press, the crunchier the coating will become after baking. Make sure each piece is generously covered for maximum flavor and texture.
Step 9: Sear the Thighs
In an oven-safe skillet, heat olive oil over medium heat. Once hot, add the coated chicken thighs skin-side down. Sear them for about 3–4 minutes until the skin is golden brown and crispy, then carefully flip and cook the other side for another 3–4 minutes until it matches in color.
Step 10: Bake the Chicken
Transfer the skillet with the chicken thighs into your preheated oven and bake for 20–25 minutes. Use a meat thermometer to check that the internal temperature reaches at least 165°F (74°C). This ensures your crunchy chicken thighs are not only delicious but also safe to eat.
Step 11: Rest Before Serving
Once the chicken is done baking, remove it from the oven and let it rest for a few minutes. This resting period allows the juices to redistribute throughout the meat, ensuring each bite of your crunchy chicken thighs is juicy and full of flavor.
Expert Tips for Crunchy Chicken Thighs
- Pat Dry: Always dry the chicken skin thoroughly before coating; moisture can prevent a truly crispy finish.
- Use Panko: For the best crunch, stick with panko breadcrumbs. Regular breadcrumbs yield a denser coating.
- Avoid Overcrowding: Cook in batches if necessary; overcrowding the pan can trap steam and lead to sogginess.
- Check Temperature: Use a meat thermometer to ensure the chicken has reached 165°F (74°C) for safe consumption.
- Let Them Rest: Allow the chicken thighs to rest for a few minutes after baking; this helps lock in juices for a succulent bite.
How to Store and Freeze Crunchy Chicken Thighs
Fridge: Store leftover crunchy chicken thighs in an airtight container for up to 3 days. Ensure they are completely cooled before sealing to maintain freshness.
Freezer: For longer storage, freeze the chicken thighs in a single layer on a baking sheet. Once frozen, transfer to a freezer-safe bag or container for up to 2 months.
Reheating: To retain the crispy coating, reheat the chicken thighs in a preheated oven at 350°F (175°C) for 15-20 minutes. Avoid microwave reheating as it can make them soggy.
Thawing: When ready to enjoy, thaw frozen chicken thighs overnight in the fridge for best results, then reheat as mentioned above for that delightful crunch!
What to Serve with Crunchy Chicken Thighs?
Transform your dinner table into a comforting feast with delightful accompaniments that perfectly complement each crunchy bite.
-
Creamy Mashed Potatoes: The rich, buttery texture of mashed potatoes pairs beautifully with the crispy chicken, offering a satisfying contrast in every bite.
-
Roasted Seasonal Vegetables: Crisp-tender veggies add freshness and color to your plate while balancing the savory flavors of chicken thighs.
-
Garlic Butter Rice Pilaf: Fluffy rice infused with garlic and herbs provides a lovely base, soaking up the juices from the crunchy chicken for added flavor.
-
Fresh Garden Salad: A mix of crisp greens and tangy vinaigrette lightens the meal, creating a refreshing counterpoint to the richness of the chicken.
-
Sweet Corn on the Cob: The natural sweetness of corn brightens the plate and offers a playful crunch that echoes the crispy chicken.
-
Crispy Brussels Sprouts: Roast these little gems until golden and crispy for a side that mirrors the crunchy texture of your main dish, adding a nutty flavor overall.
-
Apple Cider Mimosa: For a refreshing drink, this light cocktail brings a hint of sweetness, perfectly washing down the savory flavors of your meal.
-
Chocolate Cake: Indulge your sweet tooth with a slice of moist chocolate cake; it’s the perfect ending to a delightful dinner, contrasting beautifully with the crunchy chicken.
-
Lemon Sorbet: A light, zesty dessert that cleanses the palate after a hearty meal, leaving everyone satisfied and ready for the next bite of crunch.
Crunchy Chicken Thighs: Flavorful Twists
Feel free to make this recipe your own with these fun variations that will tantalize your taste buds!
- Spicy Kick: Add cayenne pepper to the flour mixture for a delightful heat that brings excitement to each bite.
- Herb Blend: Mix dried Italian herbs into the panko for an herbaceous flavor that pairs beautifully with the chicken.
- Honey Glaze: Drizzle with a bit of honey before baking for a sweet, sticky finish that contrasts with the crunch.
- BBQ Flair: Incorporate smoked paprika into the flour mixture and serve with your favorite barbecue sauce for a laid-back barbecue vibe.
- Lemon Zest: Sprinkle some lemon zest into the egg wash for a refreshing citrus flavor that brightens the entire dish.
- Asian Twist: Use sesame oil for frying and serve with a side of soy sauce for dipping to give your crunchy thighs an international flair.
- Parmesan Upgrade: Stir in extra Parmesan cheese into the panko to amplify that cheesy crunch that everyone loves.
Want something different altogether? Try serving these mouth-watering delights with a side of creamy mashed potatoes or the vibrant and delicious Strawberry Pecan Chicken Salad for a refreshing counterpoint! Whatever you choose, these variations will ensure you have a delightful dinner that keeps the family coming back for more.
Make Ahead Options
These Crunchy Chicken Thighs are perfect for busy weeknights when you want to save time without sacrificing flavor! You can easily prep the chicken thighs up to 24 hours in advance by coating them in the flour mixture and storing them in the refrigerator. To maintain their crispy texture, avoid applying the panko coating until just before cooking. You can refrigerate the chicken thighs (wrapped tightly) in an airtight container until you’re ready to finish the recipe. When you’re ready to serve, simply dredge the thighs in the egg wash, coat them with the panko mixture, sear, and bake for that crunchy perfection your family will love—just as delicious as when made fresh!

Crunchy Chicken Thighs Recipe FAQs
What type of chicken thighs should I use for this recipe?
I recommend using bone-in, skin-on chicken thighs for maximum flavor and juiciness. If you prefer boneless thighs, you can use them as well, but they may not achieve the same level of crispiness due to the absence of skin.
How should I store leftovers of Crunchy Chicken Thighs?
To keep your crunchy chicken thighs fresh, store them in an airtight container in the refrigerator. Make sure they are completely cooled before sealing them; they will stay delicious for up to 3 days.
Can I freeze Crunchy Chicken Thighs?
Absolutely! For longer storage, place the chicken thighs in a single layer on a baking sheet and freeze until firm. Then, transfer them to a freezer-safe bag or container, where they can be stored for up to 2 months. This way, you can enjoy them even on busy nights!
What’s the best way to reheat Crunchy Chicken Thighs?
To maintain that delightful crunch, reheat the chicken thighs in a preheated oven at 350°F (175°C) for 15-20 minutes. Avoid using the microwave, as it can turn your crispy coating soggy and unappetizing.
What if my chicken thighs aren’t crispy enough?
If your chicken thighs lack desired crispiness, ensure the skin is thoroughly dried before coating. Overcrowding the pan during cooking may also trap steam, preventing the crunchy texture. Make sure to allow space for each thigh in the skillet for even browning!
Are there any dietary considerations for this recipe?
For those with dietary restrictions, you can easily modify this recipe. Use gluten-free flour instead of all-purpose flour and plant-based milk for a dairy-free option. If you’re concerned about allergens, always double-check labels on your ingredients!

Crunchy Chicken Thighs: A Crispy Delight for Dinner Tonight
Ingredients
Equipment
Method
- Preheat your oven to 400°F (200°C).
- Pat the chicken thighs dry with paper towels.
- In a shallow dish, combine all-purpose flour, salt, black pepper, garlic powder, onion powder, and paprika.
- In another bowl, whisk together the eggs and milk until fully combined.
- Mix together the panko breadcrumbs and grated Parmesan cheese in a third bowl.
- Dredge each chicken thigh in the seasoned flour mixture.
- Dip the floured chicken thigh into the egg wash.
- Coat each thigh with the panko-Parmesan mixture, pressing gently.
- In an oven-safe skillet, heat olive oil over medium heat and sear the chicken thighs skin-side down for 3-4 minutes.
- Transfer the skillet to the preheated oven and bake for 20-25 minutes.
- Let the chicken rest for a few minutes before serving.
Leave a Reply