
As the oven warms and fills the kitchen with a cozy aroma, I often find myself daydreaming about breakfast. If you’re tired of the same old options and looking for a delightful twist, these Easy Quichelettes are just the ticket. Perfect for busy mornings or leisurely weekends, you’ll love how adaptable they are—swap in your favorite meats, vegetables, or cheeses for a breakfast that truly hits the spot. Not only are they quick to prepare, but they also make a fantastic make-ahead meal the whole family can enjoy. So, what delicious combinations will you come up with? Let’s dive into this versatile recipe that transforms breakfast into a fun, flavorful experience!
Why are Easy Quichelettes a breakfast winner?
Versatile, these Easy Quichelettes can adapt to your taste! Enjoy a savory blend of sausage, peppers, or fresh herbs — you decide! Time-saving is key; prep them in minutes and bake while you sip coffee. Family-friendly and loved by everyone, they’re perfect for busy mornings or brunch gatherings. Pair them with a light green salad or some fresh fruit for a delightful meal. Dive into this irresistible recipe and discover your favorite combinations!
Easy Quichelettes Ingredients
• Get ready to create your new favorite breakfast!
For the Base
- Eggs – Essential for structure and protein; they bind the quichelettes together perfectly.
- Milk – Adds creaminess; feel free to substitute with almond or oat milk for a dairy-free option.
- Bisquick Mix – Creates that light, fluffy texture; you can also use a homemade mix if desired.
For the Fillings
- Sausage – Adds flavor and heartiness; consider pre-cooked sausage for quicker preparation.
- Vegetables – Fresh options like spinach or bell peppers brighten your quichelette; sauté them first for enhanced flavor.
- Cheese – Choose your favorite like cheddar or feta to amp up the taste; try mixing different cheeses for a unique twist.
Explore endless variations with this straightforward Easy Quichelettes recipe!
Step‑by‑Step Instructions for Easy Quichelettes
Step 1: Preheat and Prepare
Begin by preheating your oven to 400°F (200°C). While it warms, don your apron and take a non-stick muffin pan. Generously spray each well with cooking spray to ensure your Easy Quichelettes won’t stick, allowing for a perfect release after baking. This key step sets the stage for a worry-free cooking experience.
Step 2: Whisk the Base
In a large mixing bowl, crack open the eggs and pour in the milk, whisking them together until they’re well blended and creamy. This mixture will serve as the heart of your Easy Quichelettes, so take a moment to ensure the colors meld together beautifully. Aim for a smooth and frothy texture which will contribute to their delightful fluffiness.
Step 3: Incorporate the Bisquick
Gradually add the Bisquick mix to the egg and milk blend while stirring gently. Keep mixing until the batter is smooth and free of lumps. The Bisquick gives your quichelettes that light and airy structure we love, making each bite feel like a fluffy cloud of deliciousness. Take care not to overmix; a gentle touch goes a long way here.
Step 4: Fold in Fillings
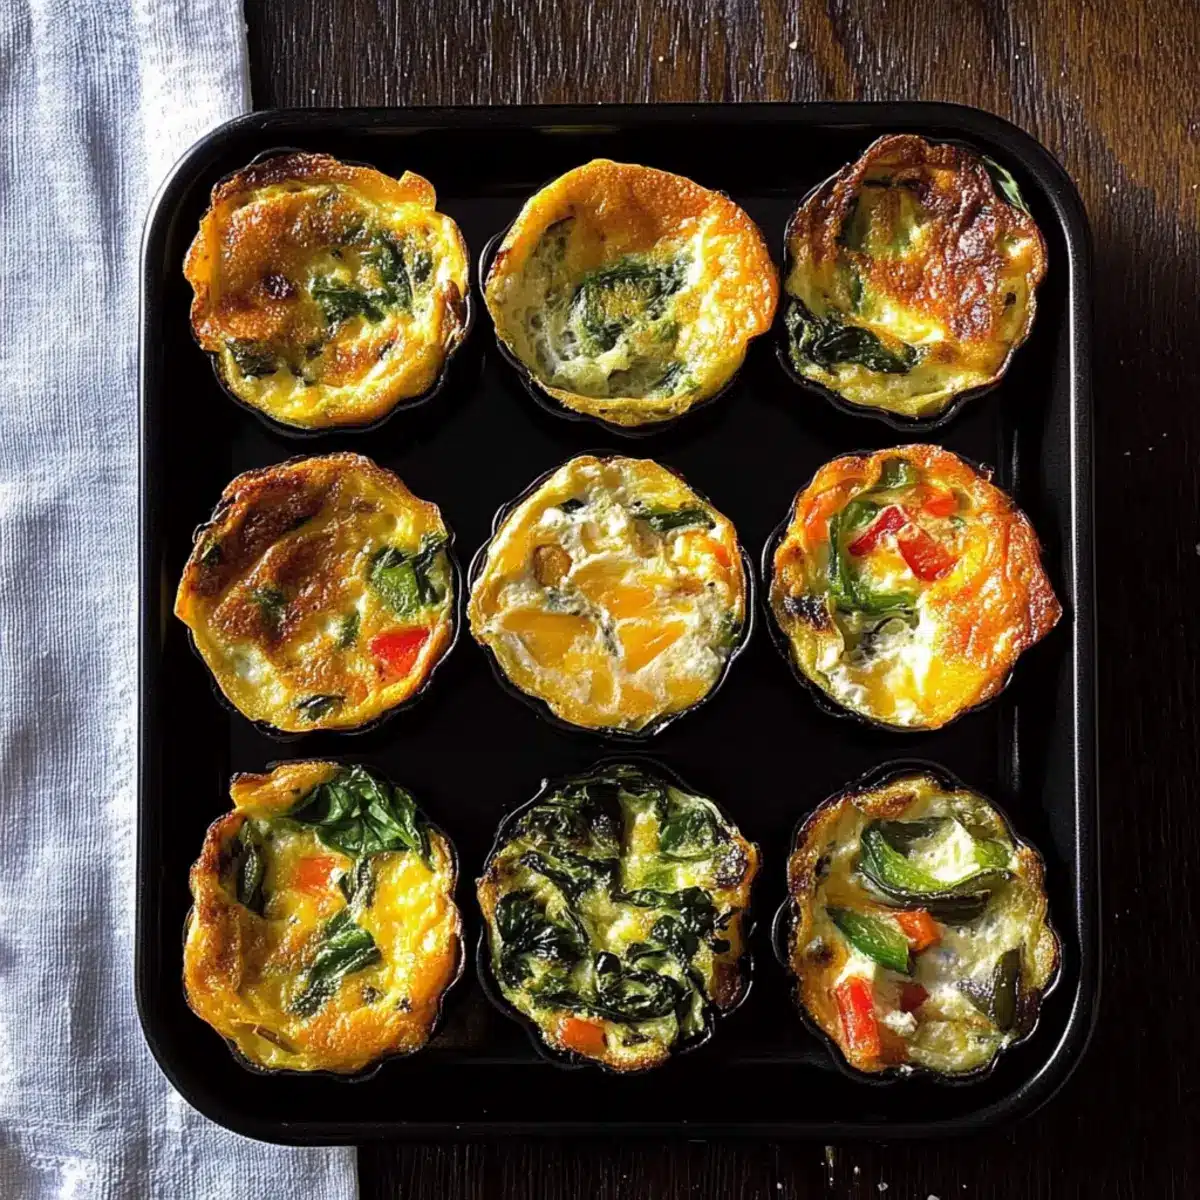
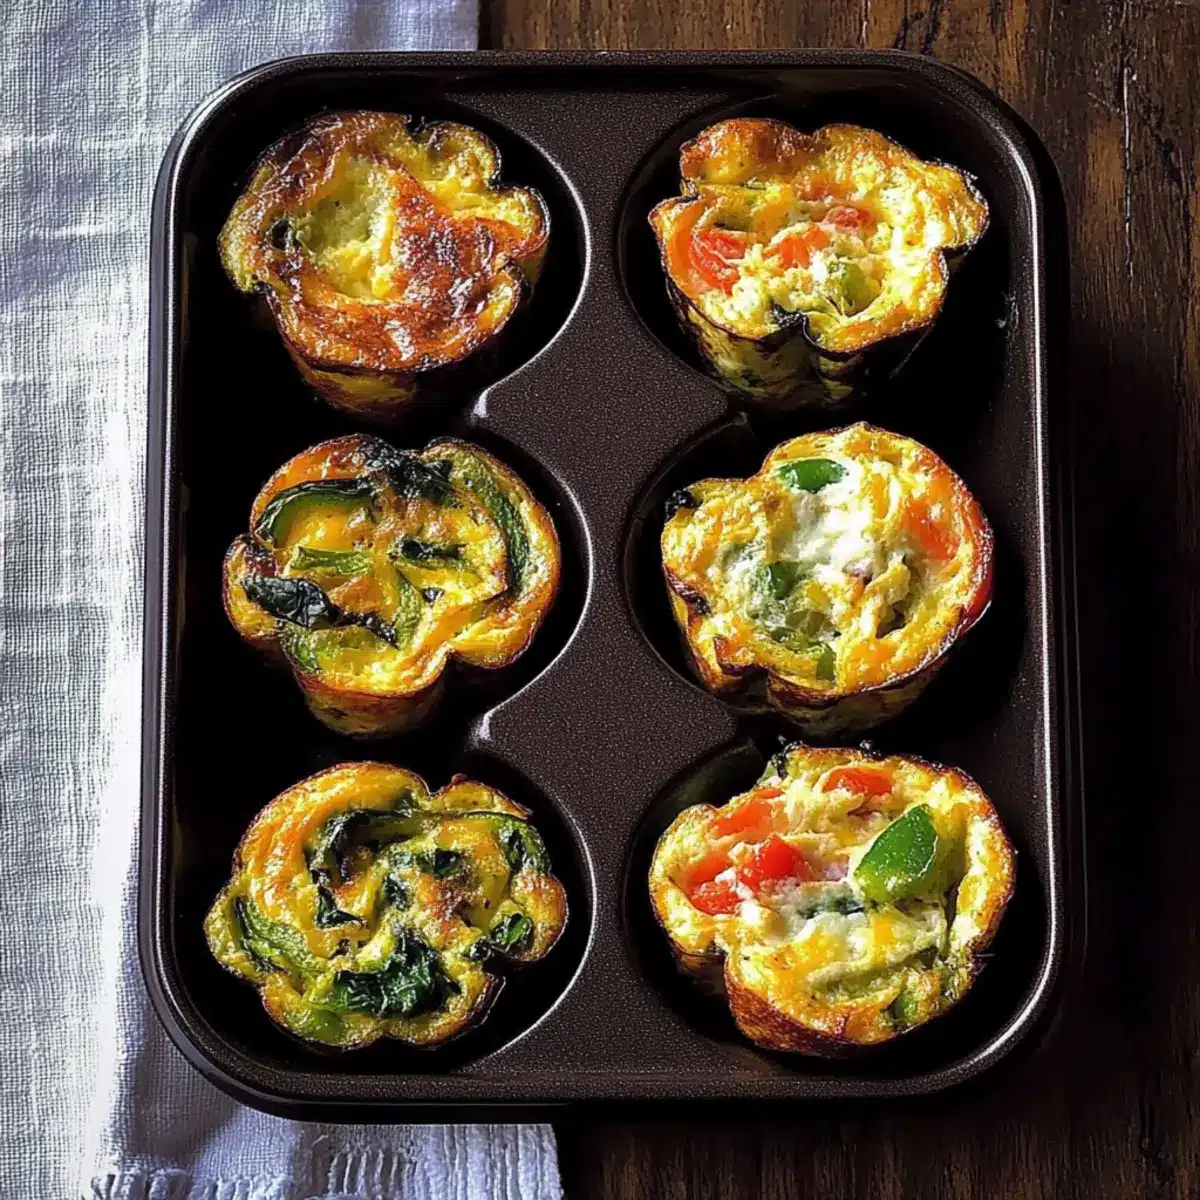
Next, it’s time to bring flavor into your Easy Quichelettes by folding in your choice of cooked sausage, sautéed vegetables, and cheese. Choose ingredients that excite you—perhaps savory sausage, vibrant bell peppers, and sharp cheddar. The goal is to create a hearty filling evenly distributed throughout the mixture, enhancing every quichelette with delicious flavors.
Step 5: Fill the Muffin Pan
Now, carefully pour your quichelette mixture into the prepared muffin wells, filling each about three-quarters full. This allows room for the quichelettes to rise without overflowing. Use a measuring cup for precision, ensuring even portions across all muffins. As the mixture settles, envision the delightful bites you’ll soon enjoy.
Step 6: Bake to Perfection
Slide your muffin pan into the preheated oven and bake for approximately 20 minutes. Keep an eye on them during the last few minutes; you’re looking for a slightly golden top and a firm, set center. These visual cues will indicate that your Easy Quichelettes are ready to come out and cool.
Step 7: Cool and Serve
Once baked, remove the muffin pan from the oven and let it cool for a few minutes. This brief resting period helps the quichelettes firm up a bit more, making them easier to remove. Gently loosen the edges with a knife before flipping them out onto a cooling rack or serving platter. Now they’re ready to bring smiles to your breakfast table!

What to Serve with Easy Quichelettes?
Looking to create a delightful breakfast spread that warms the soul? These quichelettes are versatile and pair beautifully with various sides and drinks!
- Fresh Fruit Salad: A colorful mix of seasonal fruits provides a refreshing contrast to the savory quichelettes and adds natural sweetness.
- Crispy Green Salad: Pair with a simple arugula and lemon vinaigrette for a light and satisfying crunch that balances the fluffy texture.
- Savory Bacon Strips: The salty, smoky flavor of crispy bacon complements the creamy quichelettes, making for a classic breakfast pairing.
- Herbed Yogurt Dip: A delightful dollop of herbed yogurt adds a cool, tangy element that enhances the flavors of the quichelettes.
- Zesty Tomato Salsa: Adding a spoonful of fresh salsa provides a lively burst of acidity and freshness, elevating each bite.
- Hot Coffee or Tea: Kickstart your morning with a steaming cup of your favorite brew or herbal tea for a cozy morning ritual.
- Warm Croissants: The buttery flakiness of a croissant offers a lovely texture contrast, making it a perfect addition to your breakfast table.
- Homemade Jam: Spread a bit of seasonal jam on toast for a sweet, fruity note that pairs perfectly with the savory quichelettes.
- Chocolate Croissant Muffins: For a delightful twist, serve alongside sweet pastries that enhance the breakfast experience, especially for chocolate lovers!
Make Ahead Options
These Easy Quichelettes are perfect for meal prep, saving you time on busy mornings! You can prepare the egg and milk mixture and mix it with the Bisquick up to 24 hours in advance; simply store it in the refrigerator. In addition, you can chop and pre-cook your preferred fillings, such as sausage or vegetables, and keep them stored in an airtight container for up to 3 days. When it’s time to bake, just fold the fillings into the mixture, pour into the muffin pan, and bake as directed. This way, you’ll enjoy delicious, fresh Easy Quichelettes with minimal effort, ready in no time for breakfast bliss!
Expert Tips for Easy Quichelettes
- Pre-Cook Fillings: Ensure all sausage and dense vegetables are cooked beforehand to avoid any undercooked surprises.
- Mind the Mix: Avoid overmixing the egg and Bisquick mixture. A gentle fold helps retain air for that light, fluffy texture in your Easy Quichelettes.
- Experiment Freely: Don’t hesitate to swap out ingredients! Mix different cheeses and vegetables to discover your favorite flavor combinations—let your creativity shine!
- Watch the Oven: Keep an eye on your quichelettes in the last few minutes. Look for a golden top and a firm center to know they’re perfectly baked.
- Storage Savvy: If you make these ahead, store them in an airtight container in the fridge for up to 3 days. They’ll reheat beautifully for quick breakfasts!
Easy Quichelettes Variations & Substitutions
Make your breakfast exciting by customizing these quichelettes with your favorite flavors and ingredients!
-
Sausage Swap: Substitute bacon or ham for sausage to explore a different flavor profile. Each option offers its own unique, savory twist!
-
Veggie Delight: Toss in seasonal vegetables like zucchini, asparagus, or roasted red peppers for a fresh burst of color and flavor. Experimenting with each season’s produce opens up a world of delightful tastes.
-
Cheese Twist: Try mixed cheeses like mozzarella, gouda, or pepper jack instead of standard cheddar for a creamy melt and added richness. A blend can elevate the quichelettes to a whole new level!
-
Dairy-Free: Replace regular milk with almond or oat milk to make these quichelettes dairy-free without sacrificing flavor or texture. Enjoy these tasty bites without any concerns!
-
Spicy Kick: Add a pinch of cayenne pepper, diced jalapeños, or chili flakes to rev up the heat in your quichelettes. A little spice can add a delightful kick to your breakfast.
-
Herb Infusion: Toss in fresh herbs like basil, chives, or cilantro for an aromatic flavor boost. Fresh herbs can bring vibrancy to every bite and enhance the overall taste profile.
-
Mushroom Medley: Use sautéed mushrooms or leeks for an earthy touch that pairs beautifully with eggs and cheese. This classic duo can create a comforting, hearty breakfast experience.
-
Homemade Bisquick: Want to skip store-bought? Create your own baking mix with 1 cup flour, 1.5 tsp baking powder, a pinch of salt, and 1 tbsp fat for that fluffy base. It’s an easy solution for homemade cooking!
For more culinary inspiration, don’t forget to check out Baked Chicken Meatballs or perhaps whip up a delicious Shrimp Curry Green. These recipes are a great way to continue experimenting with flavors in your kitchen!
How to Store and Freeze Easy Quichelettes
- Fridge: Store your Easy Quichelettes in an airtight container for up to 3 days. This keeps them fresh and ready for quick breakfasts or snacks!
- Freezer: For longer storage, freeze quichelettes individually wrapped in plastic wrap, then place them in a freezer-safe bag for up to 3 months.
- Reheating: To reheat, simply pop them in a preheated oven at 350°F (175°C) for about 10-15 minutes or microwave for a quick fix. Enjoy them warm!
- Make-Ahead: These quichelettes can be prepared ahead of time and stored, making them a fantastic option for busy mornings or meal prep days!

Easy Quichelettes Recipe FAQs
What ingredients should I use for the best flavor?
Absolutely! For the best flavor, start with fresh ingredients. Use farm-fresh eggs and high-quality cheese, as they will significantly enhance the taste. If you’re adding vegetables, opt for those that are vibrant and in season. For meats, use pre-cooked sausage or ham for convenience. If you see any dark spots on your vegetables, it’s best to avoid those.
How should I store leftover Easy Quichelettes?
Very simply! Store your Easy Quichelettes in an airtight container in the refrigerator for up to 3 days. This keeps them fresh and ready for quick breakfasts or snacks. Just remember to let them cool completely before sealing to prevent condensation, which can make them soggy.
Can I freeze Easy Quichelettes for later?
Absolutely! To freeze, individually wrap each quichelette in plastic wrap and then place them in a freezer-safe bag. They can be frozen for up to 3 months. When you’re ready to enjoy them again, just remove from the freezer and reheat in a preheated oven at 350°F (175°C) for about 10-15 minutes, or pop them in the microwave for a quick fix.
What should I do if my quichelettes don’t puff up?
Sometimes, this can happen due to overmixing the egg mixture. To avoid this, mix just until combined; a few lumps are okay! Another trick is to ensure your oven is fully preheated before baking, as a steady, hot environment is essential for helping them puff up and achieve that fluffy texture we’re after. Don’t worry too much; even if they don’t puff perfectly, they will still taste delicious!
Are there any dietary considerations I should keep in mind?
Definitely! If you have specific dietary concerns, feel free to customize your Easy Quichelettes. For a lighter option, use skim milk or skip cheese altogether. If you’re cooking for a family member with allergies, substitute with non-dairy milk and ensure all ingredients are safe for them. For pets, avoid sharing any quiche made with onions or garlic, as these can be harmful to them.
Delicious Easy Quichelettes for Effortless Breakfast Bliss
Ingredients
Equipment
Method
- Preheat your oven to 400°F (200°C) and spray each muffin well with cooking spray.
- In a large bowl, whisk together the eggs and milk until well blended and creamy.
- Gradually add in the Bisquick mix, stirring gently until smooth and free of lumps.
- Fold in your choice of cooked sausage, sautéed vegetables, and cheese.
- Pour the mixture into the prepared muffin wells, filling each about three-quarters full.
- Bake for approximately 20 minutes, watching for a slightly golden top.
- Remove from the oven and let cool for a few minutes before serving.
Leave a Reply