
As the scent of golden cream puffs fills the kitchen, I can’t help but feel a wave of nostalgia wash over me. This Mother’s Day Cream Puff Dessert perfectly marries an airy pastry with rich, homemade vanilla pudding, creating a treat that dazzles the senses and warms the heart. Not only is this delightful dessert simple to whip up, but it also offers room for creativity—mix in instant pudding or drizzle it with chocolate for fun twists! Whether you’re treating a special someone or satisfying your own sweet tooth, this recipe is a guaranteed crowd-pleaser. What’s your favorite way to make it your own?
Why is this Cream Puff Dessert a Must-Try?
Simplicity: This recipe is incredibly easy to follow, making it perfect for both novice and seasoned bakers alike.
Versatility: With options to use homemade or instant pudding, you can tailor this dessert to fit your schedule and preferences.
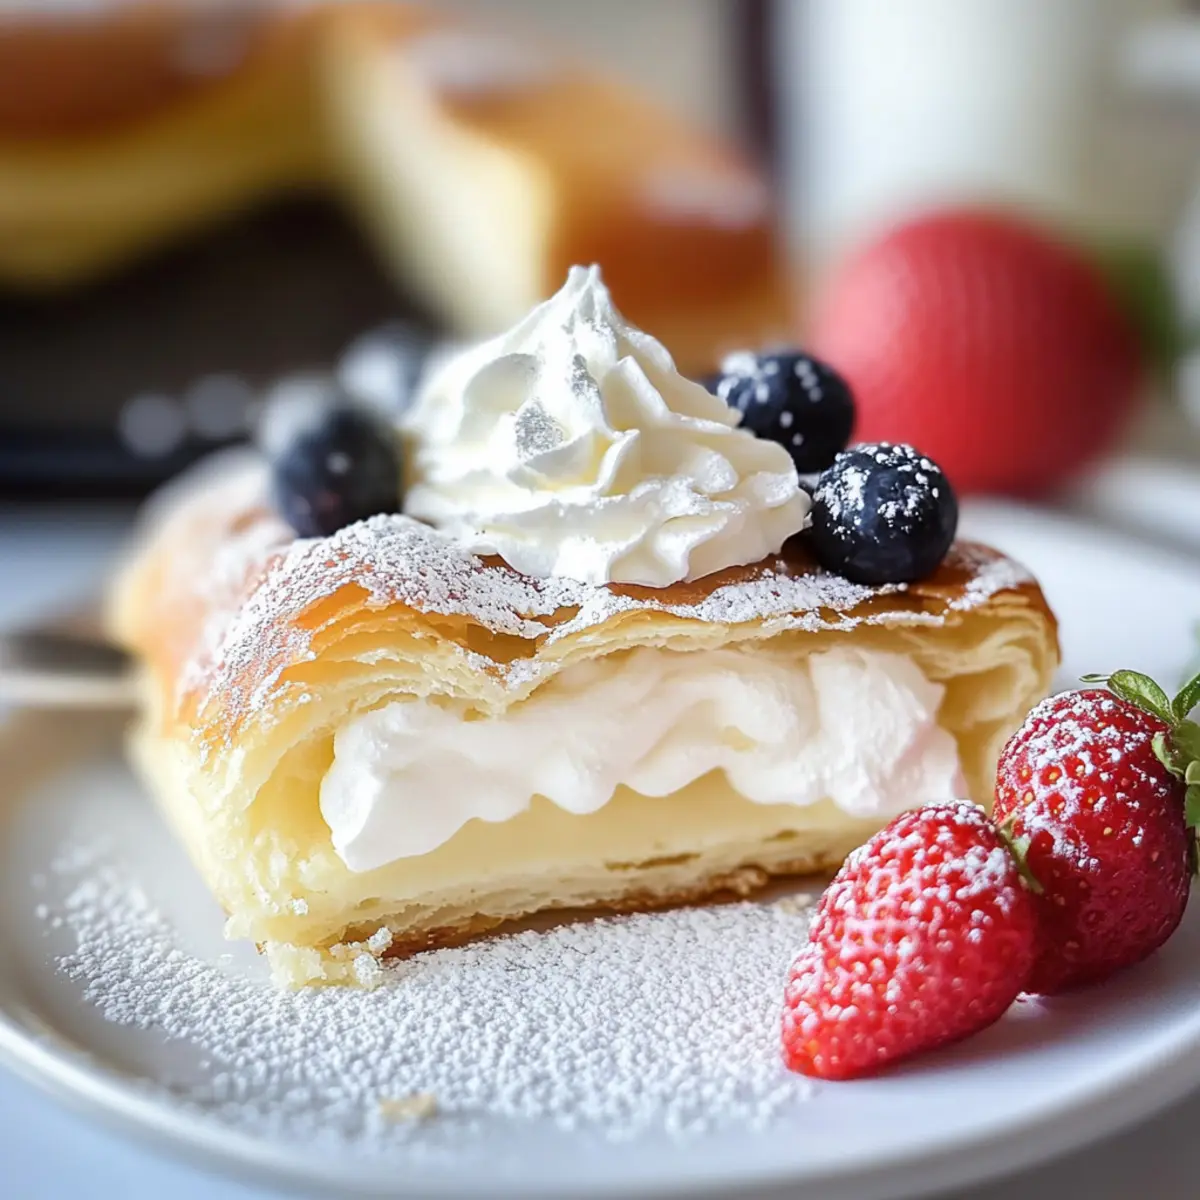
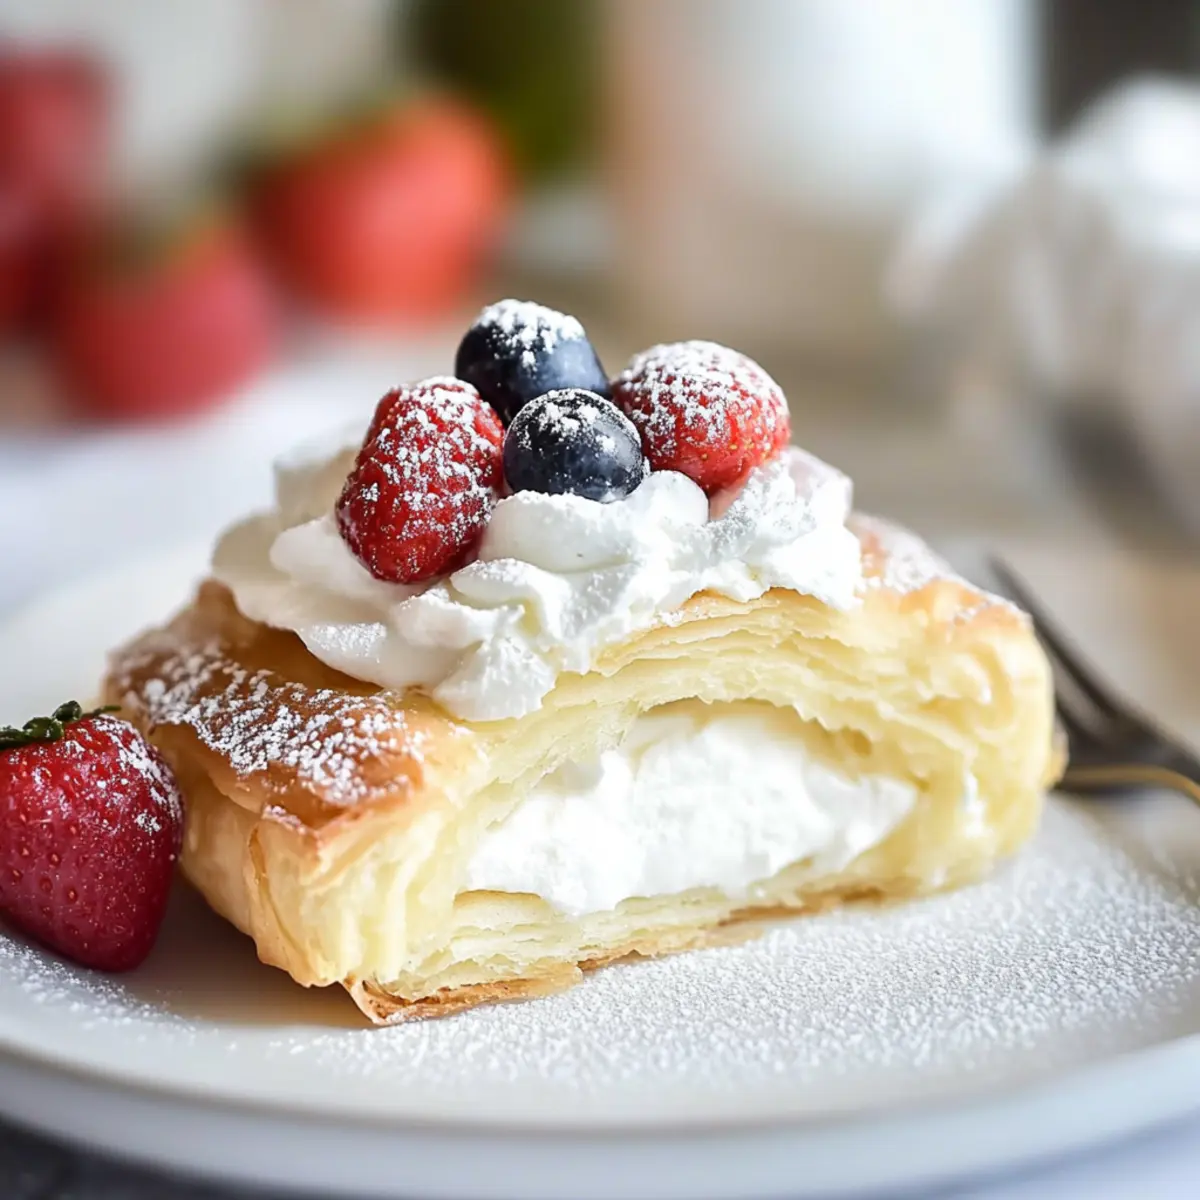
Impressive Presentation: The airy cream puff layered with rich vanilla pudding topped with whipped cream creates a stunning dessert that will wow your guests.
Crowd-Pleasing Flavor: This dessert combines light pastry with a luscious filling, making it irresistible to all.
Nostalgic Touch: It captures the warmth of home cooking, perfect for family gatherings or special occasions like Mother’s Day.
Couldn’t have enough desserts? Check out my recipes for Pumpkin Cream Cheese or Tuscan Chicken Orzo for more delightful options!
Mother’s Day Cream Puff Dessert Ingredients
For the Cream Puff Layer
- Water – Provides moisture for the cream puff layer; use filtered water for best results.
- Butter – Adds richness and flavor; can be substituted with margarine if needed.
- Flour – Establishes the structure of the cream puff; all-purpose flour is recommended, but gluten-free blends can be experimented with.
- Eggs – Essential for structure, contributing to the lightness and rise of the cream puff; no substitute recommended.
For the Vanilla Pudding Filling
- Sugar – Sweetens the pudding filling; brown sugar offers a deeper flavor, but granulated is preferred for classic taste.
- Cornstarch – Thickens the pudding; can be substituted with arrowroot or tapioca starch for a gluten-free option.
- Salt – Enhances flavor; use kosher or table salt as available.
- Whole Milk – Provides creaminess to the pudding; alternatives like almond or coconut milk can be used for lactose-free options.
- Egg Yolks – Intensify the richness and color of the pudding; no substitutes will replicate this effect.
- Cream Cheese – Adds creaminess and tang to the pudding; substitute with mascarpone for a different flavor profile.
- Vanilla Extract – Infuses the pudding with flavor; can be directly substituted with vanilla bean paste for a richer taste.
For the Topping
- Whipped Topping – Offsets the richness of the pudding; can be swapped with homemade whipped cream for a fresher touch.
- Chocolate Sauce – An optional drizzle for added flavor; perfect for those who love a chocolatey twist.
- Fresh Berries – Optional toppings for extra flavor and presentation; they add freshness and a pop of color!
This Mother’s Day Cream Puff Dessert is sure to create heartwarming memories and delightful moments!
Step‑by‑Step Instructions for Mother’s Day Cream Puff Dessert
Step 1: Preheat the Oven
Begin by preheating your oven to 400°F (200°C). While the oven is warming up, take a 9×13-inch baking dish and lightly grease it with butter or non-stick spray. This will ensure your cream puff layer releases easily once it’s baked, creating a lovely golden base for your Mother’s Day Cream Puff Dessert.
Step 2: Make the Cream Puff Layer
In a saucepan over medium heat, combine 1 cup of water and 1/2 cup of butter, bringing the mixture to a boil. Once it bubbles, remove it from the heat, and quickly stir in 1 cup of flour until a smooth dough forms. Let this mixture cool for about 5 minutes, then beat in 4 eggs one at a time, until fully incorporated. Spread the dough evenly into your greased baking dish, then bake for 20 minutes, or until it’s puffed and golden brown. Allow it to cool for 30 minutes on a wire rack.
Step 3: Prepare the Vanilla Pudding Filling
While your cream puff layer is cooling, make the filling. In a medium saucepan, whisk together 3/4 cup of sugar, 1/3 cup of cornstarch, and 1/4 teaspoon of salt. Gradually add 4 cups of milk, then place the saucepan over medium heat. Stir continuously until the mixture begins to bubble and thicken, about 10-15 minutes.
Step 4: Temper the Egg Yolks
In a small bowl, whisk together 4 egg yolks. Once your pudding mixture is thick, slowly temper the egg yolks by adding a small amount of the hot pudding to the yolks, whisking constantly. This will prevent the eggs from cooking too quickly. Combine the tempered egg yolks back into the pudding mixture and cook for an additional 1-2 minutes.
Step 5: Finish the Pudding Filling
Remove the pudding from heat and stir in 4 ounces of cream cheese, 2 tablespoons of butter, and 1 tablespoon of vanilla extract until everything is melted and smoothly combined. Let the pudding cool to room temperature, then refrigerate it for at least 1 hour to thicken further.
Step 6: Assemble the Mother’s Day Cream Puff Dessert
Once the cream puff layer has cooled and the pudding mixture has thickened, pour the pudding filling over the cream puff base, spreading it evenly to cover. Gently cover the dessert with plastic wrap and refrigerate it for 4-6 hours, or until fully set and chilled.
Step 7: Serve and Garnish
When you’re ready to serve your Mother’s Day Cream Puff Dessert, top it with a generous layer of whipped topping. For an added touch, drizzle with chocolate sauce and sprinkle fresh berries on top for color and freshness. Slice and enjoy the delightful combination of textures and flavors!

Expert Tips for Mother’s Day Cream Puff Dessert
-
Smooth Dough: Ensure the cream puff dough is smooth and sticky before spreading in the pan; this helps with even puffing for perfect texture.
-
Egg Tempering: When tempering egg yolks, add hot pudding slowly to prevent curdling; whisk constantly to ensure a creamy filling.
-
Prevent Pudding Skin: Cover the pudding with plastic wrap directly on the surface while it cools to prevent a skin from forming; this keeps your filling silky smooth.
-
Chill Time Matters: Allow the assembled Mother’s Day Cream Puff Dessert to chill adequately; it enhances the flavors and improves texture for a delightful experience.
-
Adaptable Variations: Don’t hesitate to experiment with flavored extracts or alternate fillings; creativity makes each batch delightfully unique!
What to Serve with Mother’s Day Cream Puff Dessert
Elevate your gathering with delightful pairings that enhance the creamy elegance of this dessert.
-
Fresh Berries: The burst of sweetness from strawberries or raspberries adds a lovely contrast to the creamy layers, making each bite refreshing.
-
Whipped Cream: A dollop of freshly whipped cream on the side complements the dessert’s richness and adds a touch of lightness.
-
Chocolate Sauce: A drizzle of rich chocolate sauce provides a decadent finish, marrying beautifully with the vanilla pudding and puff pastry.
-
Mint Leaves: Fresh mint leaves serve as a bright garnish, adding a hint of freshness that cuts through the creaminess, perfect for those warm spring days.
-
Sparkling Wine: A glass of bubbly pairs wonderfully, balancing the sweet flavors and adding a festive touch to your celebration.
-
Coffee: A cup of rich coffee rounds out the meal perfectly, enhancing the dessert’s flavors and providing a satisfying finish. The bitterness of coffee complements the sweetness beautifully.
-
Lemon Sorbet: Serve lemon sorbet alongside for a zesty palate cleanser that contrasts the sweetness, making each bite of the cream puff feel light and invigorating.
-
Chocolate-Covered Strawberries: For an extra luxurious twist, serve chocolate-covered strawberries to heighten the dessert experience with indulgent flavors.
Mother’s Day Cream Puff Dessert Variations
Feel free to express your creativity and personalize this delightful dessert to fit your taste!
-
Chocolate Twist: Add cocoa powder to the pudding mix for a rich chocolate experience. This indulgent variation is perfect for chocoholics looking to satisfy their cravings!
-
Almond Flavor: Substitute vanilla extract with almond extract in the pudding for a beautiful nutty finish. Almond flavor pairs exceptionally well with the creaminess, adding an unexpected layer of delight.
-
Fruit Delight: Top with seasonal fruits like strawberries, raspberries, or peaches for a fresh and fruity take. The natural sweetness from the fruits will enhance the dessert and add a burst of color!
-
Instant Pudding Shortcut: For a quicker option, use instant pudding instead of homemade. Just mix it according to package instructions and pour it over the cooled cream puff layer for a faster treat.
-
Coconut Cream Swap: Replace whole milk with coconut milk for a tropical twist. This creamy alternative will give a hint of coconut flavor and pair beautifully with fresh berries.
-
Nutty Crust: Incorporate finely chopped nuts like pecans or almonds into the cream puff dough for added texture. This little twist will elevate your dessert and offer a satisfying crunch!
-
Spiced Sensation: Add a pinch of cinnamon or nutmeg to the pudding for a cozy, spiced flavor. It’s a wonderful way to bring warmth to your dessert and make it perfect for any occasion.
Exploring these variations will not only enhance your Mother’s Day Cream Puff Dessert but will also create lovely traditions for future celebrations. For more ideas, consider trying my Light Choux Cream or the luscious Purple Potato Mushrooms. Enjoy your cooking!
Make Ahead Options
These Mother’s Day Cream Puff Dessert components are perfect for meal prep, saving you precious time on the big day! You can prepare the cream puff layer up to 24 hours in advance; just cool it completely, then store it covered at room temperature. The vanilla pudding filling can also be made ahead and refrigerated for up to 3 days; just ensure it’s placed in an airtight container to prevent a skin from forming. When you’re ready to assemble, simply pour the chilled pudding over the cream puff layer, cover, and let it set in the refrigerator for 4-6 hours. With these make-ahead tips, you’ll enjoy a stunning and delicious dessert with minimal stress!
How to Store and Freeze Mother’s Day Cream Puff Dessert
Fridge: Store the dessert in an airtight container in the refrigerator for up to 3-5 days. Best enjoyed fresh to maintain the cream puff’s texture.
Freezer: For longer storage, you can freeze the unfilled cream puff layer for up to 2 months. Just ensure it’s well-wrapped to prevent freezer burn.
Reheating: If the filled dessert has been frozen, thaw it in the fridge overnight. Serve chilled, as the creamy filling is best enjoyed straight from the fridge.
Assembly Tip: Avoid freezing the entire assembled Mother’s Day Cream Puff Dessert, as this may affect the texture of the cream puff and pudding filling.
Mother’s Day Cream Puff Dessert Recipe FAQs
How do I know if my cream puff dough is ready?
Your cream puff dough should be smooth and sticky before spreading it in the baking dish. If it holds its shape when scooped but can seamlessly be spread, you’re good to go! This texture ensures even puffing during baking.
What’s the best way to store leftovers of the Mother’s Day Cream Puff Dessert?
Store the dessert in an airtight container in the refrigerator for up to 3-5 days. To maintain the cream puff’s texture, it’s best enjoyed fresh. If it’s covered in whipped topping, consider adding that fresh before serving.
Can I freeze the cream puff layer?
Absolutely! To freeze the unfilled cream puff layer, allow it to cool completely, then wrap it tightly in plastic wrap and place it in a freezer-safe bag for up to 2 months. When you’re ready to use, thaw it in the refrigerator overnight before filling.
What should I do if my pudding isn’t thickening?
If your pudding doesn’t thicken, it might be due to insufficient cooking time. Keep it on medium heat and stir continuously for an additional 2-3 minutes until it bubbles and thickens, making sure the cornstarch has completely dissolved. Patience is key!
Can I make this dessert dairy-free?
Yes, you can! For a dairy-free version of this Mother’s Day Cream Puff Dessert, substitute the whole milk with almond milk or coconut milk. Use a dairy-free cream cheese alternative for the filling, and everything will blend beautifully without sacrificing flavor.
What toppings can I add to enhance the dessert?
You can get creative with toppings! Fresh berries add a refreshing twist, while a drizzle of chocolate sauce gives a decadent touch. Crushed nuts or a sprinkle of powdered sugar can also elevate the presentation and flavor profile.

Irresistible Mother's Day Cream Puff Dessert to Cherish Together
Ingredients
Equipment
Method
- Preheat your oven to 400°F (200°C) and grease a 9x13-inch baking dish.
- In a saucepan over medium heat, combine 1 cup of water and 1/2 cup of butter until boiling. Remove from heat, stir in 1 cup of flour until smooth, then cool for 5 minutes.
- Beat in 4 eggs one at a time until incorporated. Spread the dough in the baking dish and bake for 20 minutes until puffed and golden.
- Cool the cream puff layer on a wire rack for 30 minutes.
- In a saucepan, whisk together 3/4 cup of sugar, 1/3 cup of cornstarch, and 1/4 teaspoon of salt. Gradually add 4 cups of milk and heat over medium, stirring until thickened.
- Temper 4 egg yolks by adding hot pudding to them gradually, then combine back into the pudding mixture and cook for an additional 1-2 minutes.
- Stir in 4 ounces of cream cheese, 2 tablespoons of butter, and 1 tablespoon of vanilla extract until melted. Cool to room temperature, then refrigerate for at least 1 hour.
- Pour the chilled pudding over the cooled cream puff layer, cover, and refrigerate for 4-6 hours until set.
- Top with whipped topping, drizzle with chocolate sauce and add fresh berries before serving.
Leave a Reply