
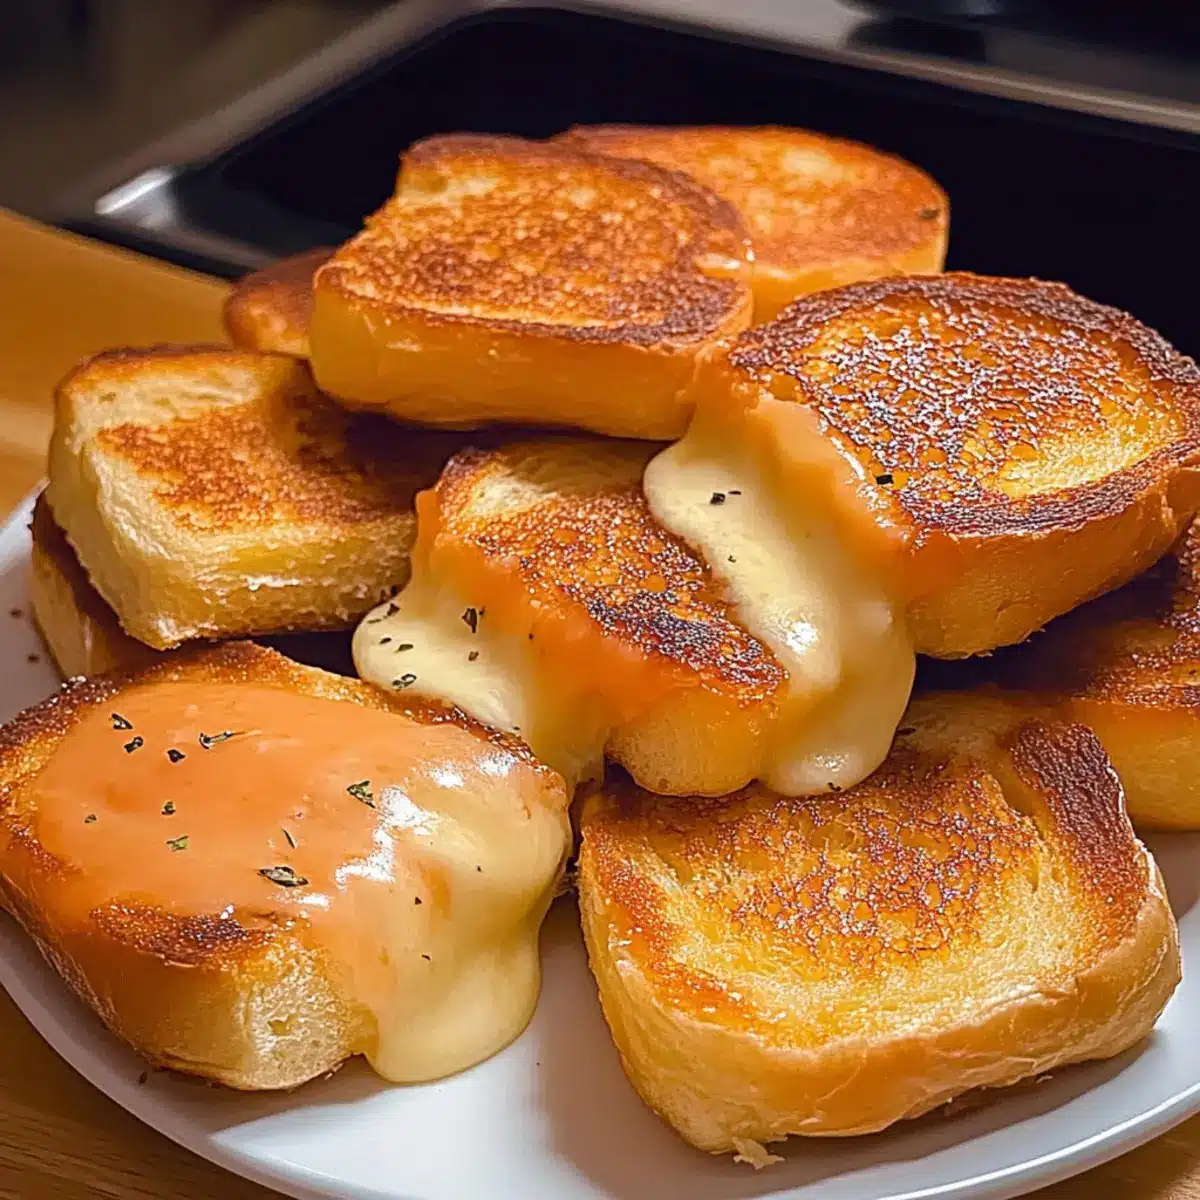
As I pulled a tray of Hawaiian Roll Mini Grilled Cheese from the oven, the warm aroma enveloped my kitchen, making it feel like a cozy embrace. This recipe is my go-to for unfussy gatherings or when I need a quick comfort food fix, capturing the magic of classic grilled cheese in perfectly bite-sized pieces. With buttery, slightly sweet Hawaiian rolls and gooey cheese, they’re not only kid-friendly but also an effortless party appetizer that you can whip up in under 30 minutes. Plus, they can easily be customized to cater to any palate—whether you prefer classic combinations or a twist with added veggies. Are you ready to dive into this cheesy bliss?
Why are these bites so irresistible?
Quick, Easy Prep: This recipe is designed for busy cooks with minimal prep time—just slice, layer, and bake!
Kid-Friendly Delight: Thanks to the sweet Hawaiian rolls and melty cheese, these mini sandwiches will be a hit with children and adults alike.
Perfect for Any Occasion: Whether it’s a family game night or a festive gathering, these mini grilled cheese bites make an ideal appetizer that everyone will love!
Versatile Flavor Options: Feel free to mix up the cheese or add veggies for a more nutritious twist—your creativity is the limit! Want to keep it simple yet delicious? Pair them with homemade dipping sauces, like ranch or marinara, just like with California Roll Cucumber for a complete snacking experience.
Effortless Storage: Assemble them ahead of time, refrigerate, and pop them in the oven when you’re ready. They freeze well too, making them a perfect quick snack option!
Hawaiian Roll Mini Grilled Cheese Ingredients
• Dive into the gooey goodness of these mini sandwiches!
For the Sandwiches
- Hawaiian Sweet Rolls – The soft and slightly sweet base that makes these bites irresistible; keep them attached for easy slicing.
- Shredded Mozzarella or Cheddar Cheese (1 ½ cups) – Key to the melty filling; mozzarella offers stretch while cheddar adds flavor, so mix or match to suit your taste.
- Unsalted Butter (3 tbsp, melted) – Gives a lovely golden, crispy topping; choose unsalted for better salt control.
Optional Add-Ons
- Garlic Powder (1 tsp) – Introducing a layer of flavor; omit if you prefer a simpler taste.
- Grated Parmesan Cheese (1 tbsp) – Enhances the cheesy flavor and serves as a savory finishing touch; swap for another hard cheese if desired.
Dipping Sauce Suggestions
- Marinara or Ranch Dressing – Perfect partners for these mini grilled cheese bites; they add a fun dipping experience that kids will love!
Step‑by‑Step Instructions for Hawaiian Roll Mini Grilled Cheese
Step 1: Preheat the Oven
Start by preheating your oven to 350°F (175°C). This will ensure that when you place your Hawaiian Roll Mini Grilled Cheese inside, they get an even bake. As the oven warms up, grab your parchment-lined baking sheet, making it ready for the mini sandwiches to come.
Step 2: Prepare the Rolls
Take the Hawaiian sweet rolls, keeping them attached, and slice them horizontally without separating each roll. Lay the bottom half on the parchment-lined sheet, ensuring they’re snugly together. This makes it easier to fill and will create a delightful mini sandwich experience after baking.
Step 3: Fill with Cheese
Sprinkle the shredded mozzarella or cheddar cheese evenly over the bottom half of the Hawaiian rolls. Be generous! The melty cheese is what makes these mini grilled cheese sandwiches a hit. Once the cheese is well distributed, carefully cap it with the top half of the rolls, sealing in that cheesy goodness.
Step 4: Butter and Flavor
In a small bowl, mix the melted unsalted butter with garlic powder and grated Parmesan cheese, if using. Using a pastry brush, generously coat the tops of the rolls with this flavorful butter mixture. This step will create a golden, crispy crust once baked, adding aromatic richness to your Hawaiian Roll Mini Grilled Cheese.
Step 5: Bake the Bites
Place the baking sheet in your preheated oven and bake for 10–12 minutes. Keep an eye on the sandwiches; they’re ready when the tops turn golden brown and the cheese is perfectly melted and bubbly. This step brings the ingredients together for a savory, warm delight.
Step 6: Slice and Serve
After baking, let your mini grilled cheese cool for 2 minutes. Carefully use a serrated knife to slice between the rolls. This will help maintain their structure and prevent any cheese from spilling out. Serve these warm Hawaiian Roll Mini Grilled Cheese bites immediately for the gooey perfection everyone will love!

Expert Tips for Hawaiian Roll Mini Grilled Cheese
Slicing Technique: Ensure to slice the rolls horizontally without fully separating them; this keeps your mini sandwiches intact and easier to handle.
Cheese Choice: Mix mozzarella with cheddar for that perfect blend of stretchiness and sharpness. Avoid using pre-shredded cheese, as it may not melt as well.
Watch the Bake: Keep an eye on the baking time; ovens vary, and you want that golden-brown top without burning the rolls.
Add Flavor: Consider sprinkling herbs like oregano or basil on the cheese for an extra flavor boost that complements the overall Hawaiian Roll Mini Grilled Cheese experience.
Dipping Sauces: Pair these bites with fun dipping sauces like marinara or garlic aioli to elevate your appetizer game; kids especially love dipping!
What to Serve with Hawaiian Roll Mini Grilled Cheese
Transform your mini grilled cheese into a delightful feast with these perfect pairings that balance flavors and textures!
-
Creamy Tomato Soup: The classic combination of grilled cheese and tomato soup never fails! The rich, tangy soup complements the cheesy bites beautifully.
-
Crispy Roasted Vegetables: A warm side of roasted veggies adds a touch of earthiness and crunch, making the meal wholesome and colorful. Think of vibrant bell peppers, zucchini, and carrots to contrast the soft bites.
-
Crunchy Salad: A fresh, crisp salad with a light vinaigrette brightens the palette and provides a refreshing balance to the cheesy richness. Consider including arugula, cherry tomatoes, and a sprinkle of feta for a delightful twist.
-
Pepperoni Pizza Dipping Sauce: For a fun, kid-friendly option, serve with a zesty pizza sauce! Its robust flavor adds a twist and makes for a messy, enjoyable dipping experience.
-
Sweet Potato Fries: Crispy, sweet potato fries offer a satisfying crunch and a hint of sweetness that pairs perfectly with the savory mini grilled cheese.
-
Garlic Breadsticks: Entrust your taste buds to the chewy goodness of homemade garlic breadsticks, great for dipping and enhancing the cheesy experience.
-
Fruit Skewers: Fresh fruit kebabs with strawberries, grapes, and melon add a healthy, fruity contrast. They bring a refreshing sweetness that brightens the overall meal.
-
Sparkling Lemonade: Cap off the feast with a cool glass of sparkling lemonade. The citrusy zing refreshes the palate and complements the savory bites splendidly.
-
Chocolate Fondue: For a sweet ending, serve mini grilled cheese with a decadent chocolate fondue as a dessert dipping option—an unexpected but delightful twist!
How to Store and Freeze Hawaiian Roll Mini Grilled Cheese
Fridge: Store any leftover Hawaiian Roll Mini Grilled Cheese in an airtight container for up to 3 days to maintain freshness. Reheat in the oven to regain their delightful crunch.
Freezer: For extended storage, wrap the assembled but unbaked sandwiches tightly in plastic wrap and foil, freezing for up to 1 month. Bake straight from frozen, adding a few extra minutes to the cooking time.
Reheating: To reheat, place baked sandwiches back in the oven at 350°F (175°C) for about 8-10 minutes until warmed through and crispy. Avoid microwaving to keep them from becoming soggy.
Make-Ahead Convenience: Assemble the sandwiches in advance and refrigerate until you’re ready to bake; this makes for a quick and easy appetizer at a moment’s notice!
Hawaiian Roll Mini Grilled Cheese Variations
Feel free to explore the delightful world of customization with these mini sandwiches that promise to elevate your taste experience!
-
Dairy-Free: Swap the cheese for your favorite dairy-free cheese alternatives. It’s a great way to enjoy the same meltiness without the dairy!
-
Spicy Kick: Add sliced jalapeños or a sprinkle of red pepper flakes before baking for a fiery twist. The heat complements the sweetness of the rolls beautifully.
-
Herb Infusion: Mix fresh herbs like basil, thyme, or chives into the melted butter for added aroma and flavor. It transforms these bites into a gourmet treat!
-
Savory Spin: Incorporate sautéed mushrooms or caramelized onions for a heartier sandwich. These additions create a rich umami flavor that balances wonderfully with the cheese.
-
Sweet Add-on: For a surprising contrast, add a thin layer of strawberry jam or jalapeño jelly on the bottom before topping with cheese. It’s sweet meets savory in each perfect bite!
-
Mixed Cheeses: Combine different types of cheeses like pepper jack and Monterey Jack for a melty, flavorful experience. This mix adds both creamy texture and tangy taste!
-
Veggie Power: Layer fresh spinach or arugula between the cheese and roll tops. This simple addition not only boosts nutrition but also adds a lovely crunch.
As you explore these variations, don’t forget to experiment with dipping sauces like homemade marinara or ranch for an extra boost of flavor, reminiscent of the satisfying pairings you’ll find in Berry Peach Cheesecake or Forest Blackberry Cheesecake. Enjoy crafting these delightful mini grilled cheese sandwiches!
Make Ahead Options
These Hawaiian Roll Mini Grilled Cheese are a fantastic choice for meal prep, saving you precious time on busy weeknights. You can assemble the sandwiches up to 24 hours in advance by layering the cheese inside the sliced rolls and brushing them with the butter mixture. Cover the assembled rolls tightly with plastic wrap or foil and refrigerate. When you’re ready to bake, simply preheat the oven and bake as directed. For even better flavor, let them sit at room temperature for about 15 minutes before baking to ensure that the cheese melts perfectly. With this make-ahead strategy, you’ll enjoy delicious, gooey mini grilled cheese sandwiches with minimal effort!

Hawaiian Roll Mini Grilled Cheese Recipe FAQs
What type of Hawaiian rolls should I use?
Absolutely, using original Hawaiian Sweet Rolls works best as they provide that signature sweetness and softness. If you can’t find them, any similar soft, slightly sweet roll would work, but be sure to keep them attached for easy slicing!
How should I store leftovers?
Store leftover Hawaiian Roll Mini Grilled Cheese in an airtight container in the fridge for up to 3 days. To reheat, pop them back in the oven at 350°F (175°C) for about 8-10 minutes to regain that crispy texture.
Can I freeze these mini sandwiches?
Yes, you can! Wrap the prepared but unbaked sandwiches tightly in plastic wrap and foil, then freeze them for up to 1 month. When you’re ready to enjoy, simply bake them straight from frozen, adding an extra 2-3 minutes to the cooking time.
What if my cheese isn’t melting properly?
If you find your cheese is not melting as well as you’d like, try using a mix of mozzarella and cheddar cheese. Also, avoid pre-shredded cheese, as it often contains anti-caking agents that can interfere with melting. For best results, shred the cheese yourself right before using it.
Is there a way to make these sandwiches healthier?
Definitely! To make Hawaiian Roll Mini Grilled Cheese healthier, consider adding sliced veggies like tomatoes, spinach, or bell peppers for added nutrition. You can use low-fat cheese options or whole wheat rolls as alternatives to reduce calories while maintaining flavor.

Hawaiian Roll Mini Grilled Cheese: Easy, Cheesy Kid-Friendly Bites
Ingredients
Equipment
Method
- Preheat your oven to 350°F (175°C). Prepare your parchment-lined baking sheet.
- Slice the Hawaiian rolls horizontally without separating. Lay the bottom on the baking sheet.
- Sprinkle the cheese evenly over the bottom roll half and cap it with the top half.
- Mix melted butter with garlic powder and Parmesan, then brush it on top of the rolls.
- Bake in the preheated oven for 10–12 minutes until golden and bubbly.
- Let cool for 2 minutes before slicing and serve warm.
Leave a Reply